
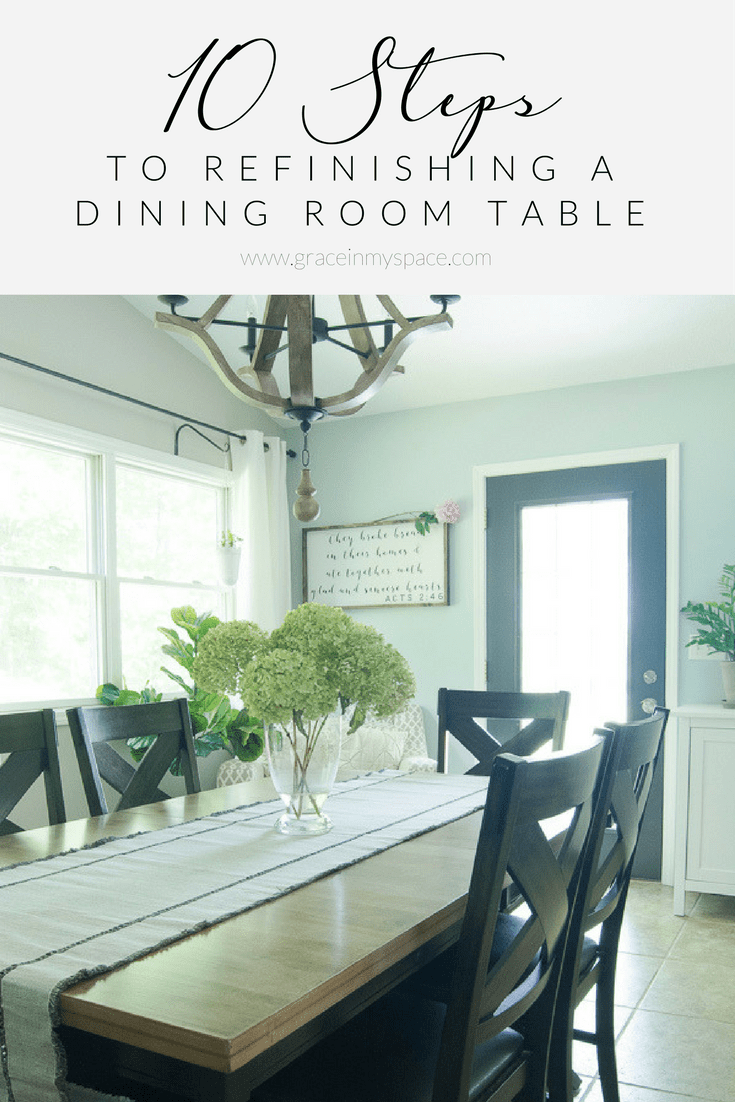
How to Update Your Wood Dining Table
Ya’ll know I love a good DIY project and today I’m sharing how I updated my wood dining table with this tutorial!
Learn how to affordably update a dark wood table with this DIY tutorial. You will learn how to strip and refinish a wood dining table for a modern farmhouse style makeover.
Wood Dining Table Update
If you follow me on Instagram (Which…you should be. Wink wink. 😉 ) then you may have seen my stories or post where I walked through this project. No worries if you missed those, I’ve got all the steps right here in my tutorial. Let’s get to the project, shall we?
Post may contain affiliate links where I earn a small commission at no extra cost to you on your purchases.
Refinishing My Dining Room Table
Table refinishing ideas are vast and bottomless, but many of them are about how to paint a dining table. However, I didn’t want to paint my wood dining table and lose all that beautiful wood grain.
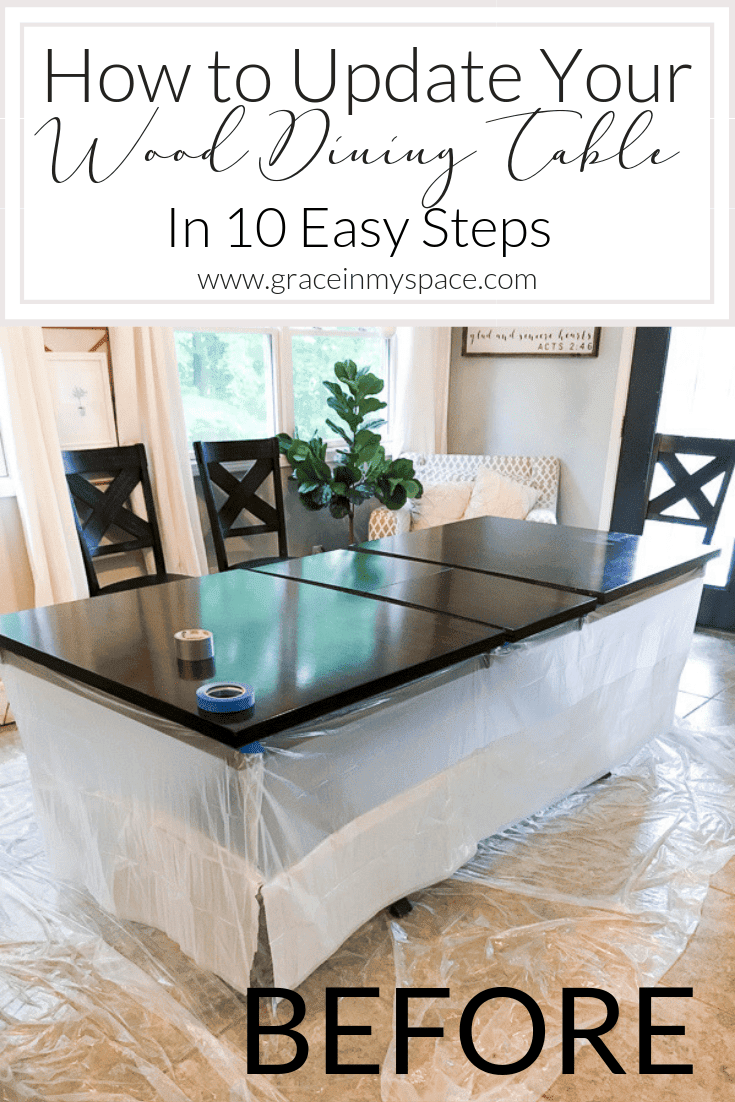
Let’s take a look at the before. My wood dining table was bought in 2012. It is very sturdy and serves my family well.
But after some years of my children abusing it with forks, toys and other such unforgiving objects, it needed some help. Plus, it just wasn’t really my style anymore.
At the time of purchase I loved moody dark woods. Now, not so much. I’m lightening up my home one step at a time for a more modern farmhouse style.
Wood Dining Room Table: Before

I thought about selling this set and purchasing new. But woah nelly! Do you know how much dining sets cost these days?
Plus, I really like the bones of my table.
The hidden leaf is just about the most awesome invention ever. Plus I love the trestle legs. A table’s gotta have good legs.
And the style fits well enough with my desire to lean towards modern farmhouse. It just needed to be lightened up.
DIY is a huge part of my blog and how we’ve been able to do so much to our home in such a small amount of time. If you can dream it, you can DIY it! Make sure to join my blogging community for members-only freebies like my must have DIY tool list download!
DIY Furniture Refinishing Materials
So let’s do this!
Here’s what you’ll need to refinish your dining table! Pay attention to the list because some items aren’t pictured. (Which is par for the course on my DIYs. Constantly running back to the store for more supplies.)
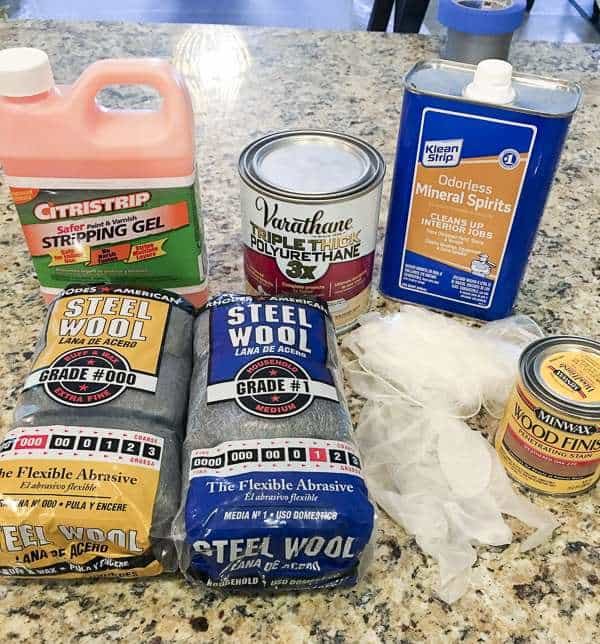
- Citri-Strip Stripping Gel (No Fumes!! Guys this was super easy to use.)
- Steel Wool
- Grade 0000 (not pictured)
- Grade 000
- Grade 1
- Mineral Spirits
- Thick Gloves (Don’t buy the flimsy medical gloves pictured…you’ll thank me later.)
- Polyurethane of choice. Personally I wouldn’t recommend the triple thick pictured. It was difficult to work with because it was TOO thick.
- Paint brush (I’ve linked my ALL TIME FAVORITE brush for you. The rubber short handle and angled edge bristles are perfection.)
- Putty knife
- Wood stain (if you want to change the color of your wood)
- Drop cloth and painters tape to protect your floors or other parts of the furniture
You can find my favorite DIY materials on my Amazon Storefront if you are an avid DIYer and like to stock up!
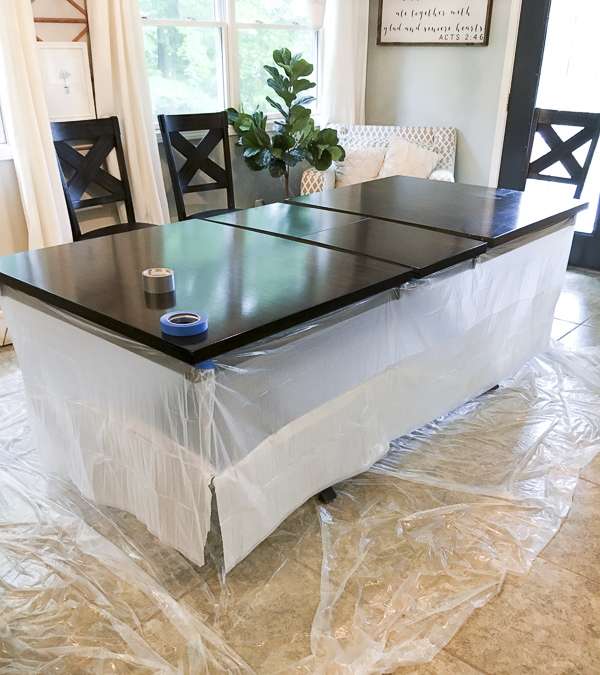
Table Makeover Step 1: Prep
Protect your work surface with drop cloths and tape any parts of the furniture you do NOT want to strip.
I wanted to maintain the dark wood on the bottom of my table so it matched my chairs, which I was not planning to strip.
Step 2: Do A Test
Put on those lovely rubber gloves. Next, dump your stripping gel into a bowl you do not mind tossing later. Then, try a test swatch on your furniture with a paint brush.
I tried to do this in as inconspicuous of a spot as possible by doing it on the leaf that is 99% of the time hidden and not in use.
If you don’t have that luxury, try the underside or a back edge.
I wanted to make sure that the stripper would actually take off the finish before spreading it on the entire surface and potentially destroying my table.

Once you give the test swatch a good forty minutes to work (per the Citri-Strip directions) take your putty knife and try scraping off the residue.
Hopefully, you will take off the stripper, and top coat of finish with one swipe! That is how it worked for me.
Test swatch complete without ruining anything= move on!
Step 3: Apply the Stripping Gel
Apply the stripper! Some strippers require you to work in small sections at a time to avoid it drying out before you can remove it.
What I loved about Citri-Strip was that it is able to be on your furniture from 30 minutes to many hours. So it was easy to apply to the entire surface and then take my time scraping as needed.
Step 4: Wait
Wait. Yep. The part I hate. We gave the stripping gel about 30-40 minutes to work its magic.
Some areas required a bit more time (like the edges of the table which seemed to have a different finish). If you start to scrape with the putty knife and it feels sticky then reapply a little more Citri-Strip and give it more time to “cook.”
You can also add plastic wrap to the surface of areas that seem to be resisting the stripping process. This seals in the stripper so it doesn’t dry out, which helps it eat away at the stain.
In really tough areas, leave the plastic covered Citri-Strip on for 3-4 hours. Then, do a test spot to see how it has progressed.
If your stain/paint isn’t budging after a few hours, you can leave it on up to 24 hours to give it more time to work.
Looking for other ways to refinish furniture? Check out this latest furniture flip!

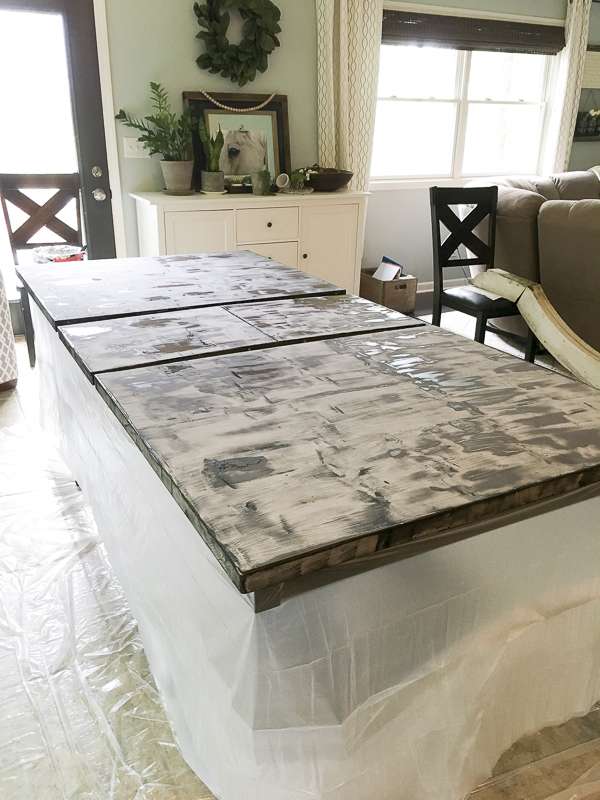
Step 5: Scrape
Next, start scraping your wood dining table!
Did I mention that this process isn’t only for updating old dining tables? This same process can be applied to a kitchen table makeover, coffee table makeover, or any piece of furniture that has a wood stain or varnish.
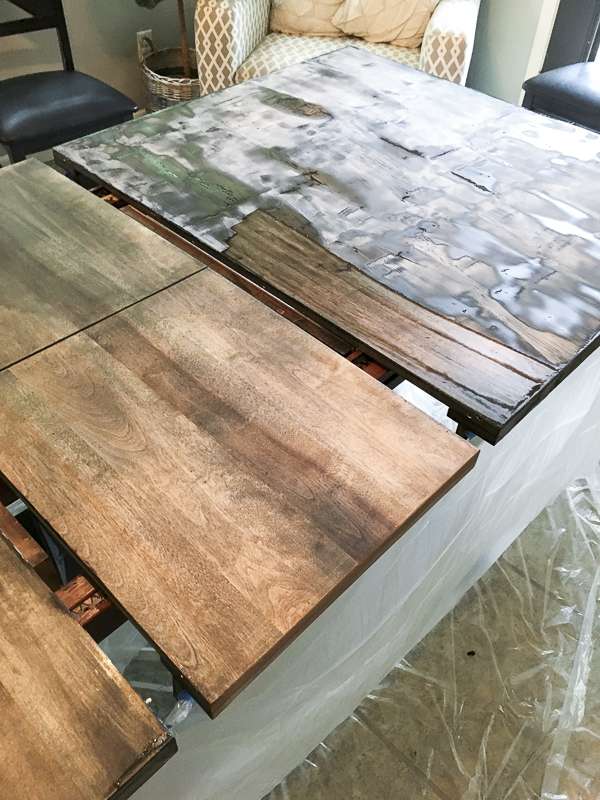
Now remember, I really wanted a modern farmhouse style dining table. So my goal was to lighten the top by removing this dark finish and staining it with a weathered oak stain before applying the poly.
But let the angel’s rejoice! Once we took off that finish it was the EXACT color I had in my head. Queue the happy dance. See all those beautiful wood grains!? They’ve been hiding for 5 years!
Step 6: Steel Wool
Once you’ve scraped the top layer of finish and stripper off it will be time to use a little elbow grease. So whip out the Grade 1 (Medium) steel wool and gently rub the surface.
What you’re doing in this step is removing any residue (finish and/or stripping gel) that your putty knife didn’t take off. You’ll start with a coarser steel wool at first and finish with the fine stuff.
TIPS:
Always go with the grain of the wood! Otherwise you will scratch it.
Once your steel wool starts to get gummed up with residue, turn it to a clean side of the pad. Otherwise you’ll just continue to rub the residue back onto the wood.
You DON’T need to use a lot of pressure. Doing so will scratch the finish of the wood.
We easily went through an entire bag of the medium steel wool, so if your project is much larger than my table top or has a lot of nooks and crannies to get into then you’ll want to purchase more.
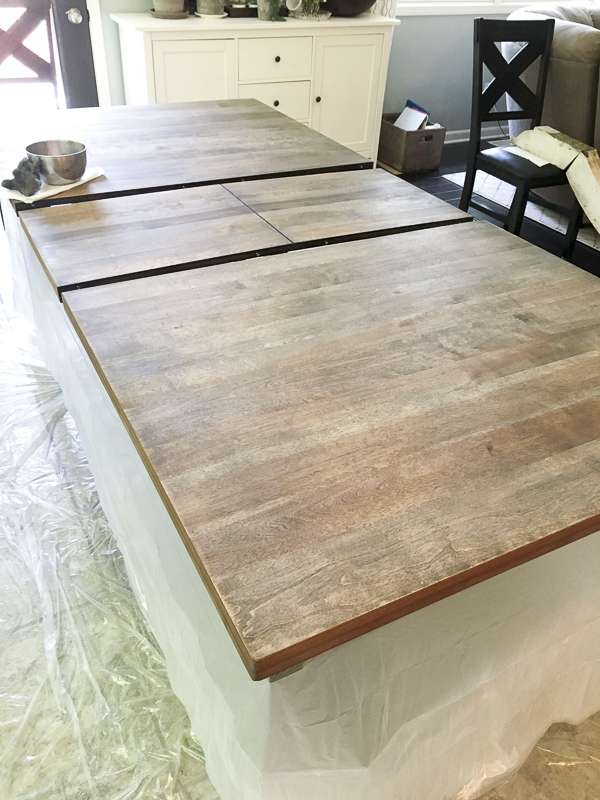
After you’ve cleaned your piece as well as possible with the Grade 1 steel wool, it’s time to do it all over again! So pull out your Grade 000 steel wool and repeat the process.
This time you are making sure to remove every last bit of residue with this fine steel wool.
After you’re finished with the fine steel wool make sure to wipe down your entire surface with a tack rag. This will collect all of the steel particles that you don’t want left in your poly. No one wants that.
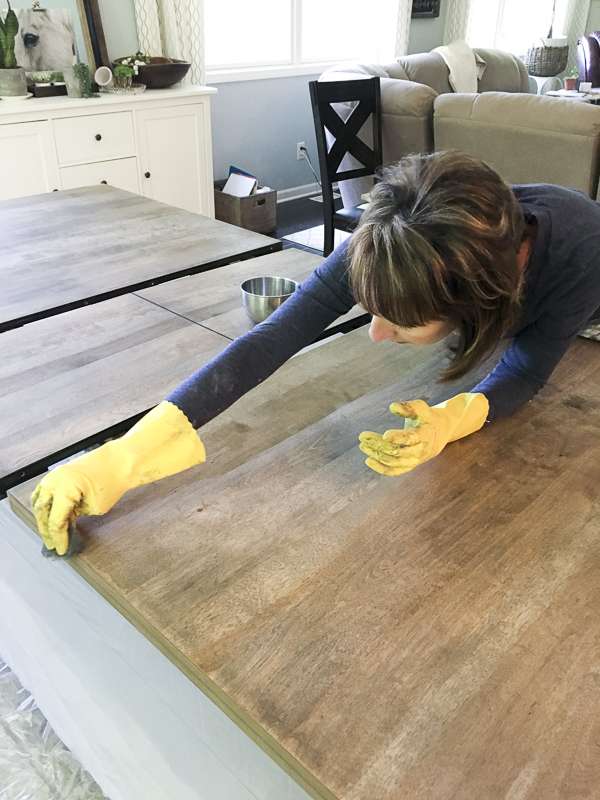
Step 7: Apply Mineral Spirits
This step is important! I took a look at the table and thought, “I don’t think we need to do that.”
The table looked perfectly fine. But I was wrong!
Once we applied the mineral spirits I could see such a difference in the condition of the wood. What was before a dull luster now shone beautifully. Plus, it conditions the wood and helps protect it.
Here’s Mom! Isn’t she cute? Also note that by now we learned our lesson and switched to thick rubber gloves. The thin ones I first purchased ripped during the steel wool step. Boooooo.
Step 8: Finish Coats
After your surface is COMPLETELY dry, it will be time to either stain it or apply your poly.
Remember, I chose not to stain it so I’ll be skipping that step. If you don’t like the color of your wood then make sure to follow the directions from the stain you choose. Drying time will be particularly important to pay attention to before you apply any poly.
I highly recommend testing stain samples on the same type of wood as your table top prior to adding stain to your newly stripped table. This way, you can see exactly how the finish will turn out.
Since I loved the color of my wood dining table, the next step is the polyurethane.
As I mentioned above, I was not a huge fan of the triple thick poly. They weren’t lying. It is THICK.
I suppose the purpose is to only have to apply one coat in our impatient day and age. But even with the triple poly I still applied two coats.
So my recommendation would be to go with a poly by Minwax that I’ve heard good reviews on (or your poly of choice!).
Apply the poly with a good brush (ahem…this brush by Wooster) in long even strokes.

Try not to start and stop in the middle of the piece to avoid any evident brush strokes once it’s dry. Instead, run the brush from one edge to the next without stopping.
Step 9: Steel Wool…Again
After your first coat of poly has completely dried you have a couple of options. 1. You can sand the table like most poly directions recommend. 2. You can use super fine Grade 0000 steel wool to “sand” any imperfections out.
Go over the area lightly (with the grain!) with super fine steel wool. If you aren’t seeing enough of an impact then you may want to consider sanding. Our imperfections were smoothed out well just using the steel wool.
Next, use that tack rag or microfiber cloth again to remove any steel wool particles.
Step 10: Apply Your Final Coat to your Wood Dining Table
Repeat step 8 with a second coat of poly. (Some brands recommend three coats.)
This will be important to DO YOUR BEST work to avoid brush strokes as you won’t be doing anymore sanding. The same tips I shared in this article on how to avoid brush strokes on painted trim apply to adding poly to furniture.
After you’ve completed your second coat you can choose to either be done or apply a third coat. If you do that, make sure you do step 9 before another coat. We were satisfied with the finish so stopped with two coats.
Now, all I had to do was wait for it to cure! Like that is an easy job with two small children who use the dining table for EVERYTHING.
I swear I watched that baby like a hawk for 7 full days before they were allowed near it again. I wasn’t about to let all that work go down the drain by one stray fork prong.
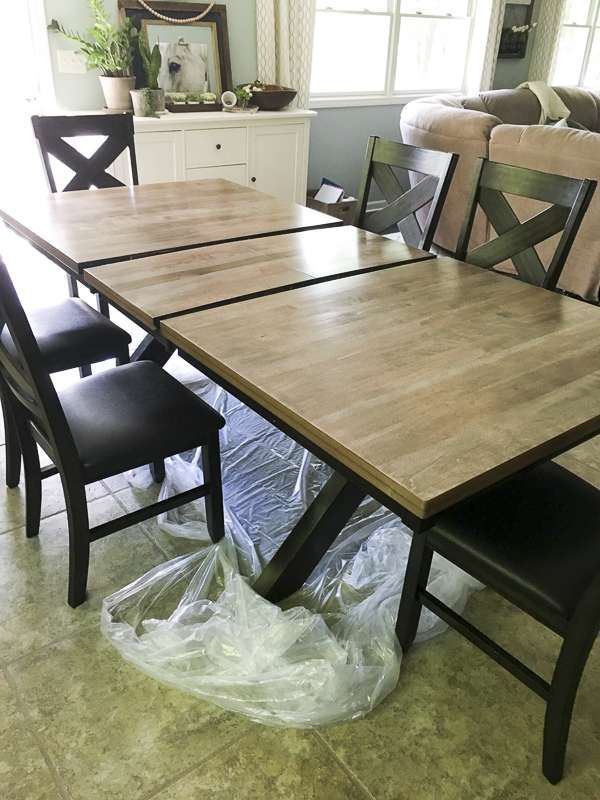
Wood Dining Table: AFTER Refinishing
So. What do ya think?


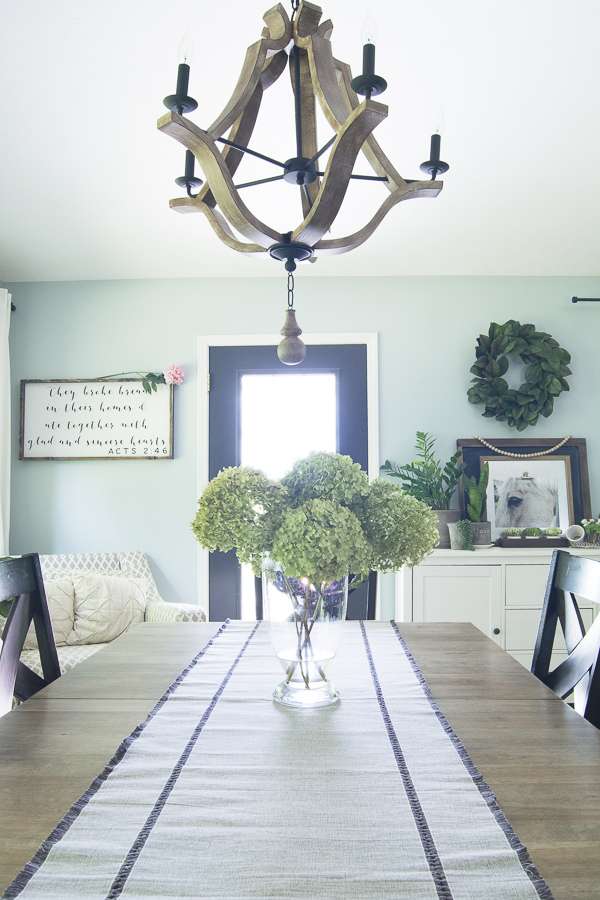
You may have noticed that chandelier. Isn’t she pretty? A little farmhouse chandelier to match my farmhouse table. Up next I’m planning to share some beautiful chandeliers I found while shopping for this beauty.
Let me know if you attempt your own DIY furniture refinishing project! And if you have any questions about this tutorial, leave them below my friends!
~Sarah
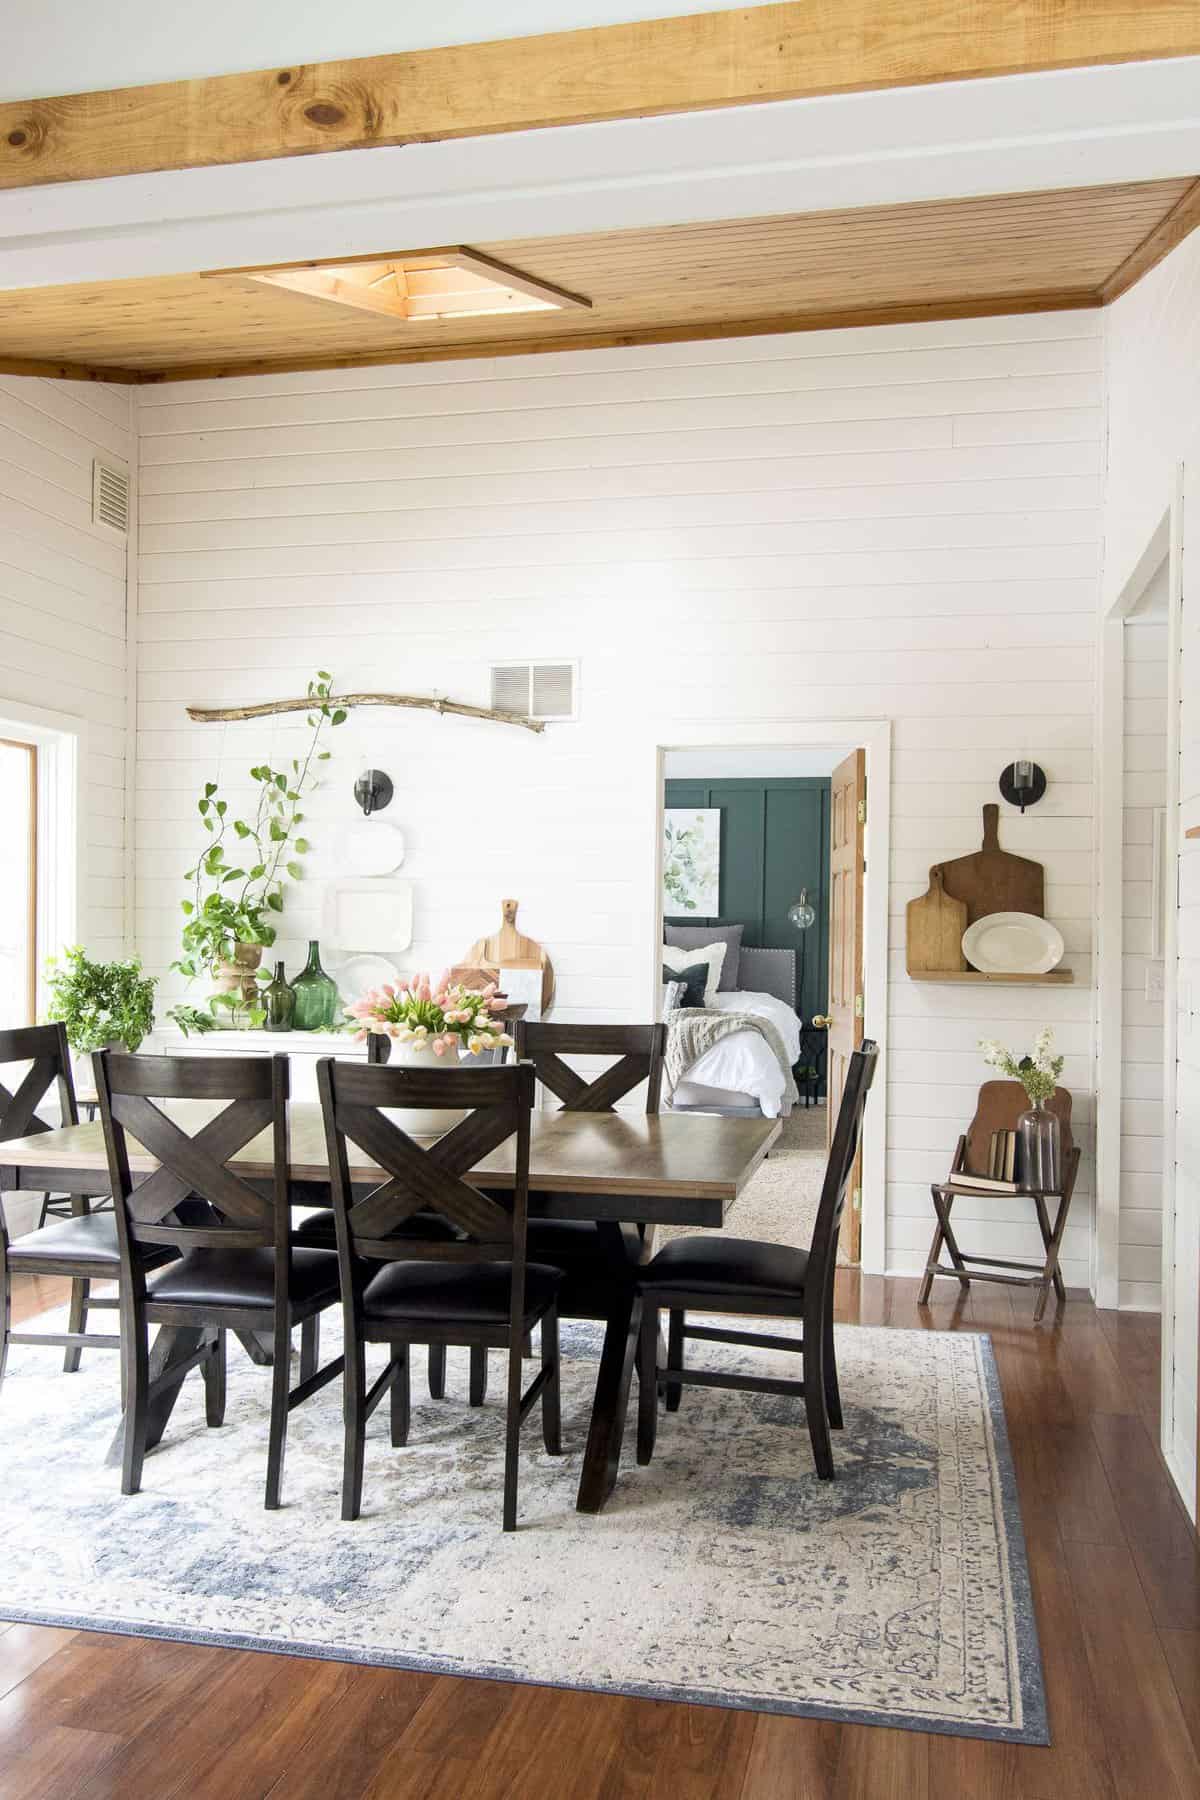
P.S. You can see my wood dining table in our new home here! I love how it brings that modern farmhouse vibe to our new space.
Shop The Post


Wow, what a stunning dining room transformation! The choice of that elegant table perfectly complements the overall aesthetic. The attention to detail in your decor is truly inspiring. This space radiates warmth and sophistication, making every meal feel like a special occasion. Amazing job! 👏🍽️
omg we have that same dinning room table and chairs we got them years ago but i was thinking wait how did you get a different table top lol then found this blog post i love how the table extends with the enclosed leaf it is truly an ingenious design
That’s what I love about it most too!
Hello,
This is a wonderful article! You have given a very unique idea for decoration and a very beautiful picture.. Thanks for sharing with us.
I’m glad you enjoyed it!
Where did you purchase your dining room chairs?
They are 15 years old! Unfortunately no longer available. 🙂
Hi Sarah, I have been staring at this project for a couple of months now, so glad I found it. I have almost the same dining set with the same goal in mind. I purchased all of the items needed and will get started with this project this week. Just had one question about the application of the mineral spirits, did you just soak a rag and wipe it over the table? I’ve never used this before. Thank you again, for this wonderful tutorial!
Good luck on your project Jessica! Yes, I just wiped it down with steel wool and mineral spirits and then dried it with a clean rag.
Love the table runner! And the table looks great!
Thank you so much!
I’m in love with this project, but scared the wood is not the good kind under the original top. How do I know if the wood under the toping is good? I was gonna purchase a new table as well, I still want the same color, just want a new coating becausenof the stains and knicks. I even thought about putting backsplash on the top of the table for a different look. What do u think?
If there is an inconspicuous spot to try stripping it, I would go that route first! Perhaps an underside or leaf that doesn’t get used? I had the same fears and that’s just about the only way to know for sure!
Sarah the table turned out beautiful! I have been contemplating redoing our kitchen table. It’s a very large drop leaf table in a medium maple. I have off white press back chairs. I’d like to paint the bottom to match the chairs. I think I’ll try to refinish the top as you did. Love a project. Thanks Sarah ???
Thank you Becky! Good luck with your project!
Gorgeous! Love how the rest of the table was left untouched.
Thank you Diane! I’m a fan of the two tone effect too. 🙂
Wow! All that hard work sure paid off! Remarkable…the final reveal is stunning. It looks like a brand new table. Thanks for sharing 🙂 With gratitude, Julie & Jodie
Thank you lovely ladies! It was definitely a project but I’m so happy I took the time to do it!
Omg I love this! I borrowed a sander and I got a quarter of the table done and dust was everywhere…what a mess and very time consuming. This is literally all o need to do. My finish on my table is the same as yours was and my vision is exactly as your ha turned out. I’m so excited to try this!! Thanks for sharing!!!
Oh I hope this works for you!! I can’t imagine sanding it down. I hope the stripping gel is so much easier. Let me know how it goes!
Wow, the table turned out beautiful. I love the fact of keeping and updating furniture instead of throwing it out to get new.
Thank you so much! Yes, I would much rather update than buy new whenever possible!
Love the detail in this diy!! The finished product is gorgeous!!
Thank you so much! I’m so glad you enjoyed it.
This came at the perfect time! I have had my coffee table from Ethan Allen taped for at least 2 months now. Like you buying a new one isn’t an option, but I can put some diy into it!!After reading your finishing adventure with your mama I’m wanting to do this! Your table turned out beautifully!
Congrats on your new blog! That’s another one of my short-term goals ?
Blessings,
Jodi Carless
Thank you so much Jodi! I hope that the process goes smoothly for you! Good luck on your DIY!
It looks amazing, Sarah! Great job!
Thank you so much Julie! I appreciate the love my friend. 🙂
??
It’s all thanks to you!