
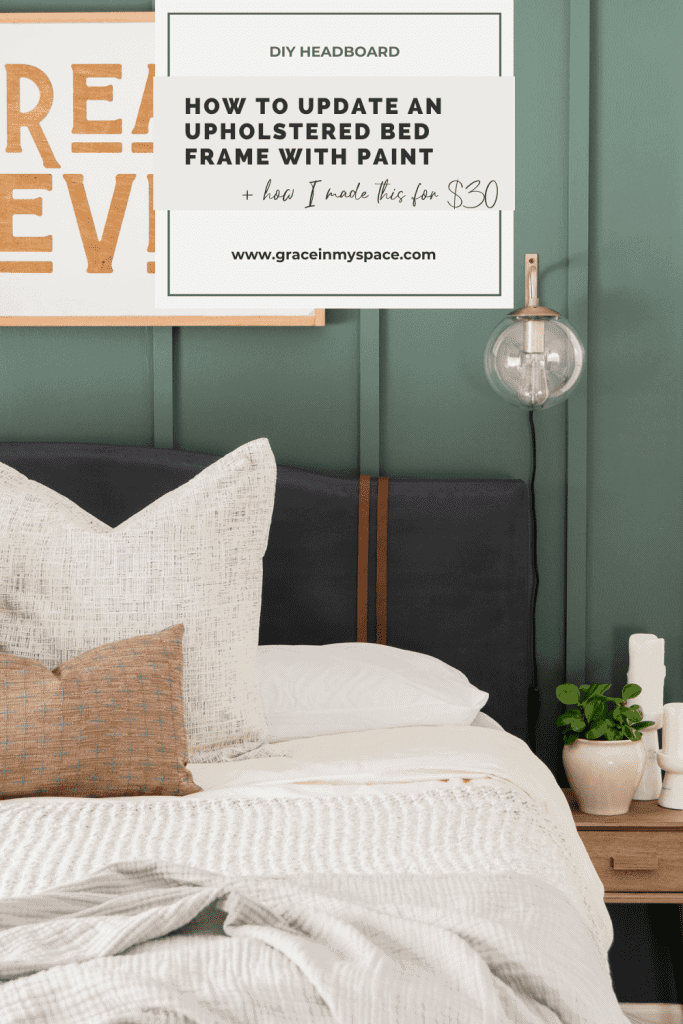
Painted DIY Upholstered Bed Frame Makeover
Do you have an upholstered bed you don’t love? Paint it! I wanted a different look in our bedroom, however there was nothing wrong with our fabric headboard. So rather than buying new, I decided to do what I do best and create a DIY upholstered headboard with paint. Here is a painted fabric headboard tutorial for a DIY upholstered bed frame makeover!

Post may contain affiliate links for your convenience.
How do you update an old headboard?
After deciding that I didn’t want to invest the money in buying a new headboard, I asked myself, “How do you update an old headboard for free?”
I figured, if I’m going to spend money on a DIY headboard, I may as well just buy new. So I was really trying to complete this project with a price tag of $0. I knew I could quickly update our existing upholstered headboard with any of these quick tricks:
- Remove the nailhead trim
- Paint the nailheads black or gold
- Completely reupholster the headboard
- Create a wood headboard by framing the existing bed frame with wood
- Add embellishments to existing upholstery

And while any of those options would recreate my headboard, what I was really craving was a color change. So, I decided to paint it!
Now, before we go any further, I want to clarify that there is nothing wrong with my grey headboard. It really isn’t even out of style! I simply wanted a change and wanted it for free. Free is my favorite number. So, I was willing to risk a DIY failure to see if I could make this look more modern on my own before buying new.
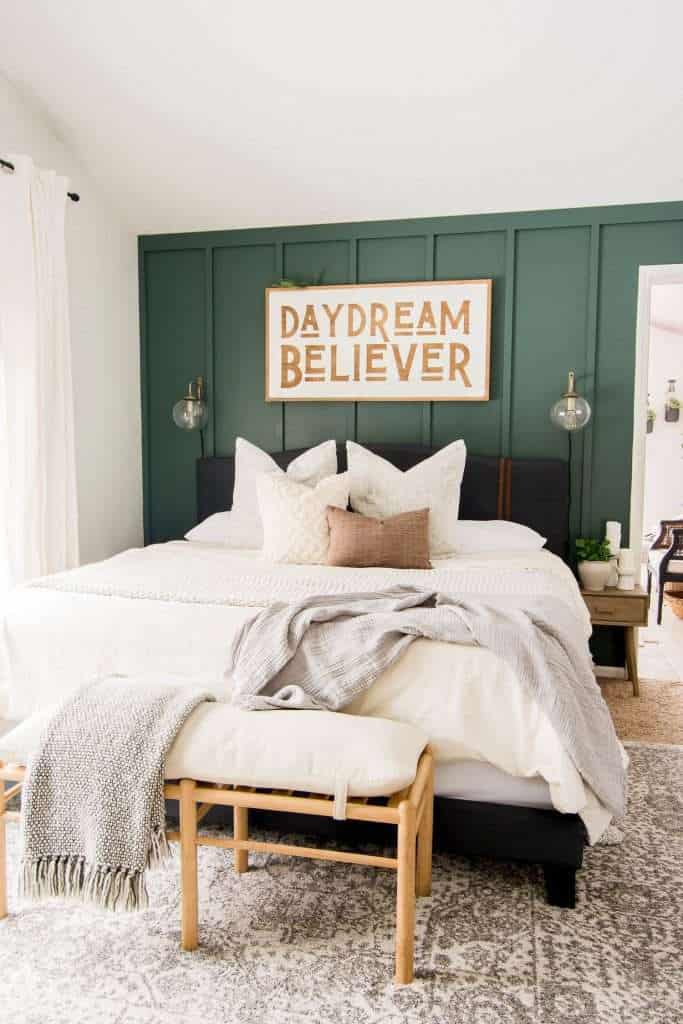
You can see how the bed frame looked styled out in my recent post on how to decorate with a dark green wall!
Can you paint a fabric headboard?
Now, the tried and true question is, “Can you paint a fabric headboard?” Yes! You definitely can. I’ve painted fabric a few times before when updating vintage chairs. It works fairly well, but there are a few tips that will help it turn out the best.
My goal in my DIYs is that someone says to me, “Oh, where did you buy that?” rather than, “Oh, did you make that yourself?” I don’t want people to think it’s a DIY! I want it to look professionally done, so let’s dive into some quick tips for how to paint fabric.
What kind of paint do you use on fabric furniture?
The first, and most important choice you have when painting a DIY upholstered bed frame or headboard is your paint choice. Painting on fabric can be done with various types of paint. I have tried several of them, with a few different techniques, and each time I’ve learned a trick or two to get a good finish.
Using Chalk Paint on Upholstery
Most people will recommend using chalk paint on upholstery or headboard fabric. Chalk paint really does work well, however you do need to mix it with water for the best coverage and finish. The key to using chalk paint for painting fabric furniture is to thin it with water and then apply several thin layers of paint.
You do not want to try to apply it in thick coats as it won’t soak in well and will look and feel stiff. So chalk paint is one option!
Using Latex Paint on Upholstery
Another option, and the one that I used for this DIY upholstered bed frame makeover, is using latex paint mixed with fabric medium.

Fabric or textile medium is intended for mixing with acrylic paints to be used on wearable fabrics. It stops the paint from becoming hard and retains the soft texture on textiles. When mixed with latex paint, it conditions the paint so it soaks into the upholstery better rather than sitting on top of the fabric.
I prefer this method because you can tint latex paint to any color you want. It creates lots of flexibility in color choices and helps you coordinate your painted fabric headboard to your room colors.
Since this is a headboard, and not a sofa or chair, I don’t mind that it isn’t the softest finish. I actually prefer a little more durability so the finish lasts!
Using Fabric Paint on Upholstery
Of course, they make paint for just about anything these days! So you can also use fabric paint on upholstery. This is applied like a spray paint but is intended to stay soft and pliable for the most comfortable finish. I have not personally tried this type of fabric paint, but it gets good reviews when doing a quick online search!

Why not just learn how to reupholster a headboard?
Quite a few people in my Instagram community asked, “Why didn’t you just reupholster it?” Because my friends, I wanted to do this for free! I had the paint and fabric medium on hand, but I didn’t have new upholstery on hand. Nor did I want to attempt to get a good fit on a DIY upholstery job. That sounded much harder than painting!

So, let’s get to the DIY upholstered bed frame makeover using paint!
DIY Upholstered Bed Frame Makeover
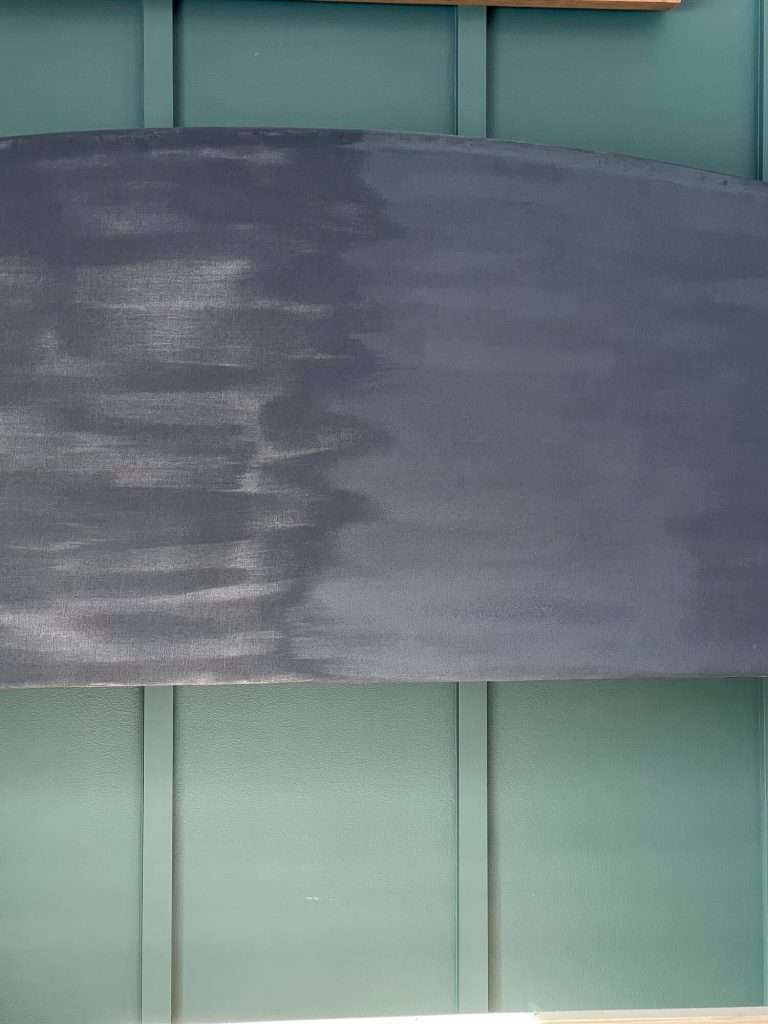
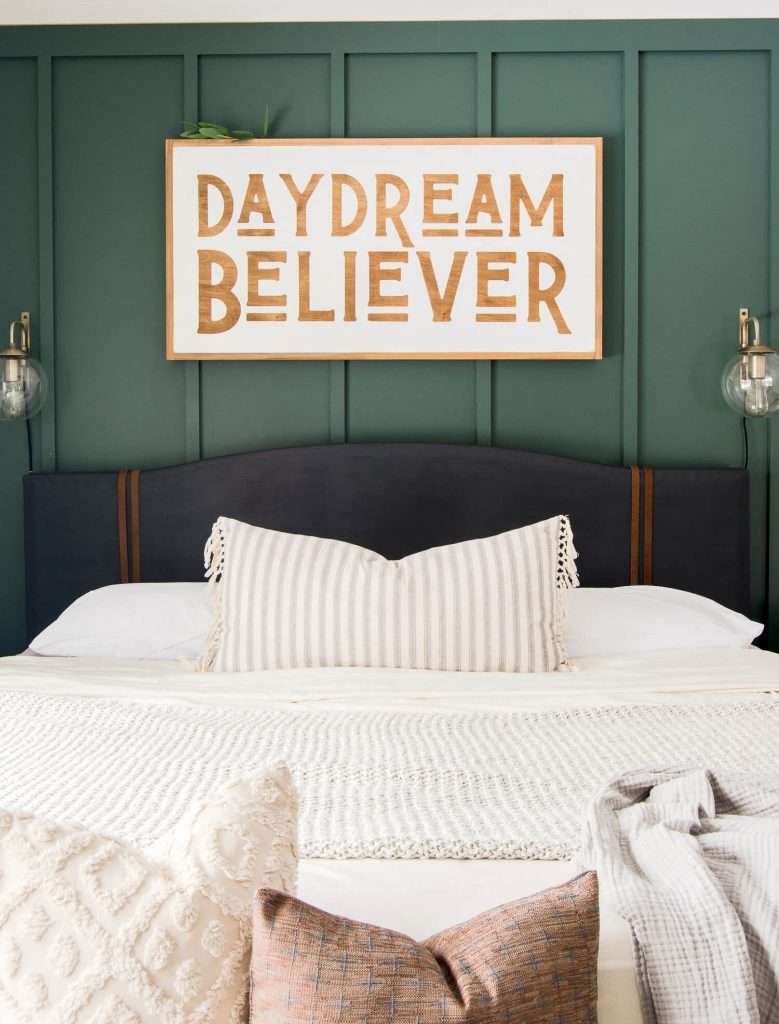
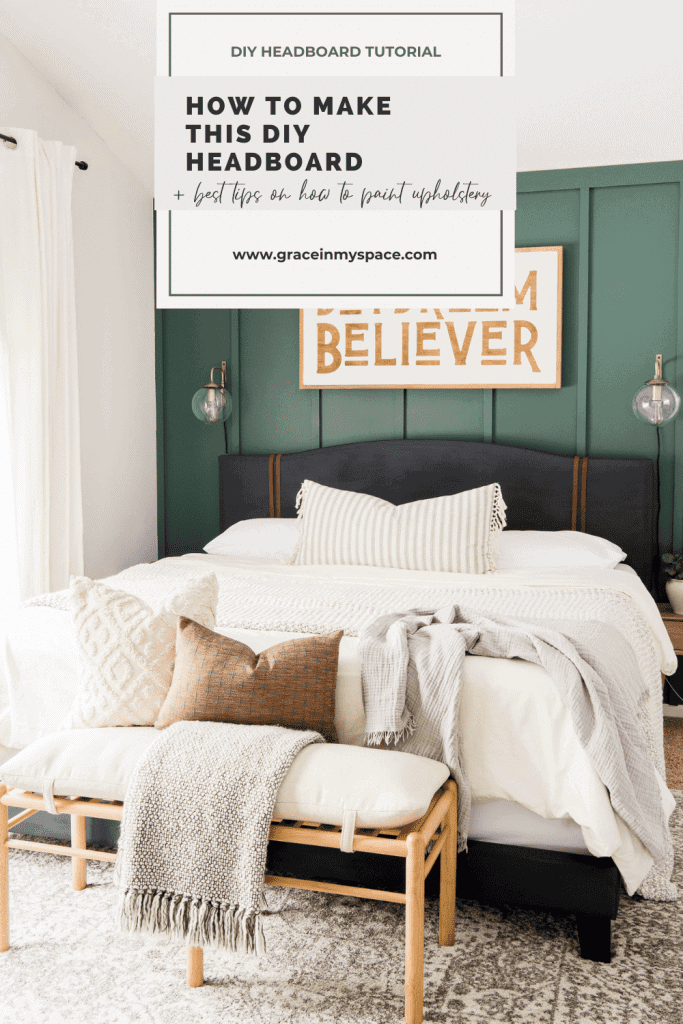
I had a few concerns about a painted upholstery headboard. First, I didn’t want it to have a shiny finish since fabrics usually aren’t shiny. So, I used an eggshell paint that I had left over from my son’s bunk room makeover. It is the color Black from Rust-oleum’s Studio Color line at Walmart.
Painting upholstered furniture feels like a risky DIY, so I highly recommend doing some testing on a part that isn’t visible if possible. I tested the way my paint adhered and the coloring on the back of my headboard first. This same painting method works for any upholstery, so if you are painting a sofa or chair, there is usually a small bit of fabric you could sample on the underside of the seating area.
Once you’re sure you want to move forward, the steps are very easy!
How to Create a DIY Upholstered Bed Frame Using Paint
1. Clean the upholstery with water and a lint free rag
First, wash down your fabric or upholstery. This will help remove the sizing so the paint can soak in. If you are painting on fabric that pills easily, make sure to shave off any worn fabric with a fabric shaver. If you skip this step, then you will have little lint balls of paint left on your furniture.
Washing the fabric also helps create a damp surface for the paint. This is important for it to be able to fully soak in.
At this time, you can tape any surfaces you want to avoid over paint on, like bed frame feet or brackets.
2. Remove any unwanted embellishments
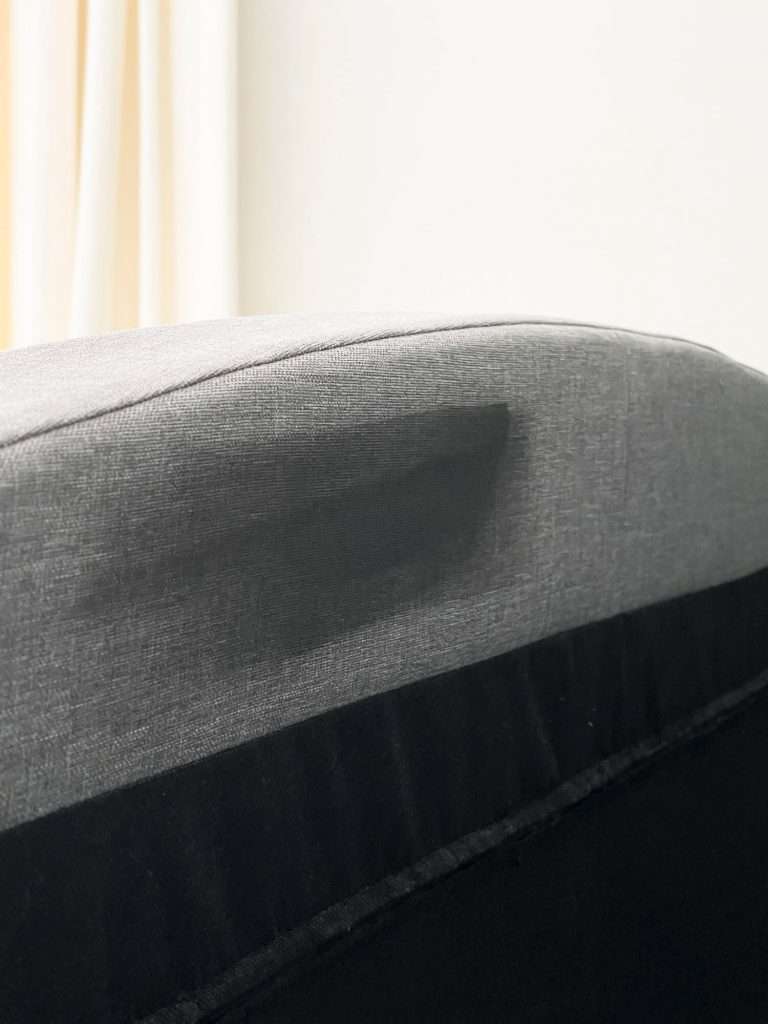
My headboard had nail heads along the outside edge that I didn’t want to show any longer. I was going for a more modern and clean look, so I removed them with a pair of pliers and flat head screw driver. If you have any embellishments you don’t want any longer, remove them prior to painting.
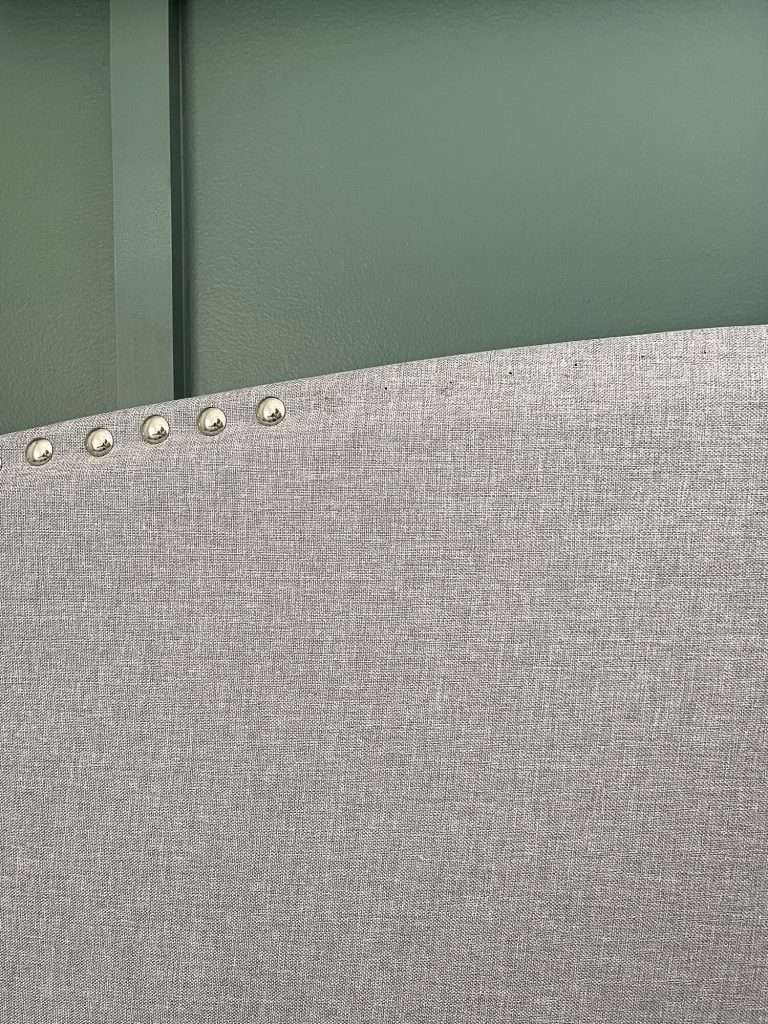
If you have things like nail heads that you want to remain, you will need to tape them off to avoid getting paint on them. You can remove them to paint, but I found that they did not come out clean (aka they were all bent up). So if you want to replace them after painting, you may need to buy new nail heads to reinstall.
Once you’ve removed nail heads or other embellishments, use an iron to iron out any indentations or holes in the fabric. This is a step that I didn’t consider doing before I painted and I wish I would have. My nail head indentations are visible since I didn’t iron them out or let the fabric relax before painting. It isn’t super noticeable, but this one little extra step would have gone a long way!
3. Spray your upholstered bed frame with water
Next, grab a spray bottle and spritz the surface you’re about to paint with water. Again, this helps the paint soak in to have a damp surface. I had a watering can on hand so that did the trick for me! Spray water on the entire headboard or bed frame first. Then, as you paint the surface, continue to spritz as you go.
This gives the fabric time to soak in the first spraying and then re-wets the surface as you paint.
4. Paint in the same direction for the entire surface
Now it’s time to paint! Depending on which type of paint you choose, mix your paint with water or fabric medium per the directions.
Brush on a thin coat of paint in the same direction for the entire surface. If you have a pattern with lines, run the brush in the same direction as the lines for best coverage.
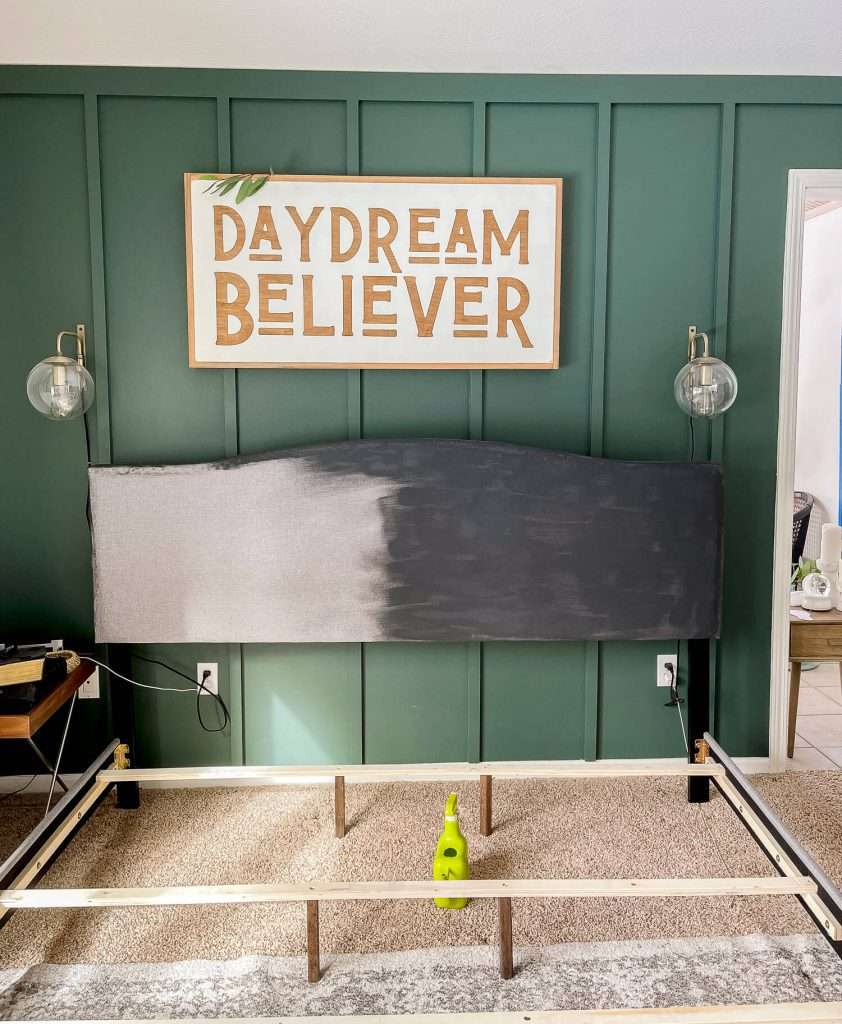
Use a short handled paint brush for best control. These angled brushes are my favorite for all projects, including trim and door painting!
If you are new to my blog, I have a lot of painting resources available for you. You can download my free guide to paint finishes below and make sure to check out my other painting projects on the blog!
Painting Tutorial Resources
- How to Paint Trim Without Brush Strokes
- Painting Interior Doors: Pros & Cons of Brushing vs. Spraying
- How to Paint Kitchen Cabinets for a Durable and Professional Finish
- How to Paint a Tile Backsplash for a Virtually Free Update
- How to Paint Window Trim Without Taping
5. Sand After the First Coat
Once your first coat is dry, lightly sand the fabric with 220 grit sandpaper. This will help loosen up the fabric so it doesn’t become stiff. And it will remove any pilling that was painted.
6. Apply 2-4 Coats Total
Once your first coat has dried you’re going to panic a little. Don’t worry, it gets better. You will need to apply 2-4 thin coats for good coverage on upholstery. Let each coat fully dry before adding another. You do not need to sand between each coat, however you may find that it helps keep the softness of the fabric to do so.
Remember to continue painting your DIY upholstered bed frame with the same direction brush strokes for every coat of paint.
7. You’re done! OR, add some detail.
Once you are satisfied with the finish, you can be done! Or, you can add some detail. Someone mentioned that they thought I’d be adding leather accents and I thought, “Why didn’t I think of that!?”
So I ordered some leather last minute and delayed the completion of my project by a couple of days waiting for it to arrive.
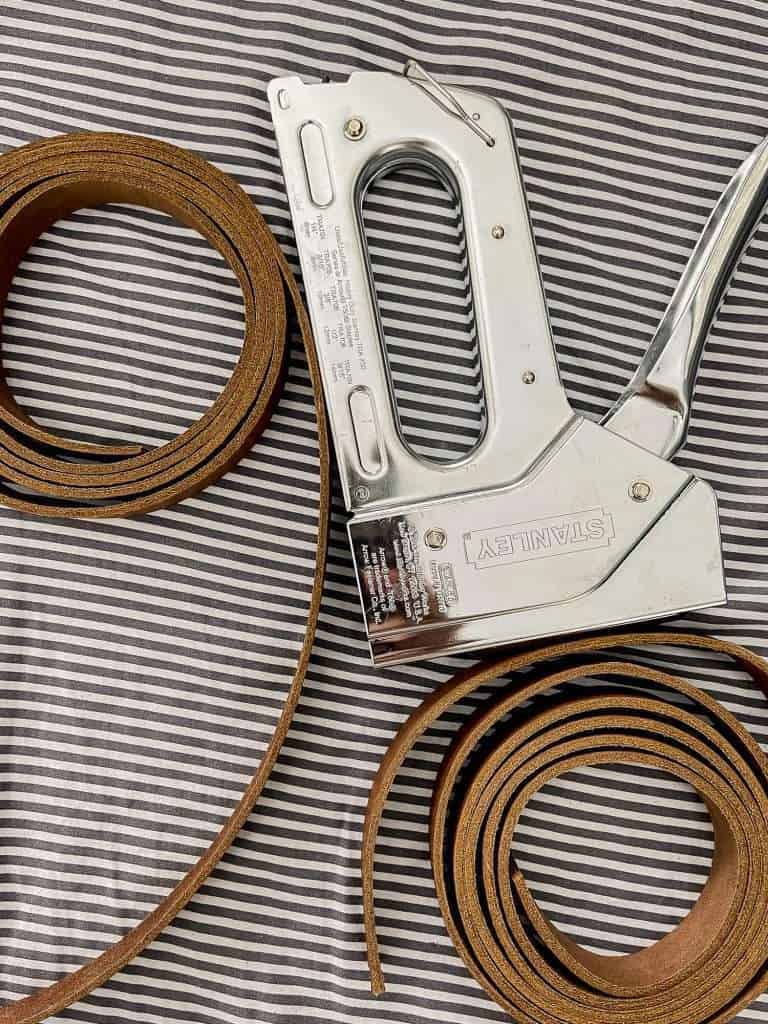
I used a heavy duty staple gun to attach the strips to the back of the painted headboard. So far it has held well, but if it loosens then I will try upholstery tacks instead.
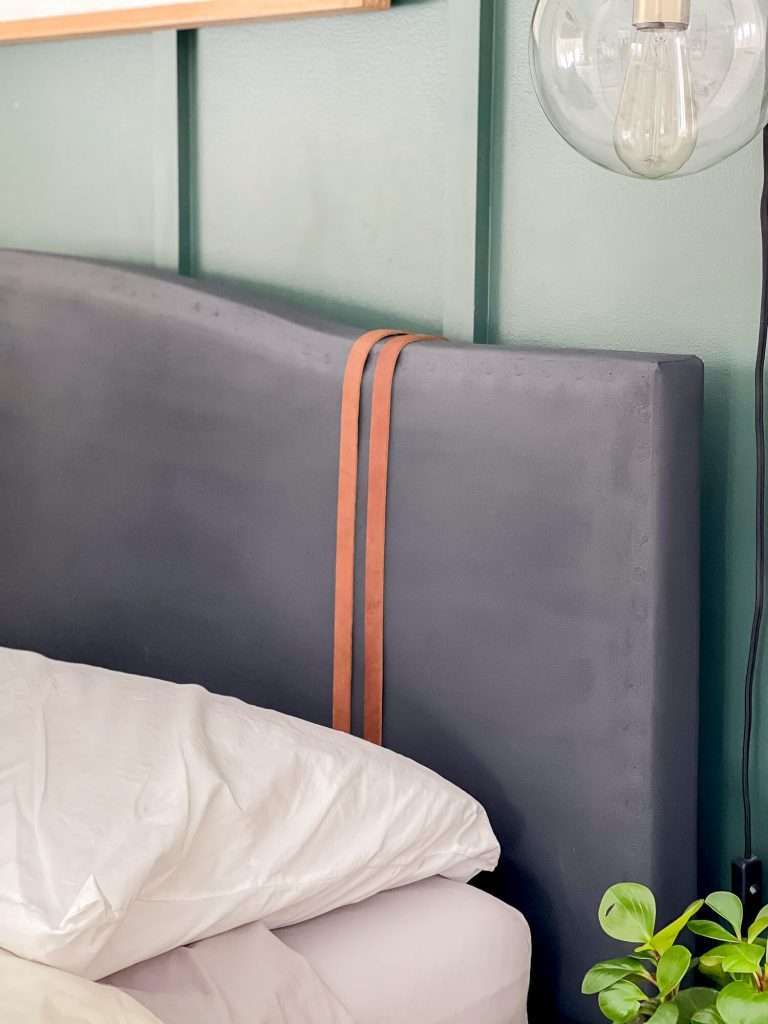
I simply cut two strips long enough to flank each side of the bed. My husband said our bed has suspenders now. I like the old man vibes. Ha!
Brand DIY New Upholstered Bed Frame for $30
And here she is, folks! This makeover would have been free if I hadn’t added the leather. But that $30 investment really sets it off and I think it would have felt very plain without it.
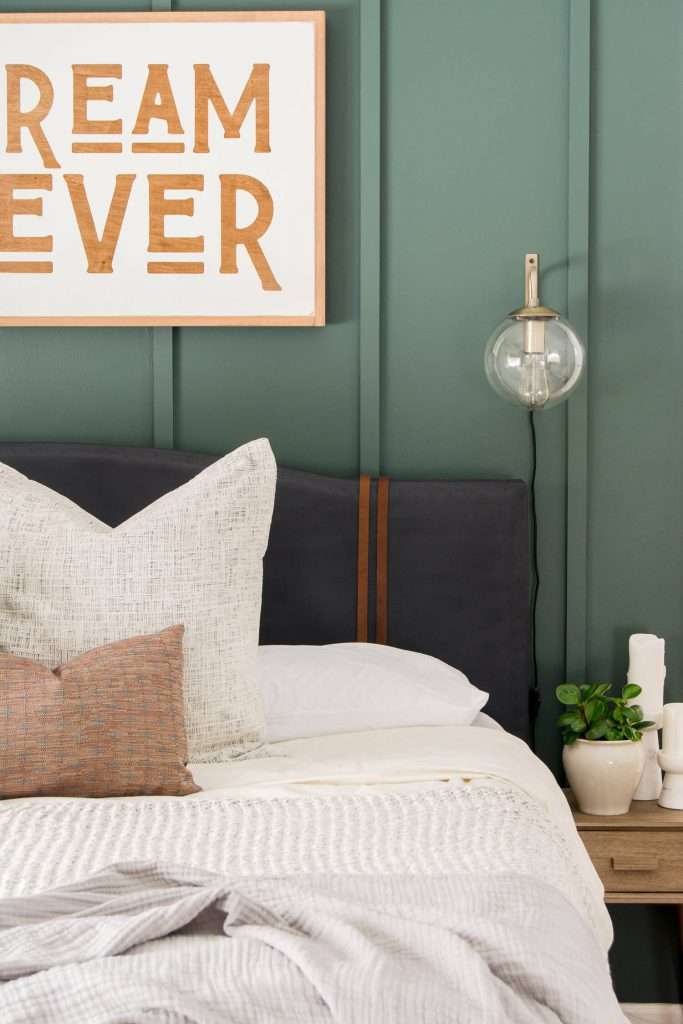
I love how much more sophisticated and moody the bed frame is now. And black matches with everything and is always a classic. So if I want to update bedding or wall colors in the future it will still coordinate well.
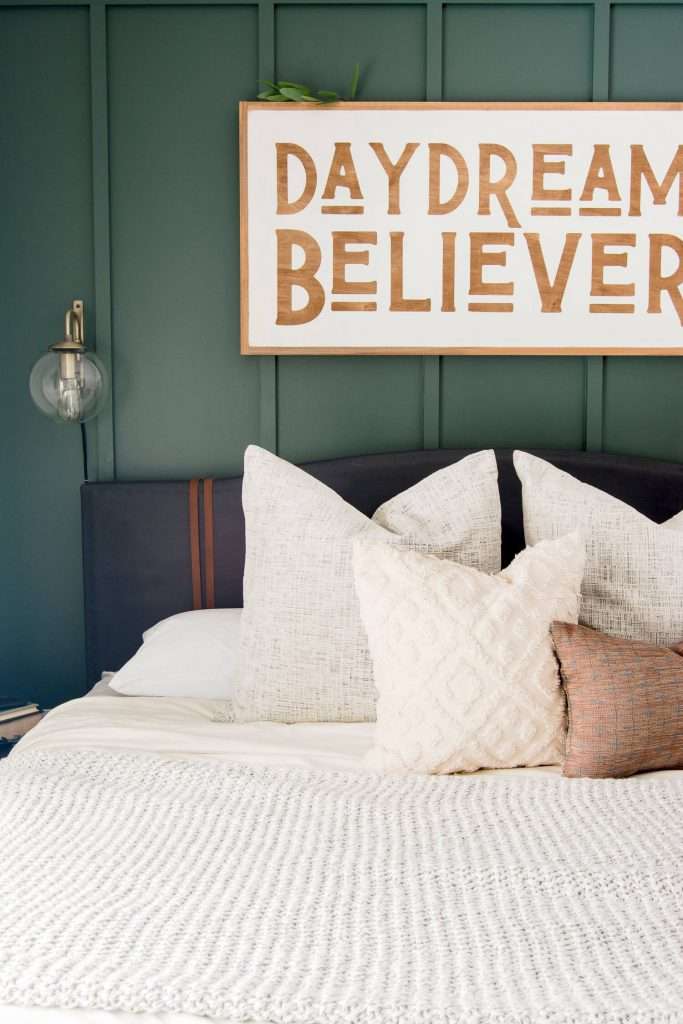
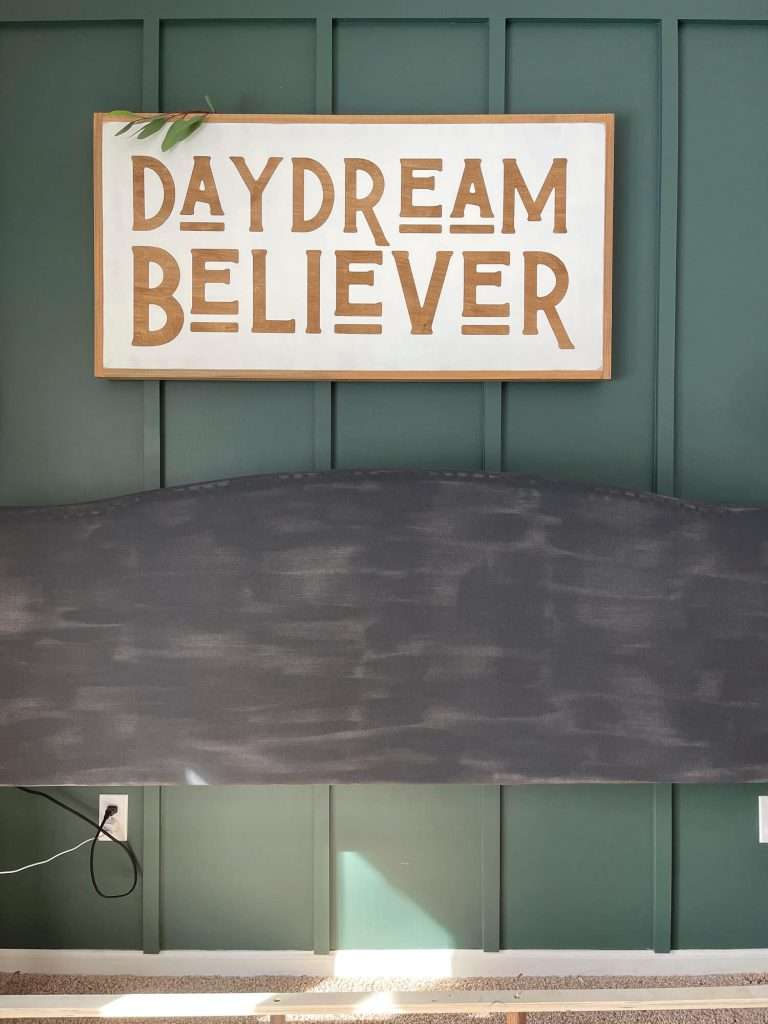
I’m not normally a daily bed maker but I LOVE the way the black headboard makes the fabrics pop on the bedding and pillows. And the leather color coordinates perfectly with my Daydream Believer sign. I always get questions about this sign so you can snag one of your own from Joyfully Said using my 15% off code GRACEINMYSPACE.
Bedding, Pillow & Decor Sources
And I’m always happy to share my decor sources. If it is still able to be purchased, you can find my bedding, pillow and decor sources linked in the lookbook below!

Stay Connected
Thanks so much for stopping by the blog today! I hope this simple DIY upholstered bed frame makeover inspires you to rethink your own headboard or bed frame before buying new! Make sure to subscribe to the blog for new tutorials and to get access to my free printable library!
You can find more details on my bedroom design, including the paint colors and seasonal styling in these articles!
And follow along with me daily on Instagram for behind the scenes looks at these projects in real time!


I’m currently doing this project following your instructions (thanks for making them so clear!) and i’m just wondering if you also added water with each new coat? Thanks!!
I loved this post. Thanks for all the great tips. Do you think this would work on a tufted headboard?
Yes, absolutely! Just be sure to get into all the grooves.
That’s a great thing, thank you
Great! It’s a great conditions
Hi. I love this bed! Can you tell me what the fabric medium is that you used for latex paint? I’m searching all over for something.
Thanks!!!!
Your tutorial was extremely helpful! I found an upholstered bed with 4-drawer storage underneath for a bargain, but wasn’t too stoked on the color. Like the other poster,I am trying to go lighter. You did a really beautiful job!! 😍
I’m so glad it helped!
You said you should mix laytex paint with the fabric medium to get a softer texture. What is the ratio you’d recommend?
You just have to follow the ratio instructions on the fabric medium that you buy. 🙂
Thank you so much for showing your amazing technique for changing out the fabric headboard and frame colors with paint!
I have the same bed frame you have so this has helped me a lot. I look forward in hearing from you on the painting charts too. That is going to be helpful for my other diy projects to come. Blessings to you and your family! Take care and stay safe as you continue your journey with all you do. 👩🎨
I’m so glad it was helpful! Good luck on your project.
This looks amazing!!! You did such a great job.
I am curious to know . . . my headboard is a darker gray and I want it lighter. Am I able to achieve this?
Any help of tips would be greatly appreciated
Thanks
You should be able to! Just use a lighter paint color and it may require a few additional coats.
OH my yes!!!! I’ve been shopping for a new bed and wondered if I could possibly change my current upholstered one. You have inspired me! So excited to do this and use the saved money on decor.
Yay! I’d love to hear how it turns out!
Did you experience any color transfer onto your pillows?
Nope! 🙂
Great job! I love the leather!
Thank you so much!
I think your headboard re-fresh completely transformed the look of your bedroom! I love how the leather straps compliment the letters of the sign above the bed.
And thanks for the tutorial:)
Thank you so much!
You have such a beautiful style!!! I am so inspired by you. Can you please share where you got the grey headboard? As you said, it’s still very in style and I’m looking for one just like it! Thank you so much in advance and thank you for all of the inspiration.
Thank you Jess! The original bed frame is linked in the post. You just have to scroll the source photos.