
Rustic Modern Guesthouse Remodel Reveal
I’m so excited to share our guesthouse remodel reveal! Today I’m sharing how we updated this knotty pine cabin to a rustic modern retreat in 8 weeks. Having a guest home is such a blessing and now we are ready to welcome house guests in style.

Post may contain affiliate links for your convenience.
One Room Challenge
If you’ve missed the 8 week journey of this guest house remodel, make sure to visit the links below. It has been so fun to be a participant in the One Room Challenge, sponsored by Better Homes & Gardens. So many inspiring projects are being revealed so make sure to check them all out!

- Week 1: Guest House Before Photos
- Week 2: Guest House Design Plans
- Week 3: Mantel Update
- Week 4: How to Hide a Mini Split
- Week 5: Bathroom Remodel for $300
- Weeks 6 & 7: DIY Ceiling Beams
Guesthouse Remodel | From Cabin to Modern Retreat
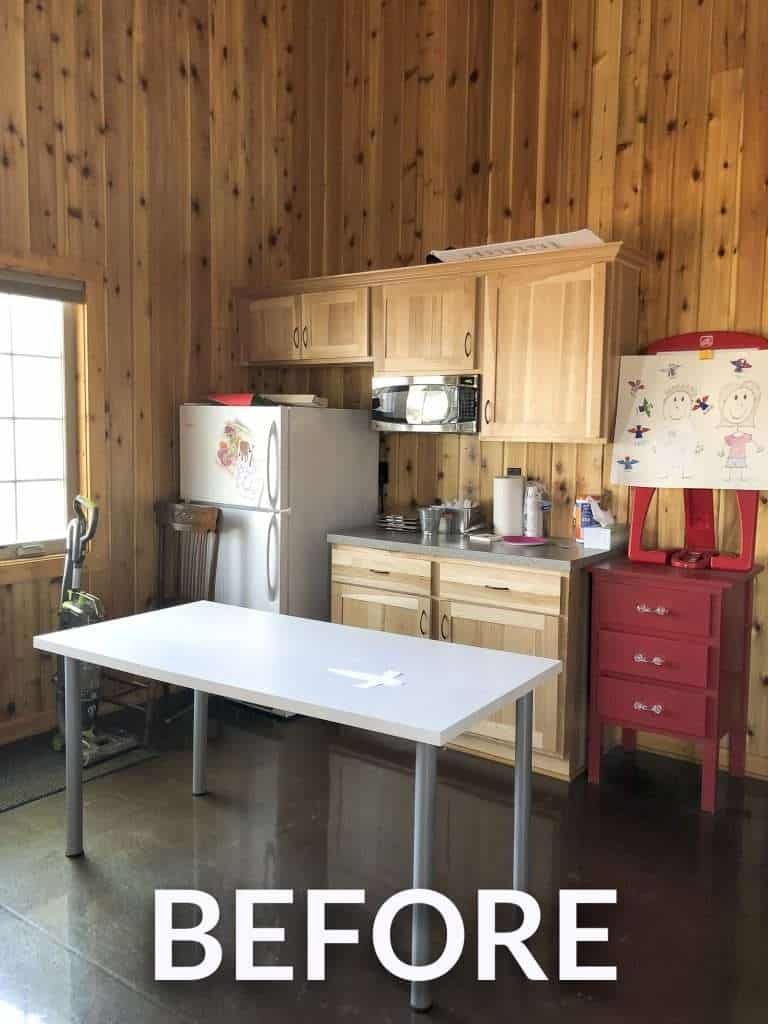
Before I get into all of the final details, let’s take a look at how this started.

A good before and after makes 8 weeks of work feel so rewarding!
I am so pleased with how the guest house turned out. Even though there are a few items I’d still like to update, like flooring and the kitchenette, it feels like an entirely different space!
Let’s break down the project as a recap of how we transformed our guest home.
Main Details & Paint Colors
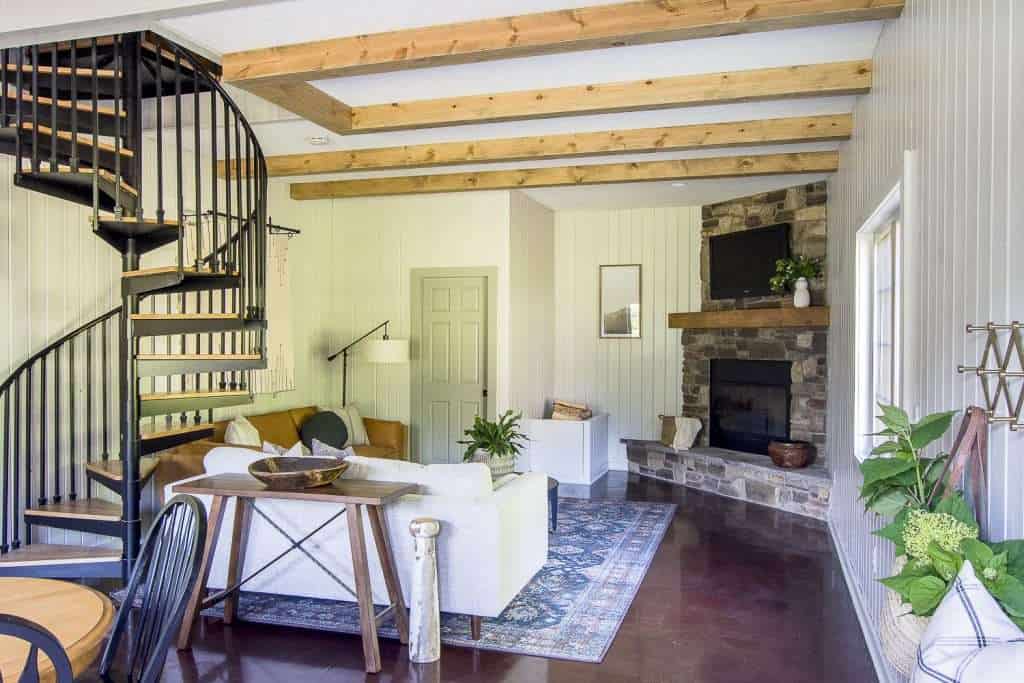
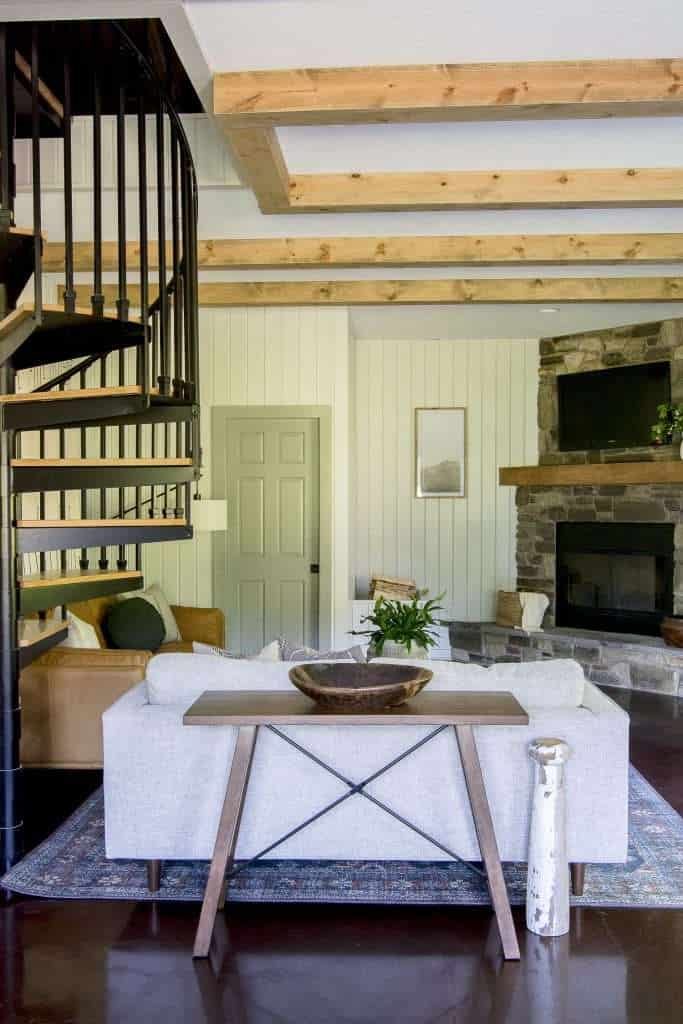
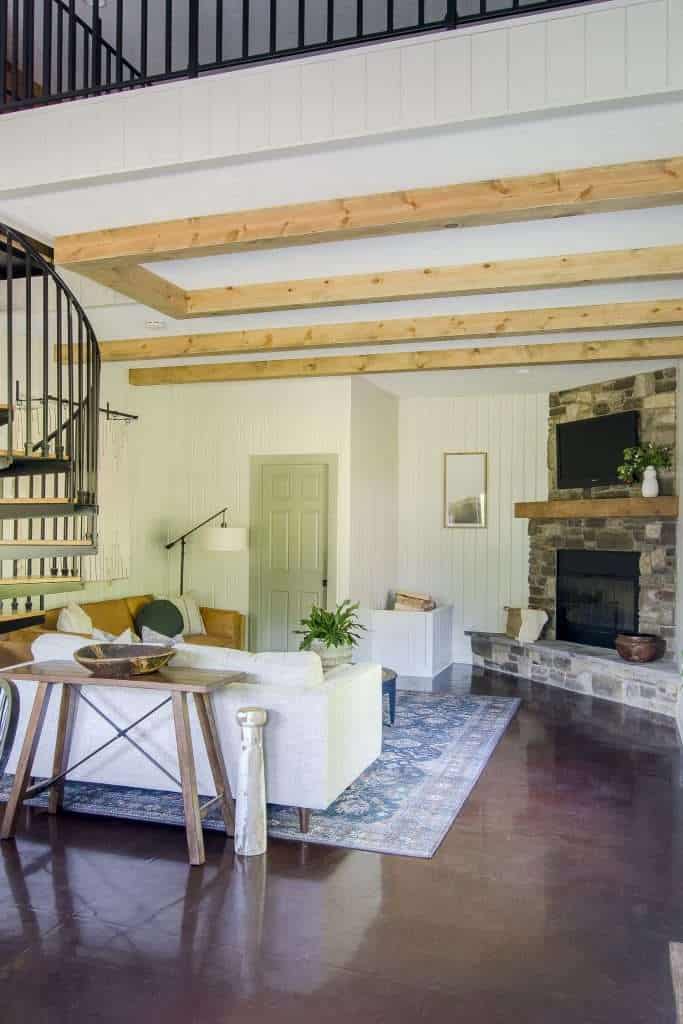
The most impactful change we made in this entire space is painting the knotty pine walls. We primed the walls, trim and bathroom cabinets with oil based primer to seal in the knots.
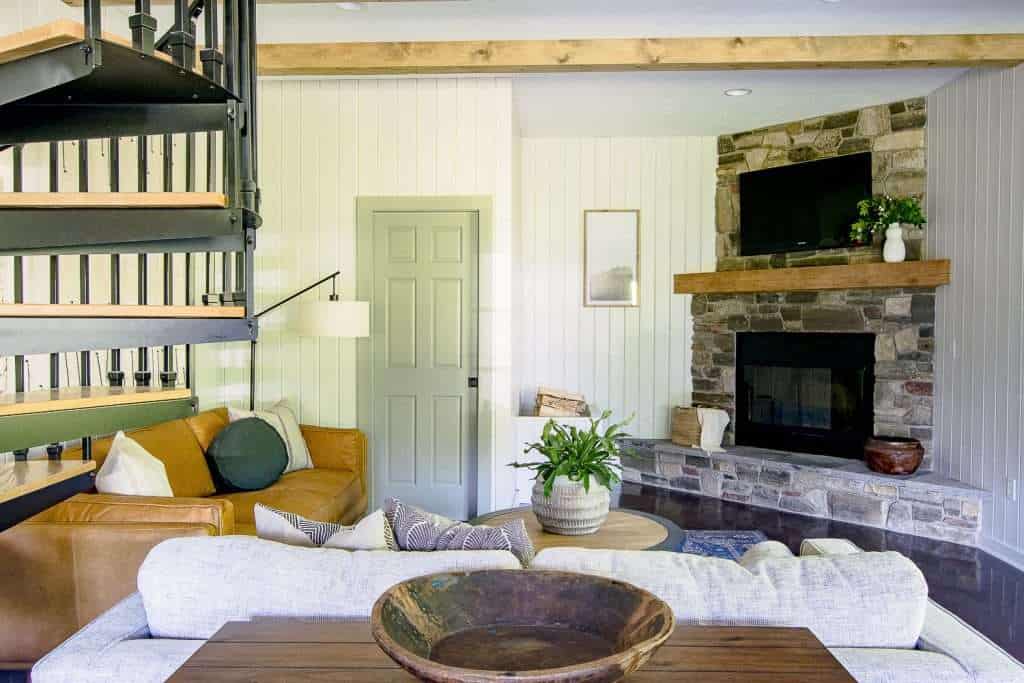
Then, we painted the walls and trim Soft Secret by Behr. I chose to paint the bathroom sliding door, bathroom cabinets, and front entrance door in Old Celadon for a contrasting color that could be used throughout the space.
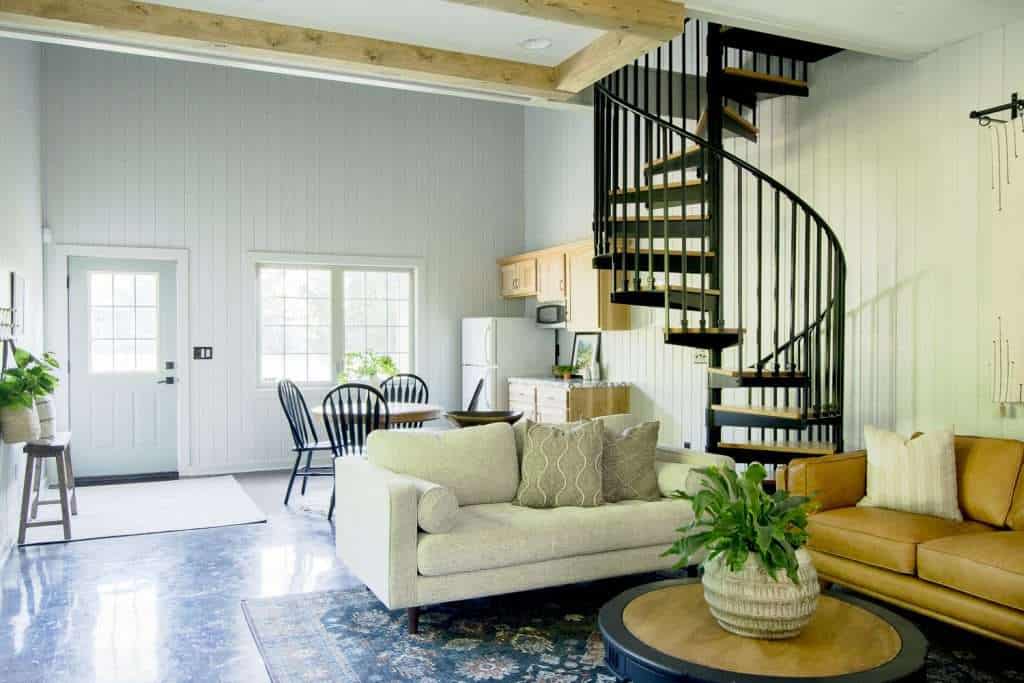
The colors work together very well and both have green/blue/grey undertones. At first glance, most of my Instagram friends have thought that the walls are white. However, in this image you can see the contrast of the true white ceiling against the softer walls.
Paint is so transformative. It completely elevated our bathroom as well.
You can see how I updated the guesthouse bathroom for $300 in week five’s update!
With paint being the immediate and most obvious game changer, let’s take some time to walk through the rest of the updates that could easily be overlooked!
Guesthouse Entryway
The entryway is, intentionally, a very simple design.
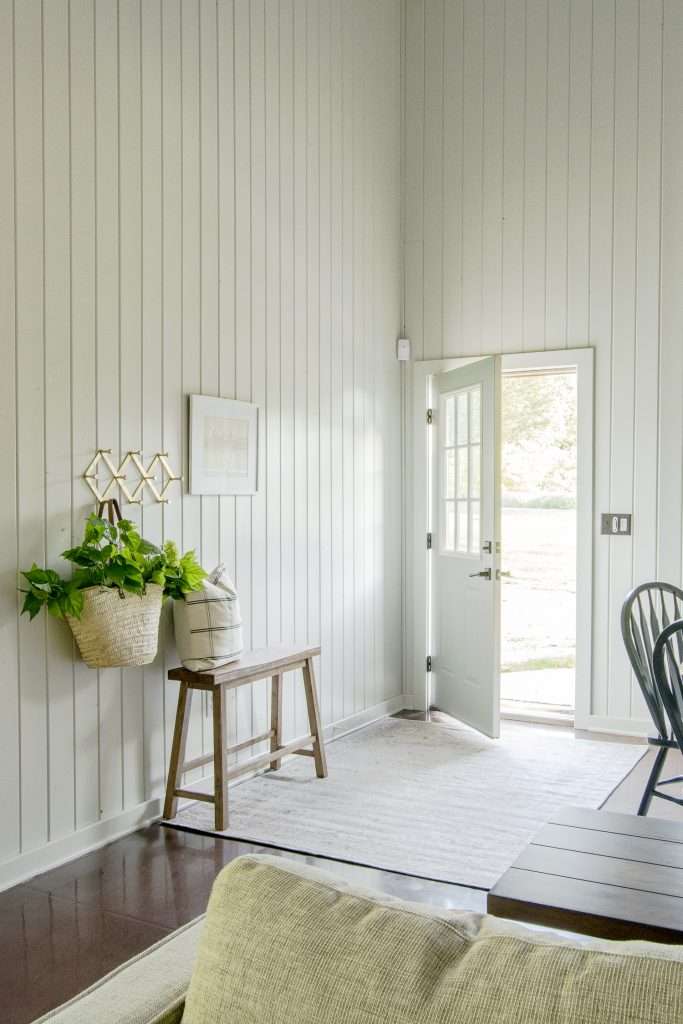
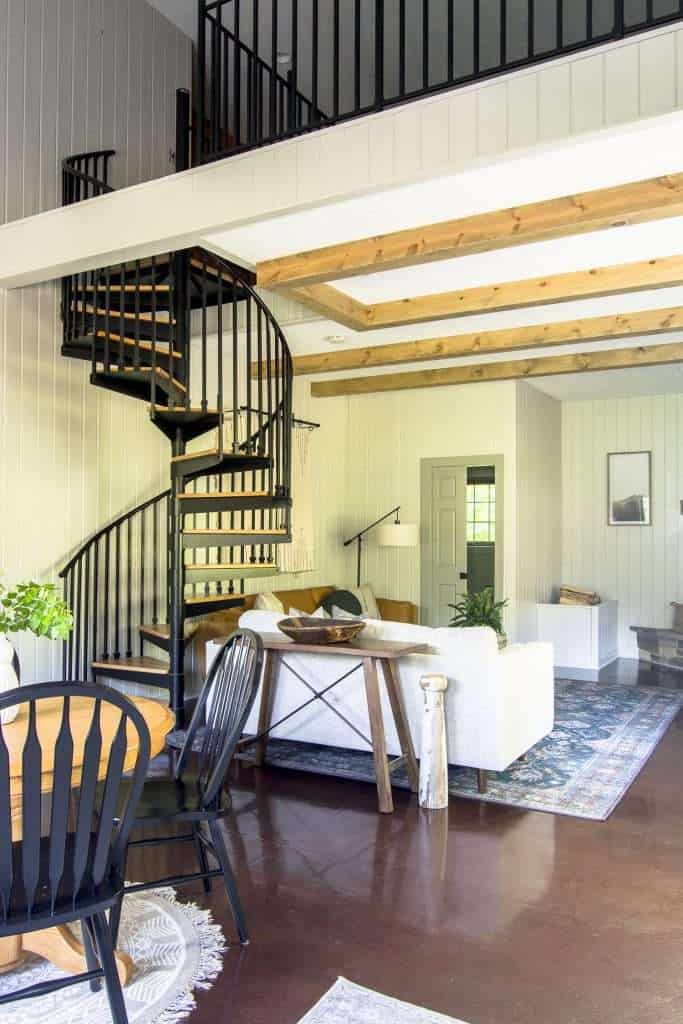
The guesthouse is one 500 square foot room with an entryway, kitchenette, dining space, and living room. In order to create definition in the room, I designed zones for each purpose.
Rugs are a fabulous way to designate zones. The entryway is zoned with two rugs: one for entry and one for dining.
Our entryway rug is actually washable, which is perfect for the high traffic we get in the guest house. We host our small group in this space so 10 children and 10 adults (plus a dog) are using this space at any given time.
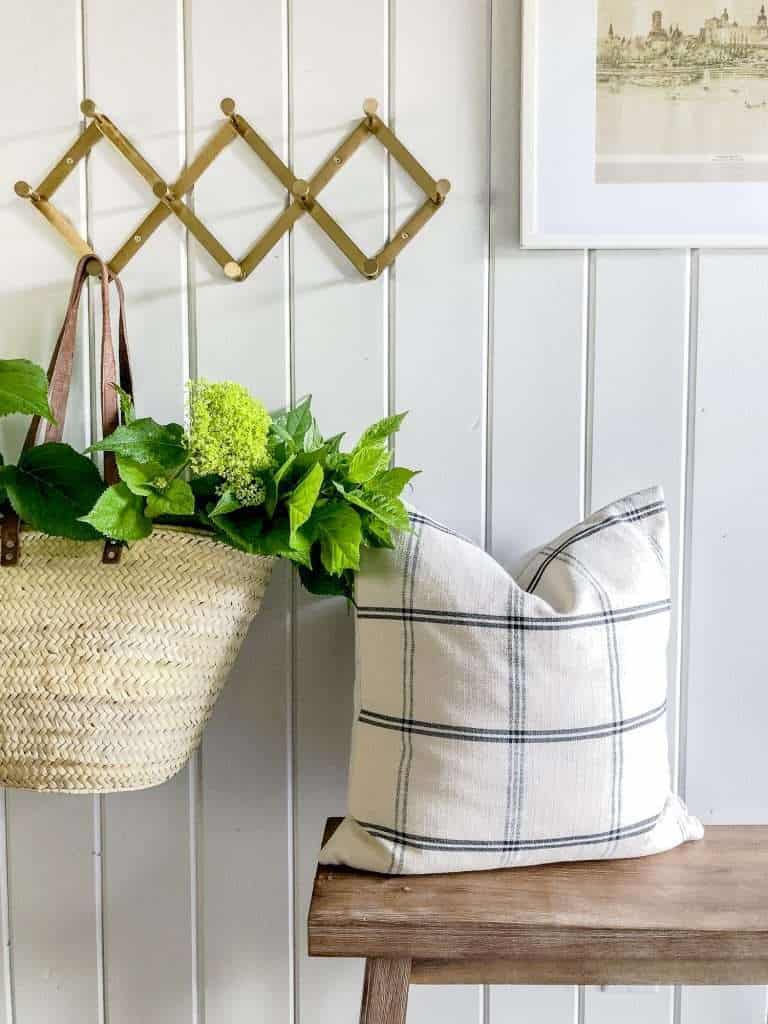
I added a simple bench for those who need to sit to put on shoes, as well as this modern take on an old coat rack. And two finishing pieces of decor are a pretty basket and an accent pillow.
I love these pillows from With Lavender and Grace. Make sure to browse her shop and use code GRACE15 for 15% off!
I love the simplicity of how it came together. The final touch was to add a print I purchased while on a trip to Poland.
Adding personal touches to a space make it feel more welcoming.

Shop This Space

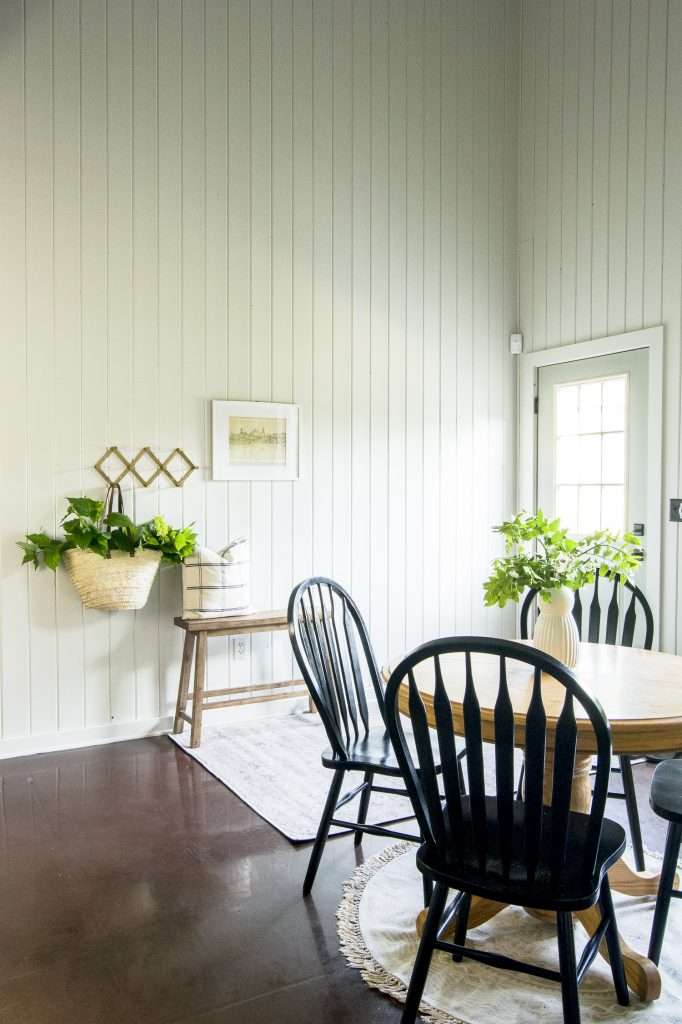
Dining Area & Kitchenette
Next, I found this small pedestal table and chair set on Facebook marketplace.

Eventually, I plan to sand down the table to raw wood and coat it with either tung oil or a clear poly. For now, I simply spray painted the chairs in a semi-gloss black with my favorite spray paint.
Combining a wood table with my modernized black chairs gives a great contrast.
Adding a round table to this space worked so much better than the larger rectangle place holder we were using before. Can you believe it’s the same space?!
The kitchen cabinets have been left wood for now. However, long term I do plan to paint them. I love the bathroom cabinet color and plan to carry that into the kitchen and then update the hardware.
We will also replace the very old and not-properly-functioning refrigerator!
For now, I did update the countertop with this marble contact paper as a quick fix. It turned out so beautiful and will look great against the blue/green cabinets once that project is complete!

Can you believe these countertops are contact paper!? Not bad for a $25 fix!
Living Space
Now on to my favorite part, the main living space!

Painting the walls and adding the ceiling beams were the major game changers in this space!
The spiral staircase was already there, but without the distraction of the knotty pine walls it really pops!
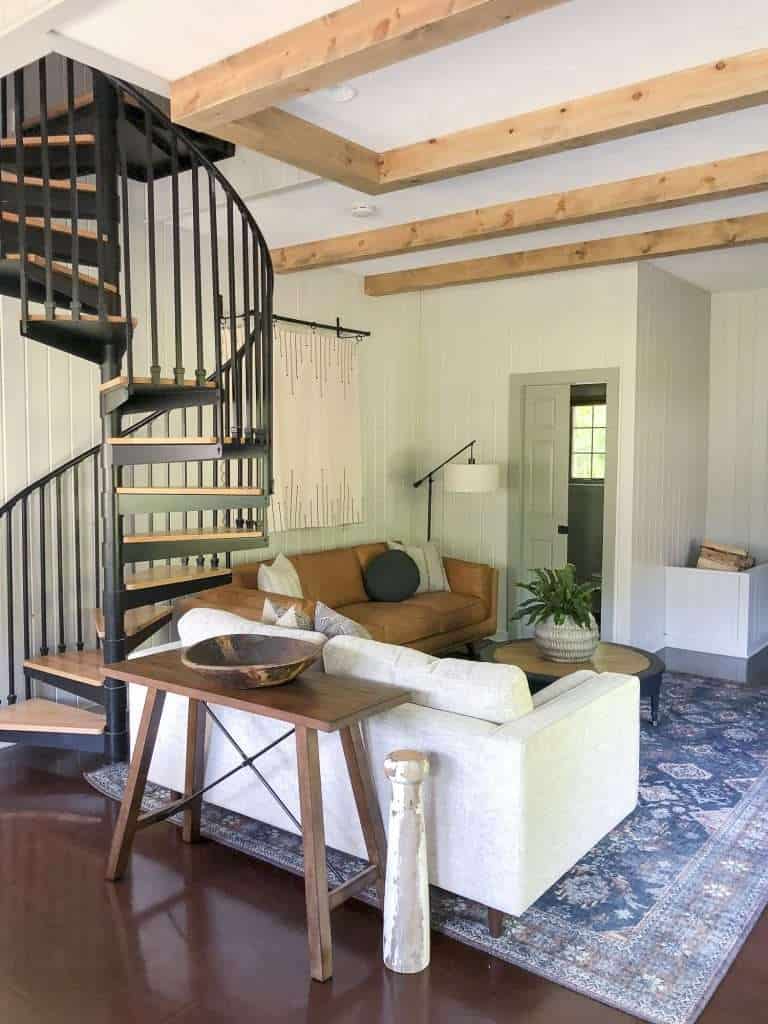
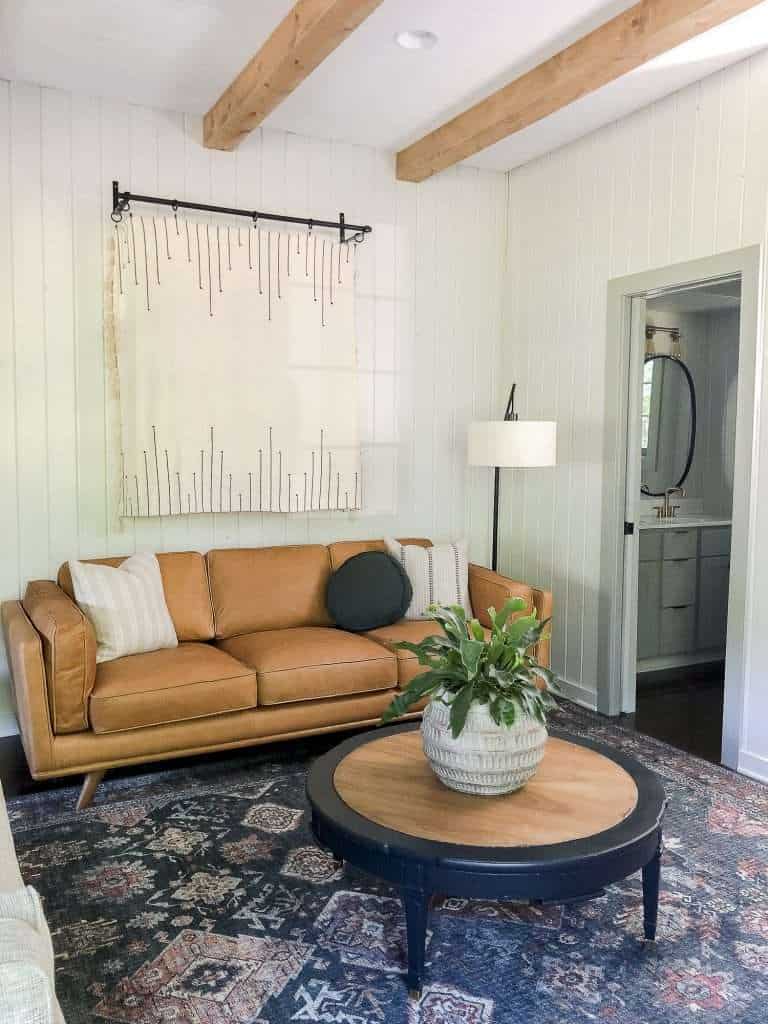
Another small project that I love is the DIY “artwork” behind the sofa. If you remember, that is functioning wall art!
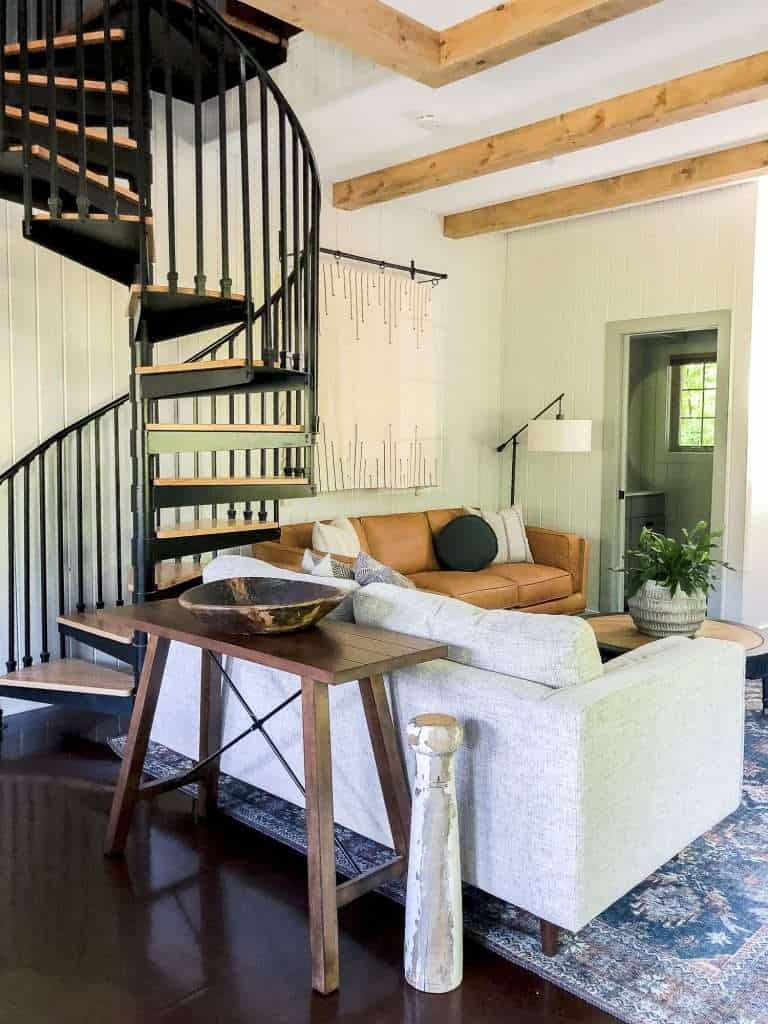
It is actually hiding our mini split! Since we don’t have full HVAC here, the mini split heats and cools the guest house and I’ve always disliked having this eyesore in the main living space.
So, I covered it with a blanket that can easily be moved over when in use. Bonus points: it serves as tapestry wall art.
Fireplace Updates
The other change I made in the main living area is updating the fireplace mantel. It was such a simple update to sand off the existing orange stain and finish it out in Miniwax Special Walnut.

I used the same stain color on the ceiling beams in a semi-transparent finish to coordinate but not match exactly.
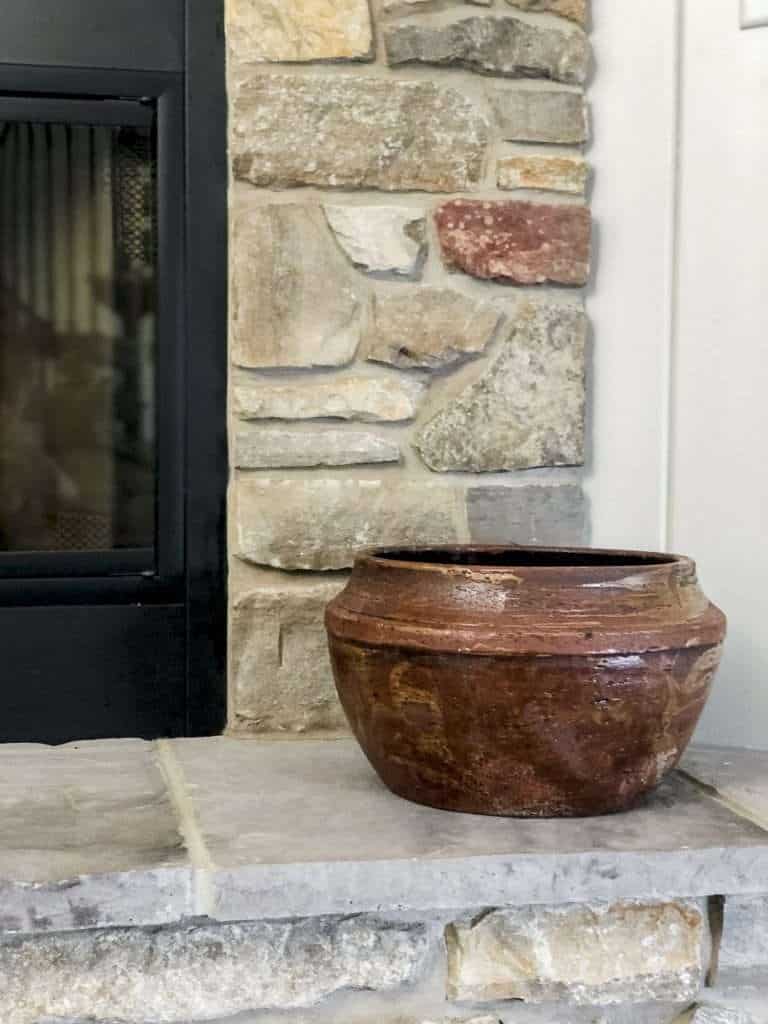
I was debating the fireplace stonework. To keep or to update. In the end, I decided to keep the more rustic look and pops of color since they coordinate with the existing floors. I brought a few of those same colors into the decor to draw it through the room.
Guest House Furnishings
The finishing touches are always my favorite part of the design process!
Quality furniture with minimal decor was the name of the game! My goal was for our family and friends to be comfortable without feeling like they can’t live in the space. Especially since we have 10 kiddos under the age of 11 in here each small group!

The Sven sofa and Timber Charme leather sofa from Article are a beautiful, comfortable, and durable addition to the space! I love the clean lines to modernize this space without feeling overly “farmhouse” style.
And, if you’ve followed along with me for awhile then you may have recognized this vintage coffee table! I refinished it before the One Room Challenge began and I think it works perfectly in this space.
The Loloi area rug was actually my anchor point for the color scheme. It has beautiful rust, tan and green/blue accents that I used to pull throughout the room and coordinate with our very red/rust-colored floors.

I kept the small decor items simple with some rustic wood antique bowls, stoneware and pottery, and modern pillows to juxtapose the modern and rustic elements easily.

Shop the Look
Stay Connected
Thank you so much for following along on this One Room Challenge guesthouse remodel! It was such a fun project and I’m so pleased with how it turned out.
I learned a few design lessons along the way, and I believe those are just as valuable as completing the guesthouse remodel itself!
What do you think of the final product? The next time I work on this space, I’ll be sharing how I update the loft! It is a small loft with sleeping quarters and has a long way to go. It will be a fun project in the future to fully complete this guesthouse.


This is beautiful and providing me with some inspiration for a ski rental we just purchased. I have a question. We have more rustic rough wood walls that I am assuming we cannot paint. That are dark. The ceiling above the beams is white. How would you approach these walls?
Hard to say without seeing it, but if it’s a ski rental then more rustic/cabinish walls sounds about perfect to create a cozy atmosphere! Perhaps just leave them as is and lighten up the space with lighter furnishings, area rugs and artwork!
Hi Sarah,
Love this transformation!!
We are about to paint our front porch, which has all knotty pine. In the blogs I have read they lightly sanded before priming. Did you do this? If not how is the primer holding up?
Thank you kindly,
I did not and it’s holding up beautifully! That said, sanding is always a good idea. 😉
Wow, I’m a fan of how your walls turned out! In our home, we had 3/4″ wood paneling everywhere and opted to tear it out and put in fresh drywall. Leaving the wood paneling and just painting it would have been a HUGE budget saver haha! And it looks beautiful and much more modern painted white. When we decided to tear our paneling out, I didn’t even consider leaving it and painting it. Next time, I might think twice or leave it as an accent wall in certain areas of the house because of how yours turned out! 🙂
I’m sure your project still turned out beautiful in the end! But paint does fix a lot of things that are simply outdated. 🙂
You have approached the matter very well and tastefully. It is immediately clear what you meant when you started doing this project. The result looks very nice. Looks fresh and more pleasing to the eye. At first it was strange to look at these transformations, although it was immediately clear what and how. But in the end we have a completely positive outcome. I like. I am inspired by some of your ideas, you have a good blog!
My dream is to one day have a small lakehouse for my family and this is exactly how I picture it in my head – just perfect!
Thank you so much!
This site truly has all of the information I wanted concerning this subject and didn’t know who to ask.
You accomplished so much in a short time!! It looks SO GOOD!
Thank you so much!
So a beautiful transformation. You did great job, Sarah❤️ Can’t wait to see the loft….give a mouse a cookie…
Thank you so much!
Wow, such a brilliant home makeover idea! Thanks for sharing
Cool Kitchen Utensils Review
I like to use Behr paint, but not many bloggers feature it. I really like the two colors you used and think I may copy them! Thanks so much for sharing your beautiful makeover. Everything looks so rustic and modern and put together.
Thank you! The colors go so well together!
It looks great! Can you come and decorate my house, please? ? You always do a wonderful job! Have a great weekend!
Haha thank you Rosie!
Sarah the transformation is incredible! You should be so proud! Enjoy your beautiful new space!
Thank you my friend!
oh Sarah the room is unrecognizable!! all those nutty pines are gone and now it’s so fresh and charming! those faux beams add so much character to the room and i am most in love with the palette … just so cozy and makes me want to come over and chill out with that fireplace on!
congrats on a gorgeous ORC makeover! looking forward to seeing more!
Thank you so much Tim! I appreciate that!
so pretty, sarah! i love that fireplace!
Thank you Cassie!