
Small Mudroom Ideas | A DIY Mudroom Makeover
Lacking space? Small mudroom ideas don’t have to include mudroom cubbies or lockers! Learn how to transform your mudroom with DIY peg racks, an Ikea hack and tongue and groove pine!

Post may contain affiliate links for your convenience.
Originally published February 14, 2020. Updated January 23, 2026.
Small Mudroom Ideas Without Mudroom Cubbies
When we first moved into this home, I was excited to have already built-in mudroom cubbies. You can see my excitement in my first mudroom blog post. I updated the space with paint and organizational staples and moved on to other rooms.
However, what is the saying? “The best laid plans of mice and men often go awry.” Well, my small mudroom went awry. In the worst of ways.
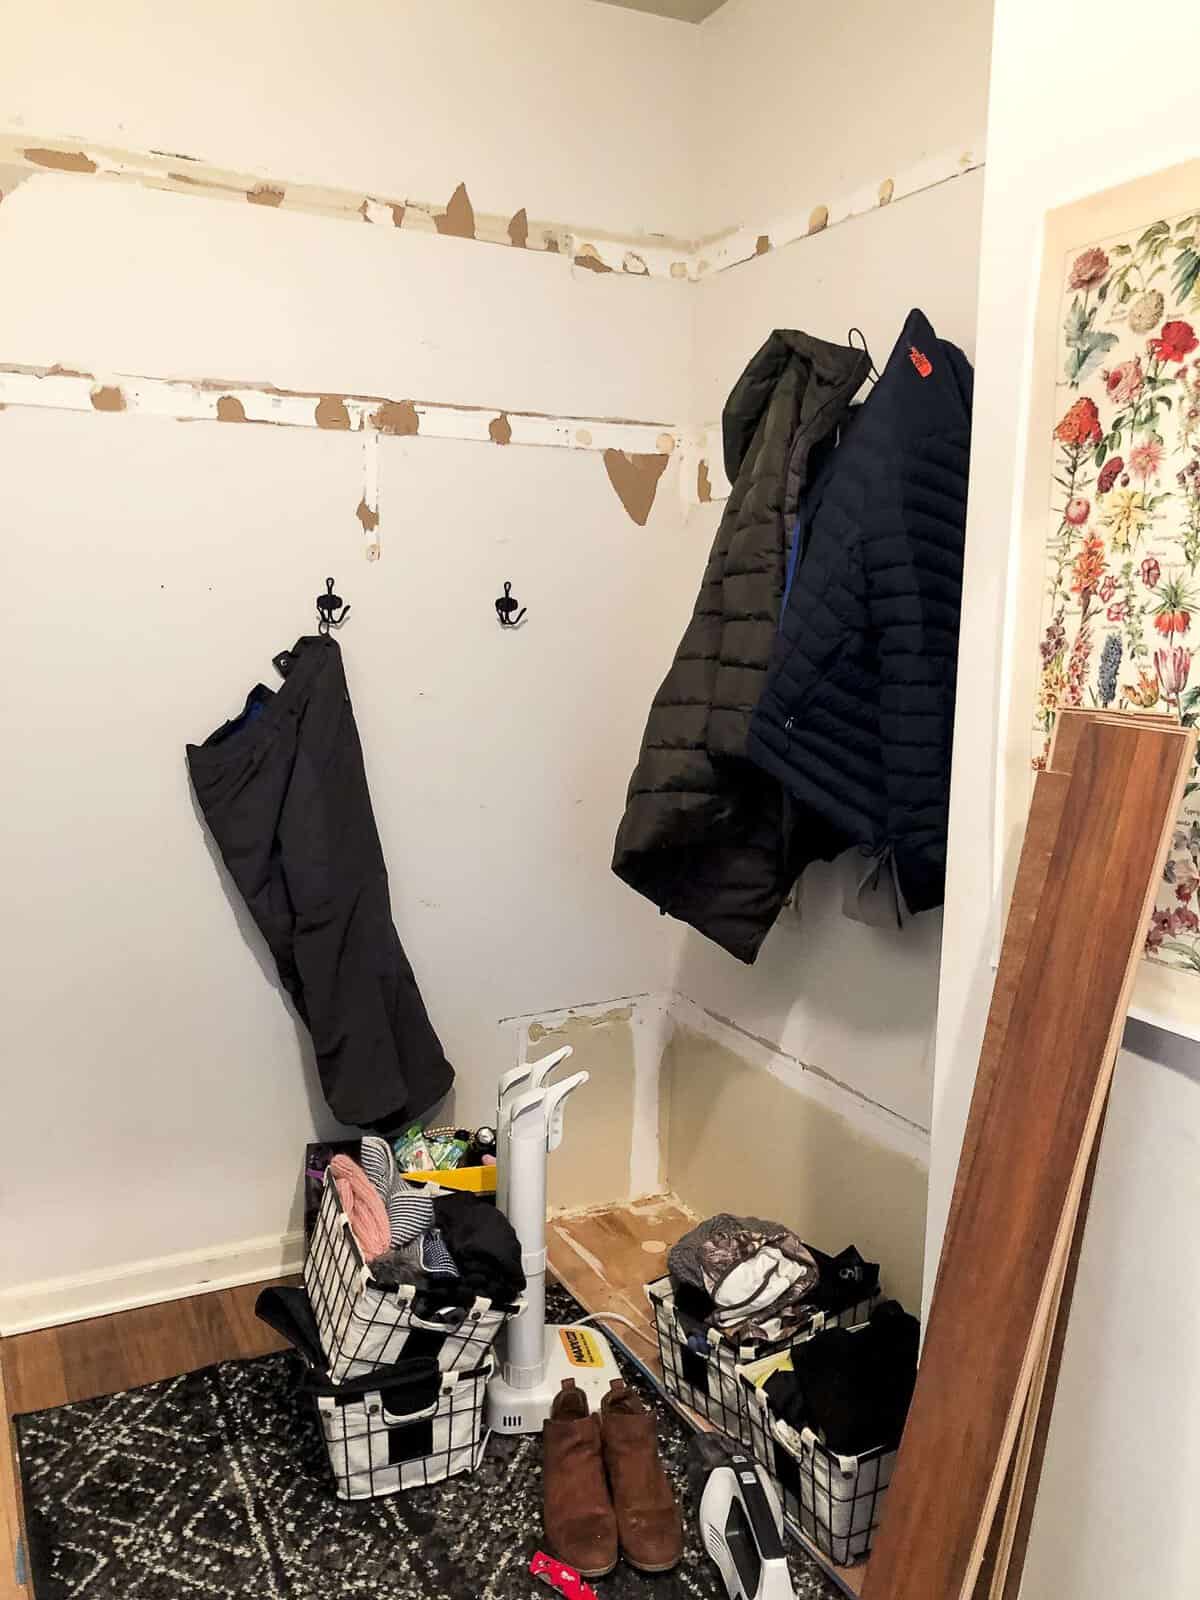
Small Mudroom Before
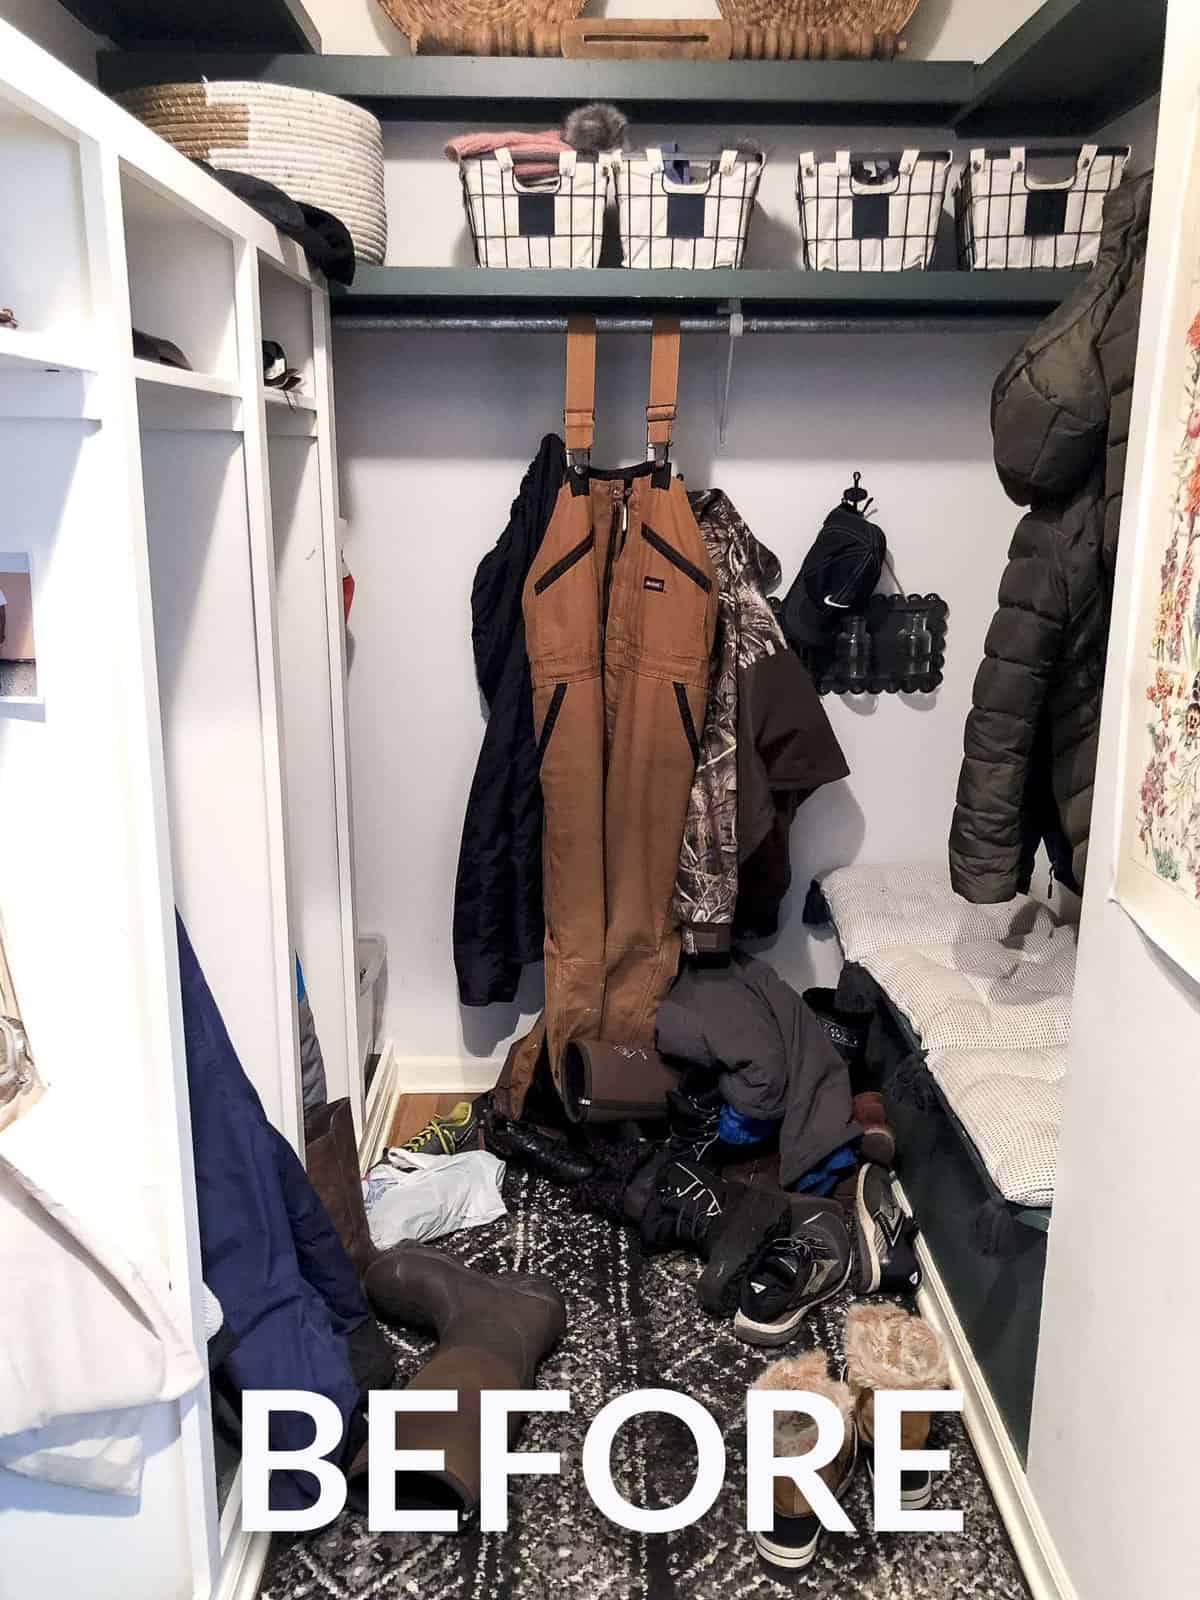
I’m not even ashamed to admit that this is how the mudroom looked daily. It is what it is! It is life with two children, living in the country, lots of Michigan winter gear and a poorly designed space.
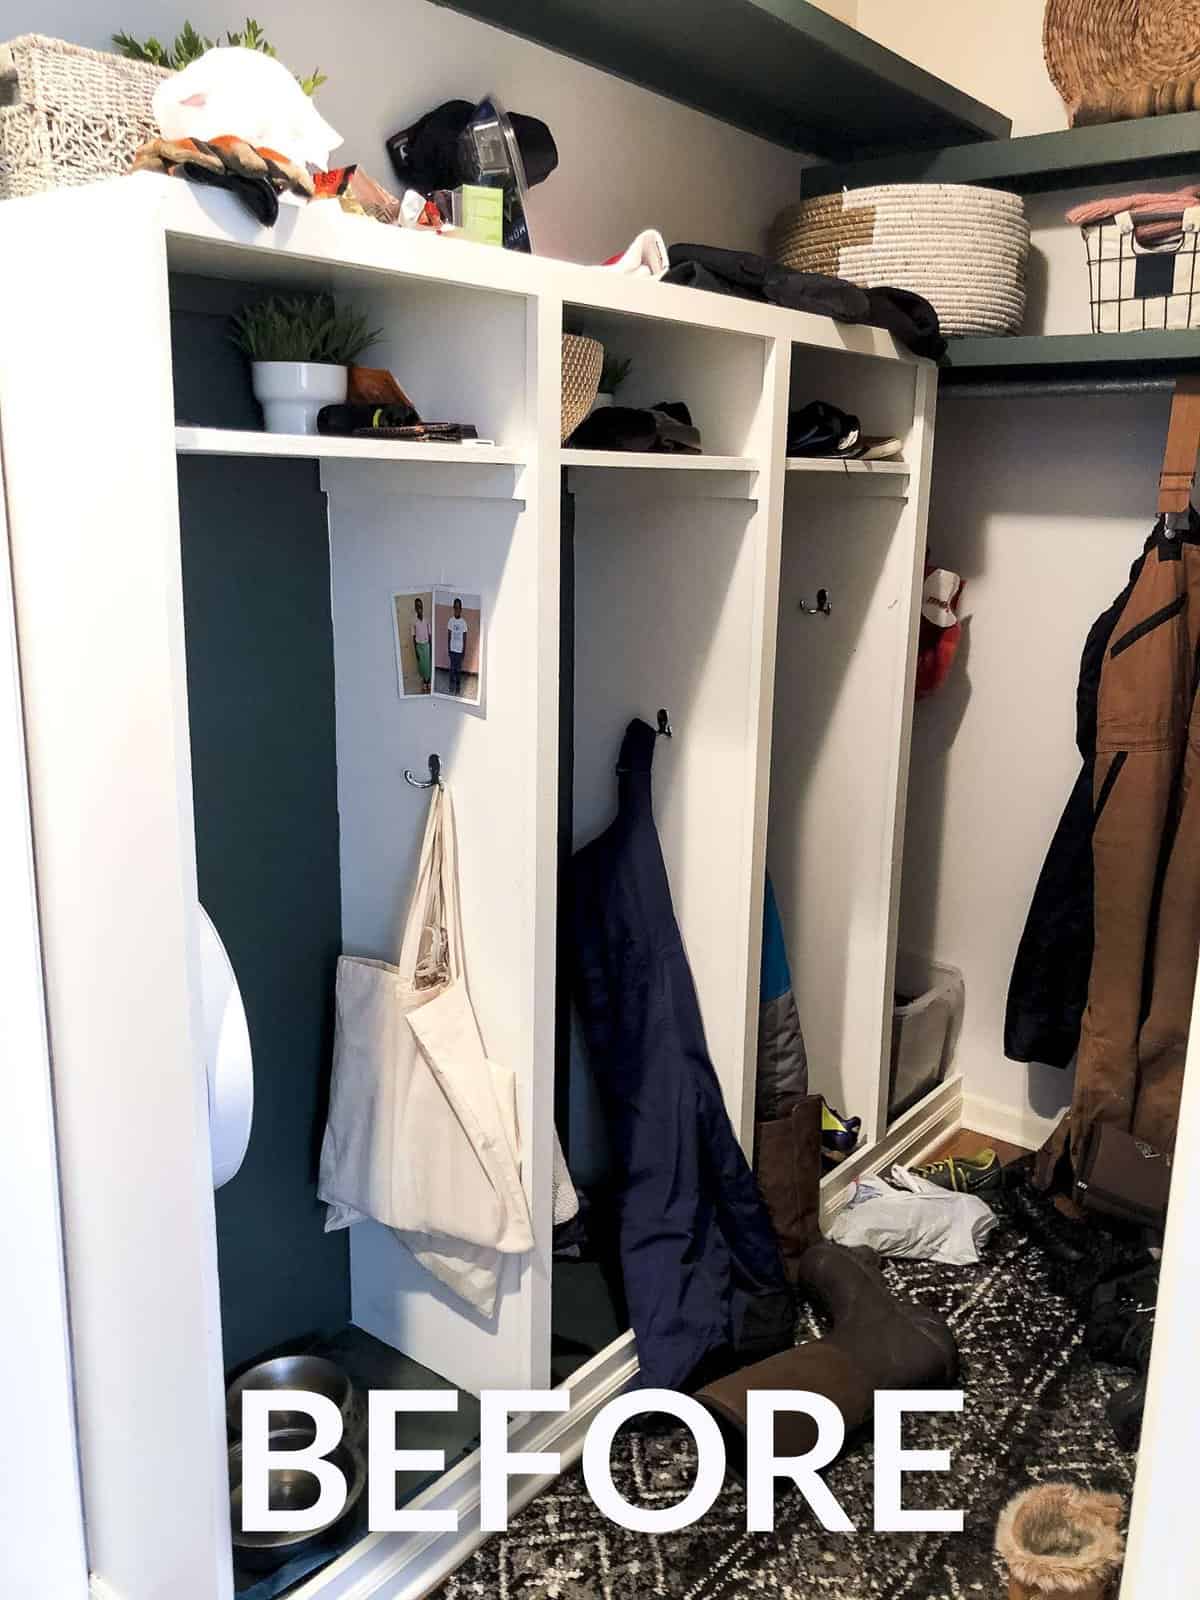
What I am sad to say is, the iconic mudroom cubbies did not work! Isn’t this everyone’s dream? To have built in mudroom lockers so that every individual has their own space?
I sure thought so! That is, until we lived with it for almost two years. These walls have seen lots of bickering and falling over each other.
Originally Aaron and I discussed adding onto the mudroom by taking up some of the space in the garage. However, that wasn’t feasible at this time and we didn’t want to lose the garage space either.
So, I rethought HOW we used the space we have rather than trying to create short-term workarounds.
DIY is a huge part of my blog and how we’ve been able to do so much to our home in such a small amount of time. If you can dream it, you can DIY it! Make sure to join my blogging community for members-only freebies like my must have DIY tool list download!
Functional Small Mudroom Ideas
Within this small mudroom, there was an already existing nook with a built in bench. The bench ended up being a hindrance for our family’s use because it was always piled with items, preventing the lid from opening.
Since I already disliked the bench, I decided that the best use of that space would be to add storage vertically. My first design plan included a custom mudroom built in.
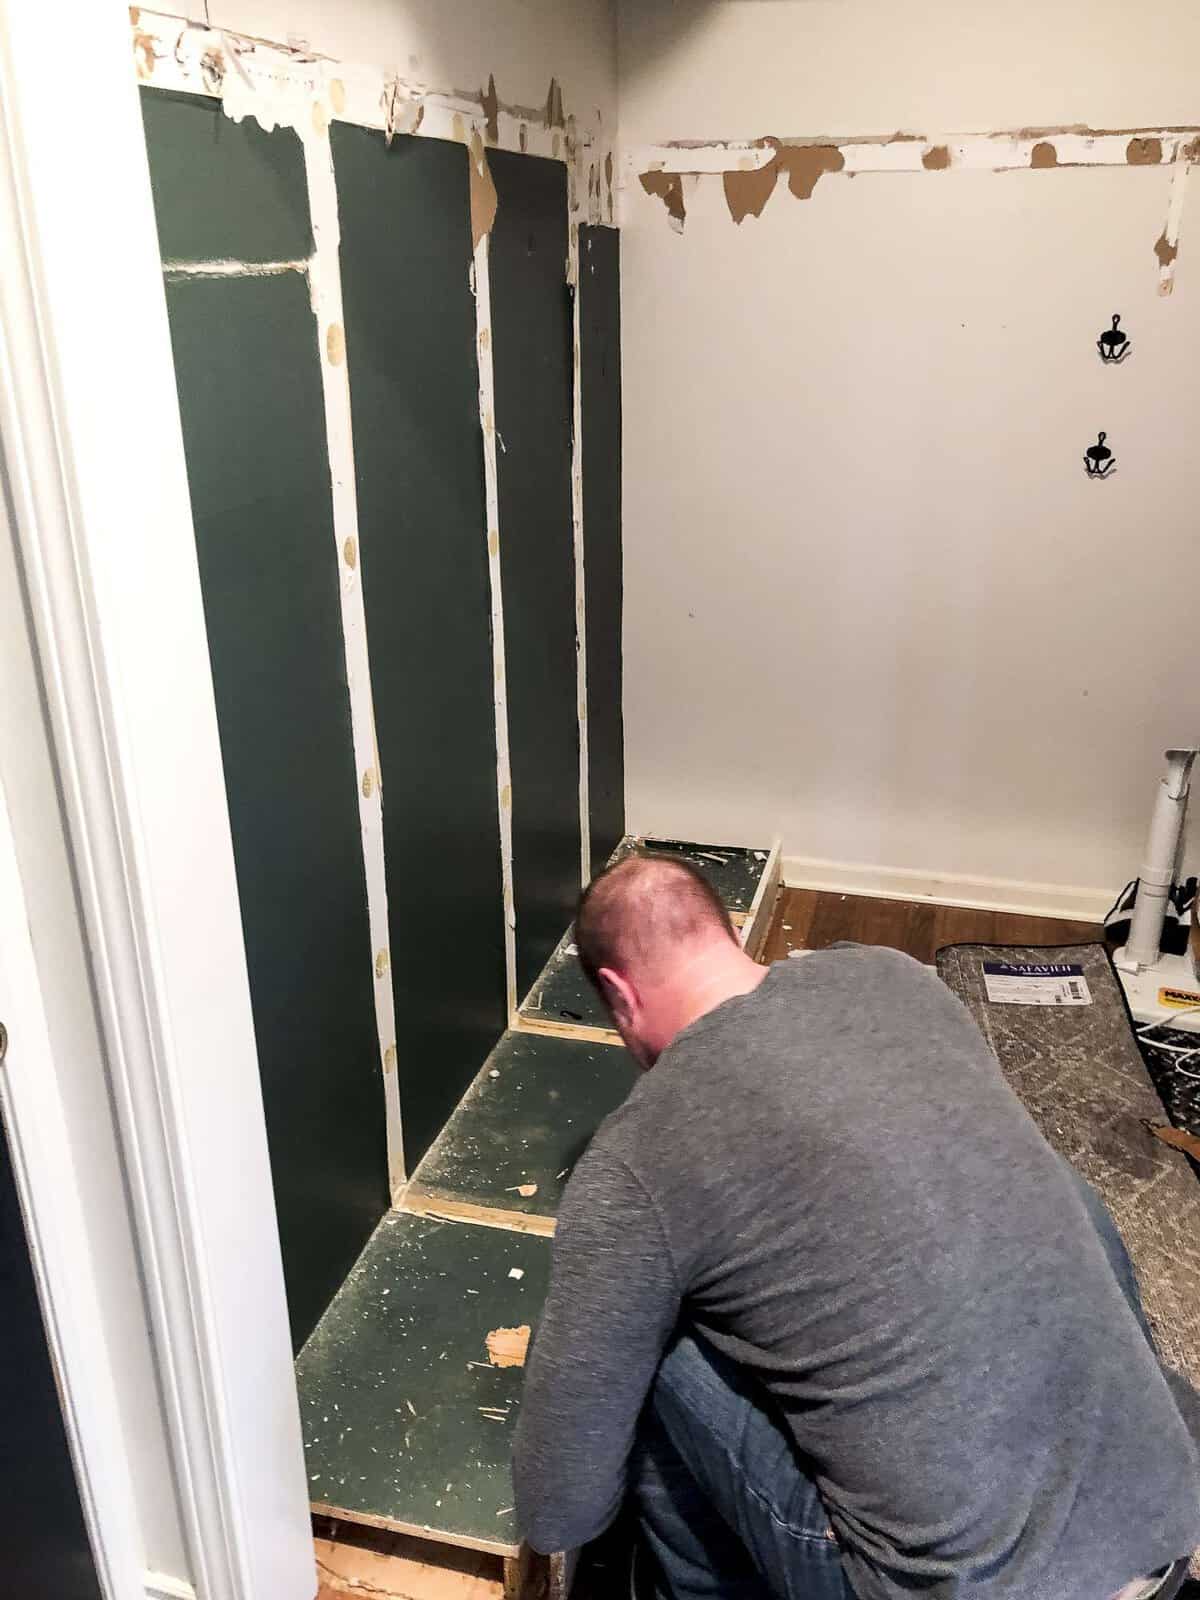
THEN, I got the quote. I quickly nixed that idea and started searching for more affordable alternatives. In the meantime, we began demo.
Tongue and Groove Pine Paneling
We ripped out all of the existing built in cubbies, shelving and bench. The previous owners really liked liquid nails. There was much more drywall damage than I anticipated.
That forced my design plan to change. Rather than completely re-drywall the room, or pay a contractor to fix it (something I’m not skilled at), I decided to cover it up!
Once I got started into the demolition, I knew that I wanted this remodel to be as affordable as possible. I chose to DIY the entire project to save money and also improve my DIY skills.
I’m always sharing on Instagram to my followers that they can do anything they put their minds to in their home. “Designing a Life: From House to Haven”! That is what my book is all about.
So, I wanted to follow my own advice.
The Mudroom Design Plan
- Add tongue and groove pine paneling floor to ceiling.
- Build DIY Peg Racks to surround the room.
- Create a faux “mudroom built-in” for storage.
- New Lighting.
- Fix the floors.
- Fresh paint.
Had I done any of this before? No! Besides painting, of course. But I’ve never installed paneling, built peg racks, fixed laminate or built a built in from regular furniture. There’s a first time for everything.
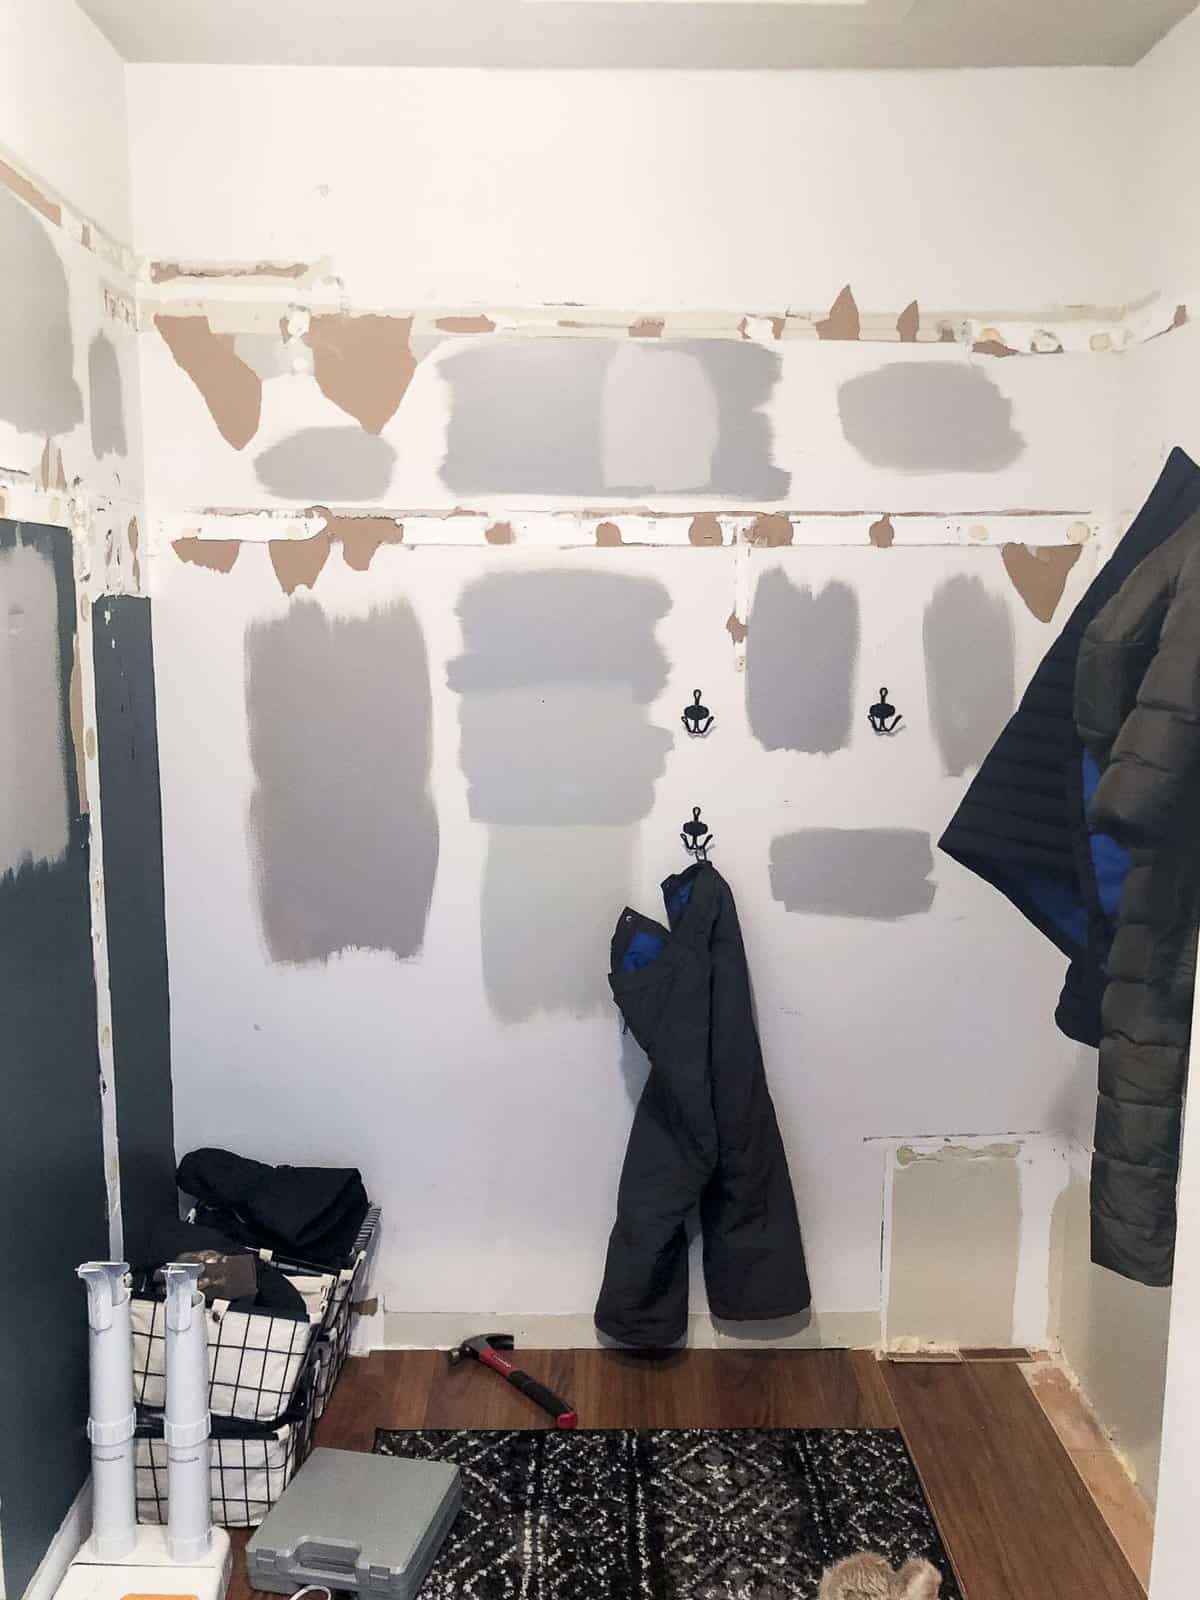
Before I put up the tongue and groove, I tested paint samples.
How I wish I had known about Samplize paint samples during this project. It would have made my process much cleaner, simpler, and more accurate!
The first two samples that I purchased weren’t what I was looking for, so I created my own mixture and had it color matched. Sabre Gray is a close match to consider.
Sample My Favorite Paint Colors

Different lighting makes it pull either green or blue but it has a grey base. So I get to enjoy a couple of colors throughout the day!
If you’ve ever wondered how to choose paint colors the right way (the first time), learn all about the professional method to choosing paint colors in this article.
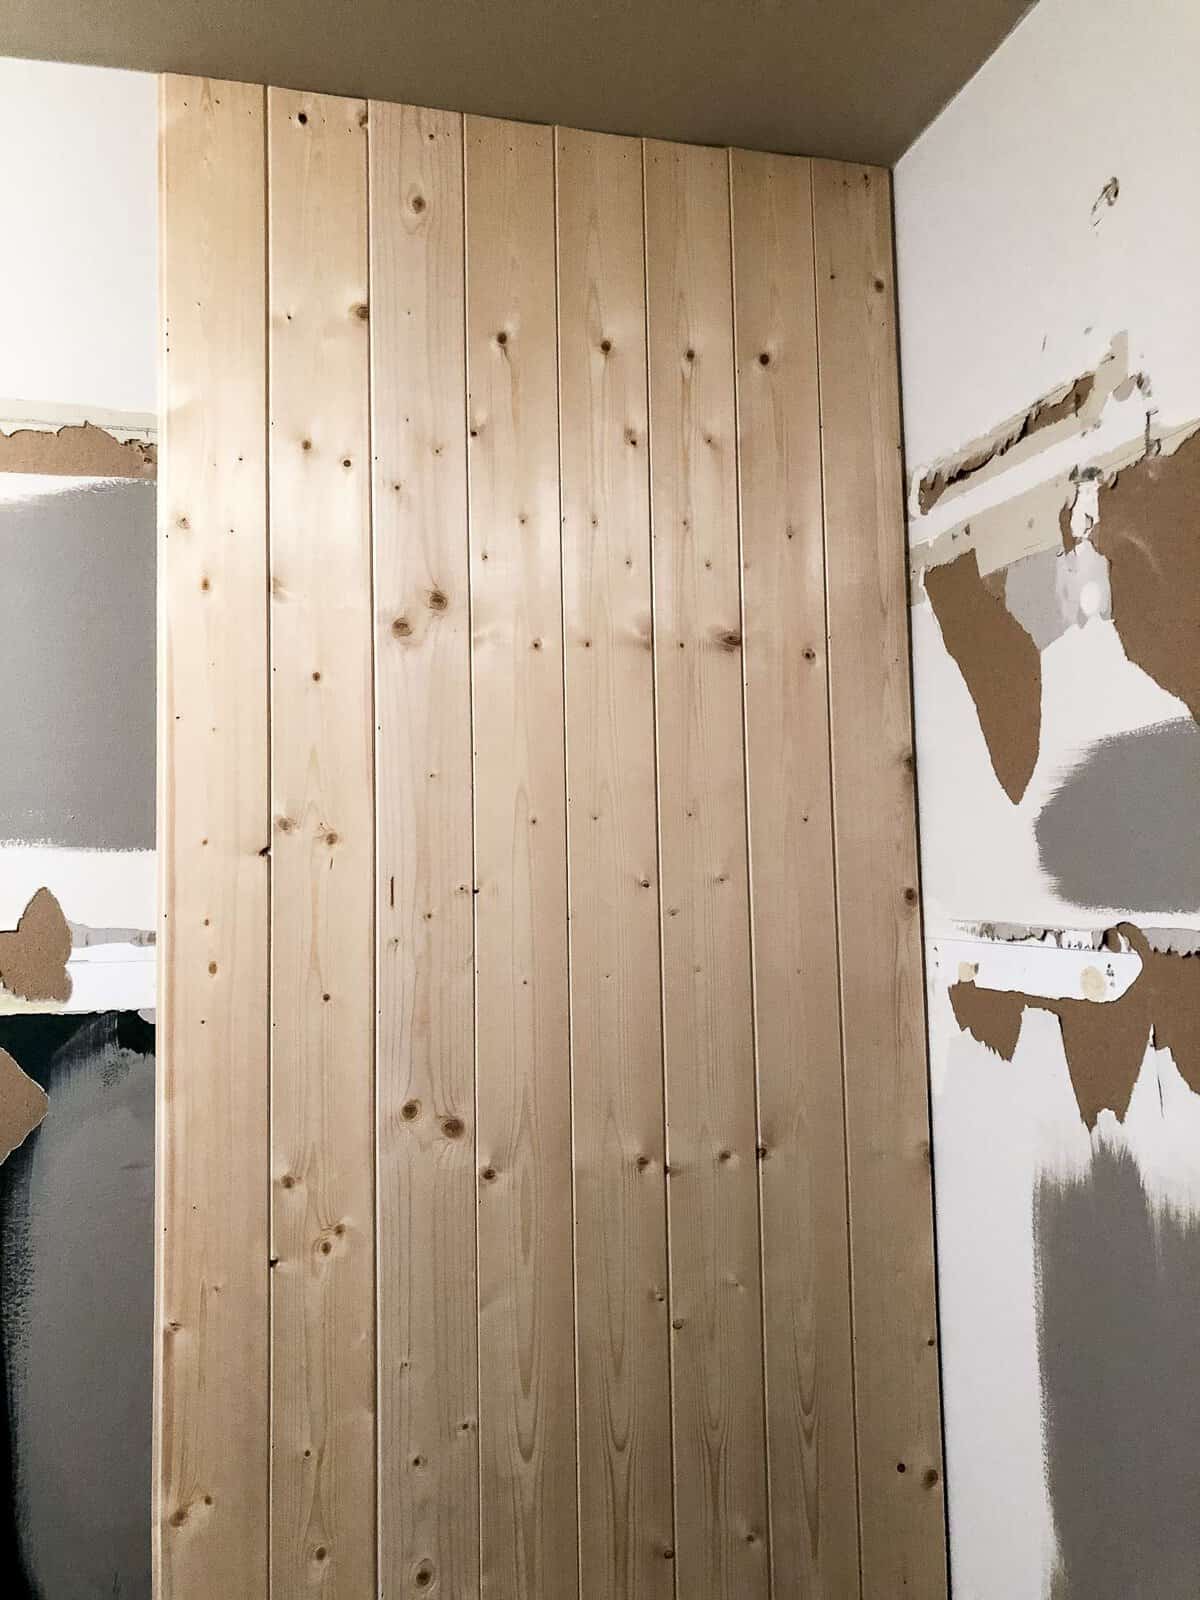
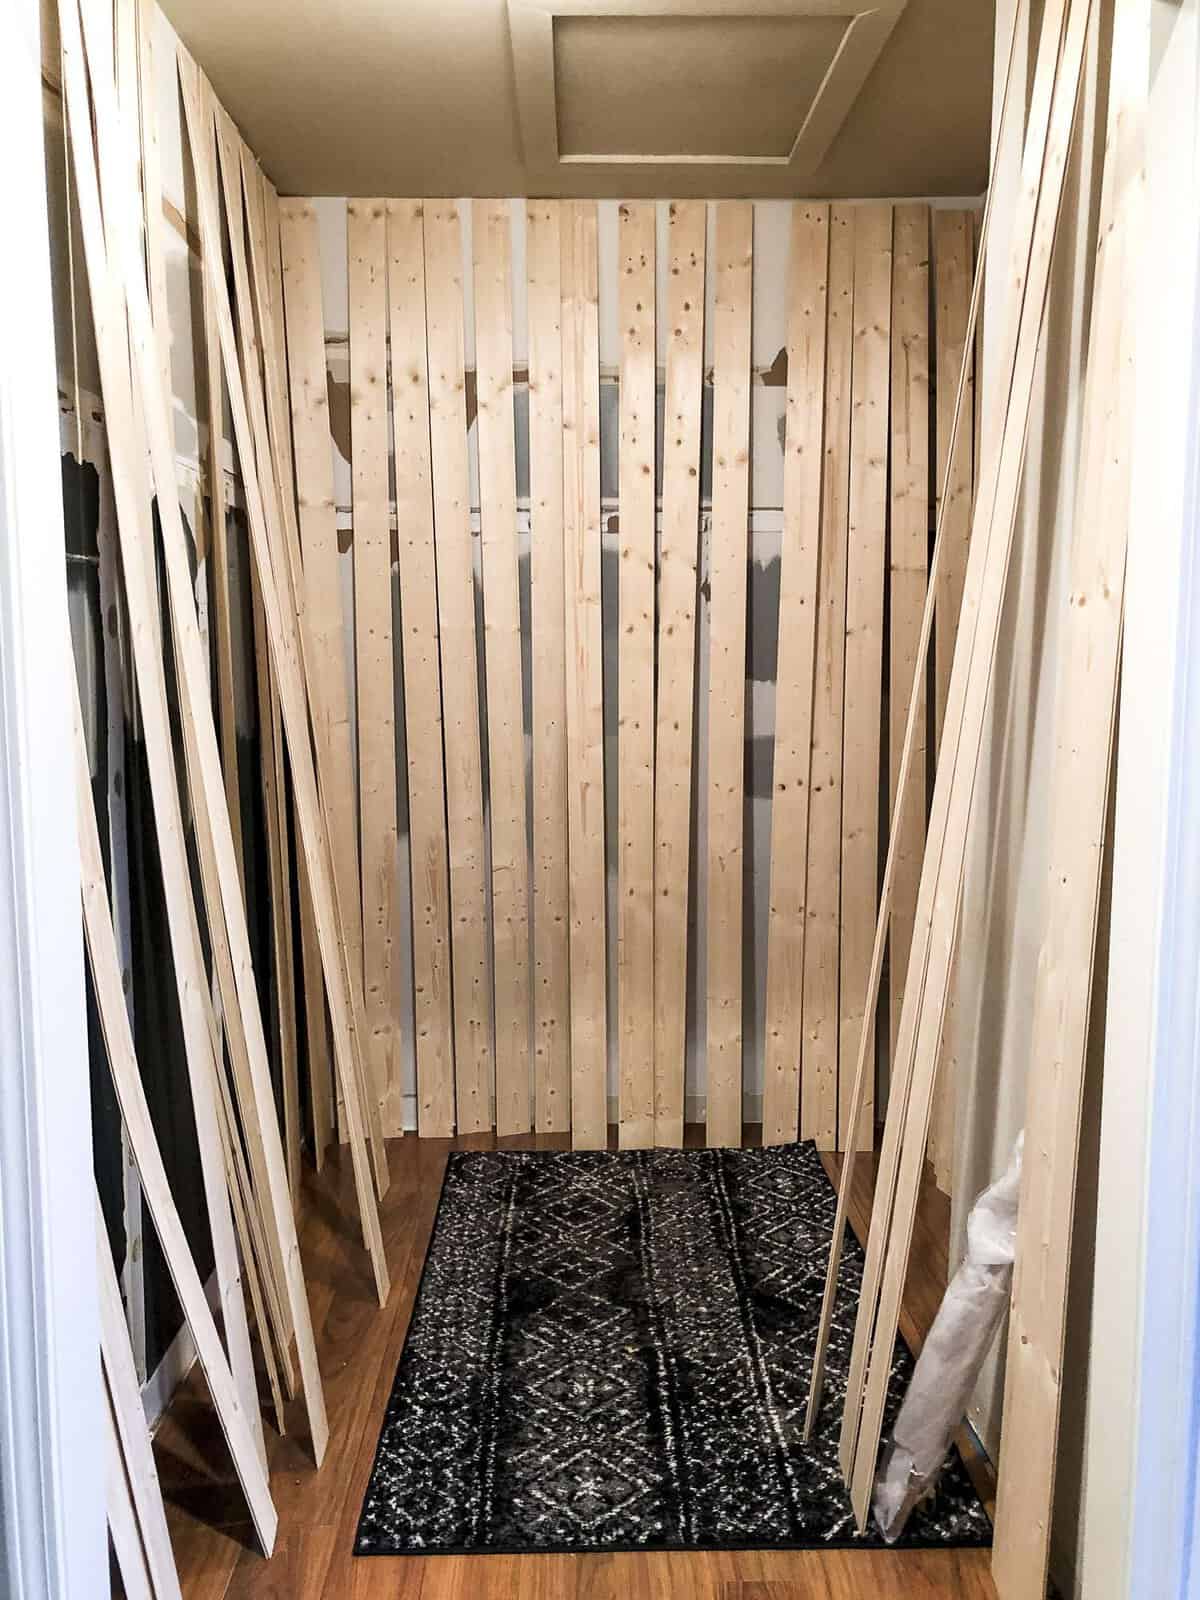
The next step was to install my tongue and groove pine paneling.
I chose to go with a knotty pine because it was affordable. If you want a more finished (less rustic) look, then I’d recommend MDF tongue and groove or something more polished. Just be sure to seal it well since MDF doesn’t love water.
The installation process wasn’t difficult. It took my mom and I less than a day!
Fair warning, lay the wood on the floor or a flat surface to acclimate. You can see in the photo above that I stood it up to get a feel for how it would look vertically.
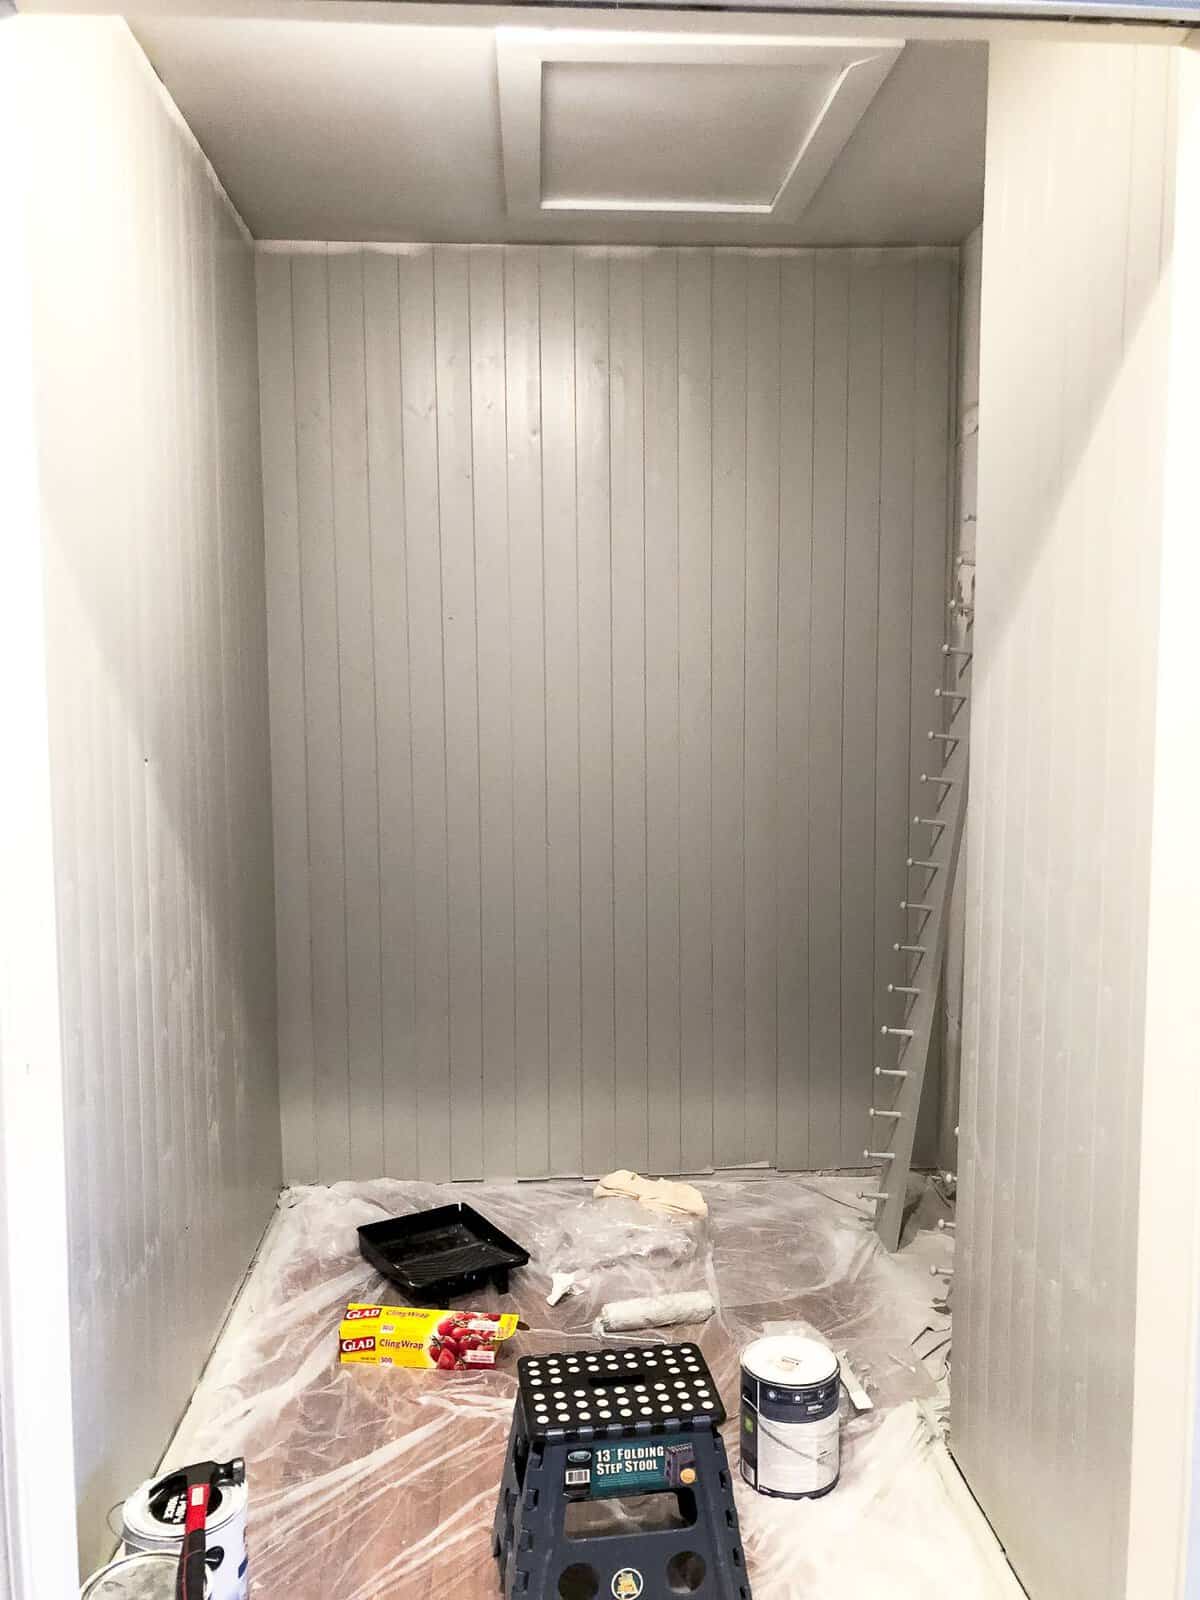
Then I left it that way for three days. Let’s just say, flat boards are easier to install than bent ones. 😉
Small Mudroom Reveal!
After installing the paneling, I:
- Made my own peg rack (Tutorial in this post!)
- Repaired the floor from removing the bench and cubbies
- Painted (Custom color mixed at Home Depot: Base 7754, CLRNT 0ZZ384th, BL 328, LL360, TL180)
- Added new lighting with the help of my hubby
- Built an IKEA hack “built-in” (Tutorial in this post!)
- Trimmed out the floor and ceiling trim
- Decorated (The best part)
And, two weeks later, it was done!
Ahem…I mean, seriously, I worked on it solo everyday for two weeks straight. But, it’s done! I never said DIY projects were easy or effortless. But they ARE DOABLE!
The custom quote for a cabinet was $2,600. And that didn’t include cost for everything else in the room!
I gutted and remodeled the entire room, DIY style, for under $1,000 (including the built in that does the exact same job that the custom one would have done).
There are definitely times to hire out projects. I’ve done it before and I’ll do it again! But this time, I’m pretty happy with my DIY version.
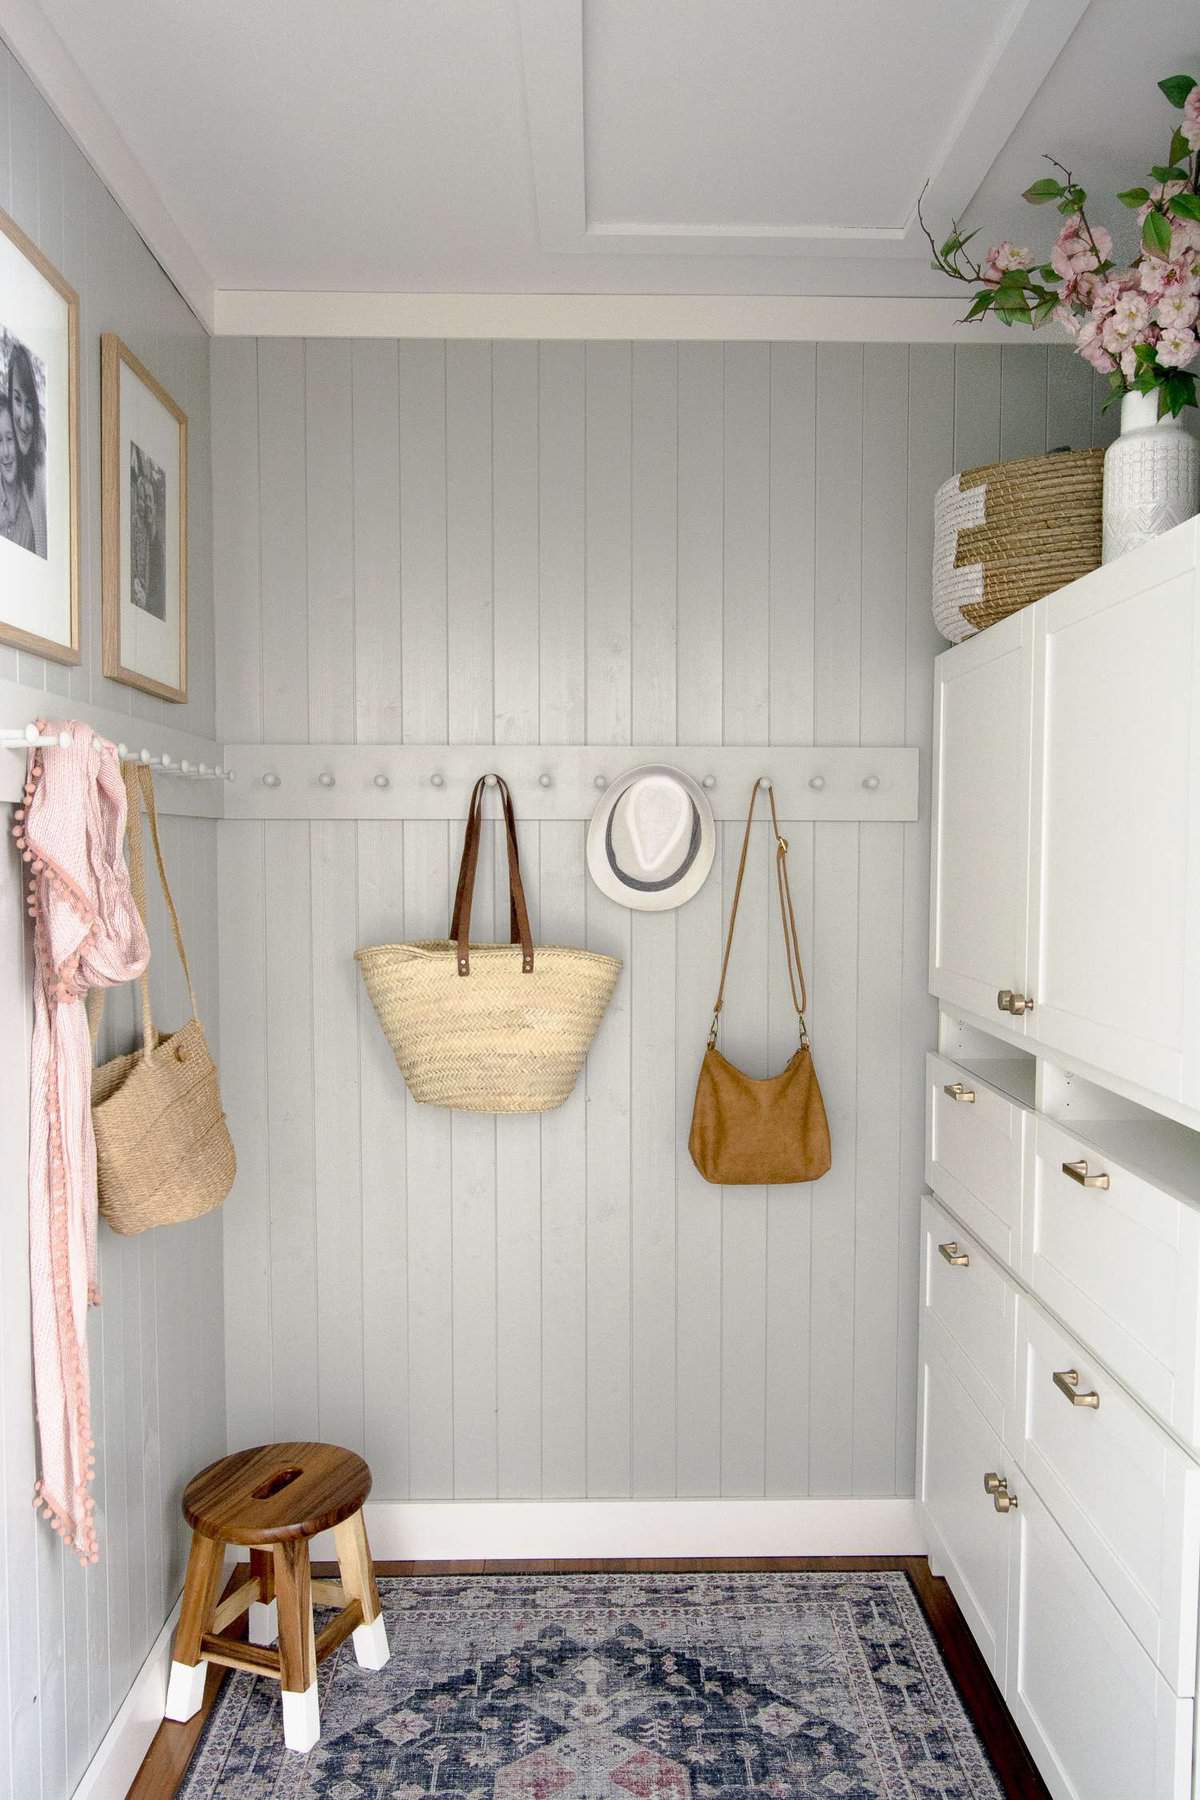
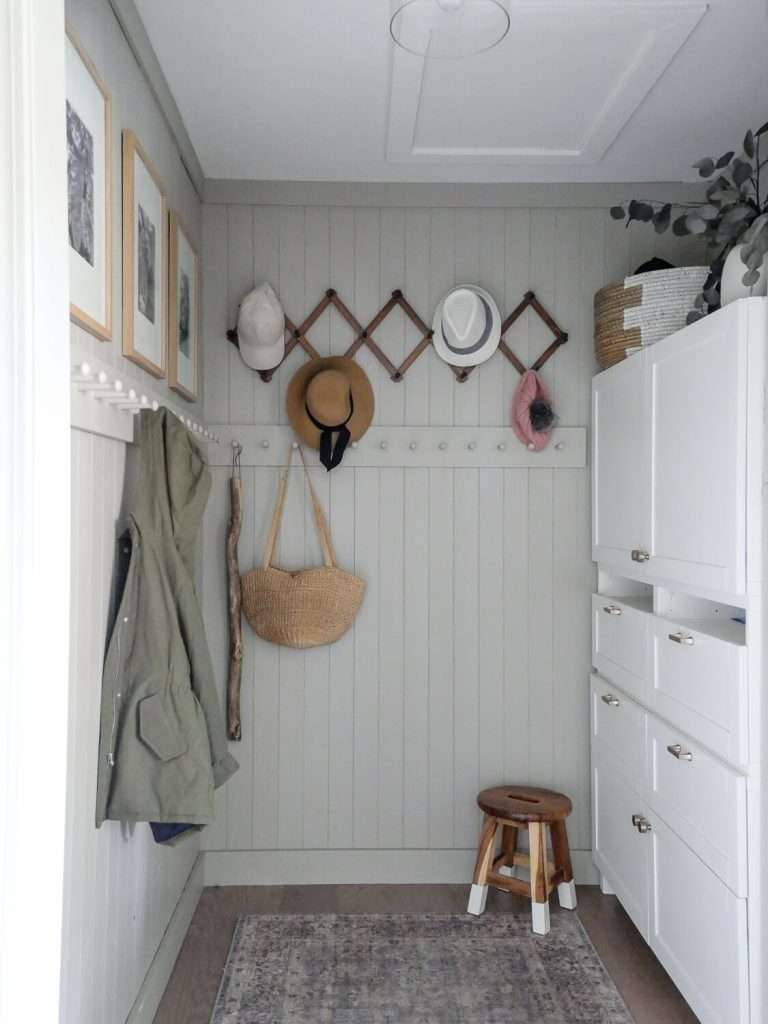
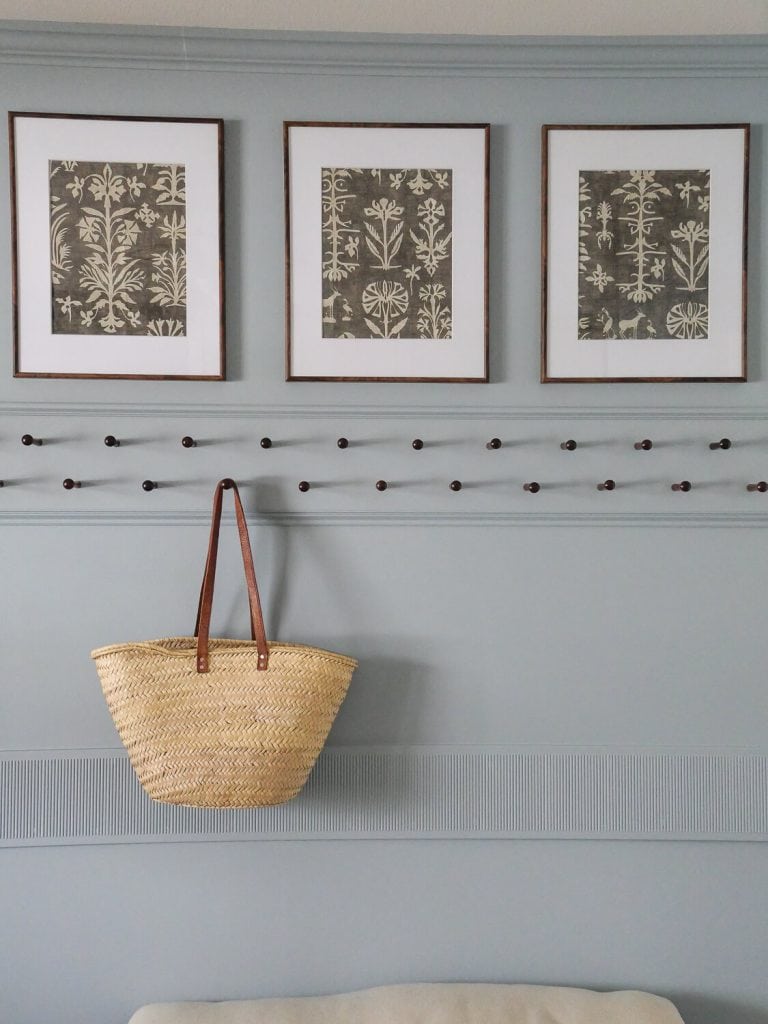
DIY Peg Rack
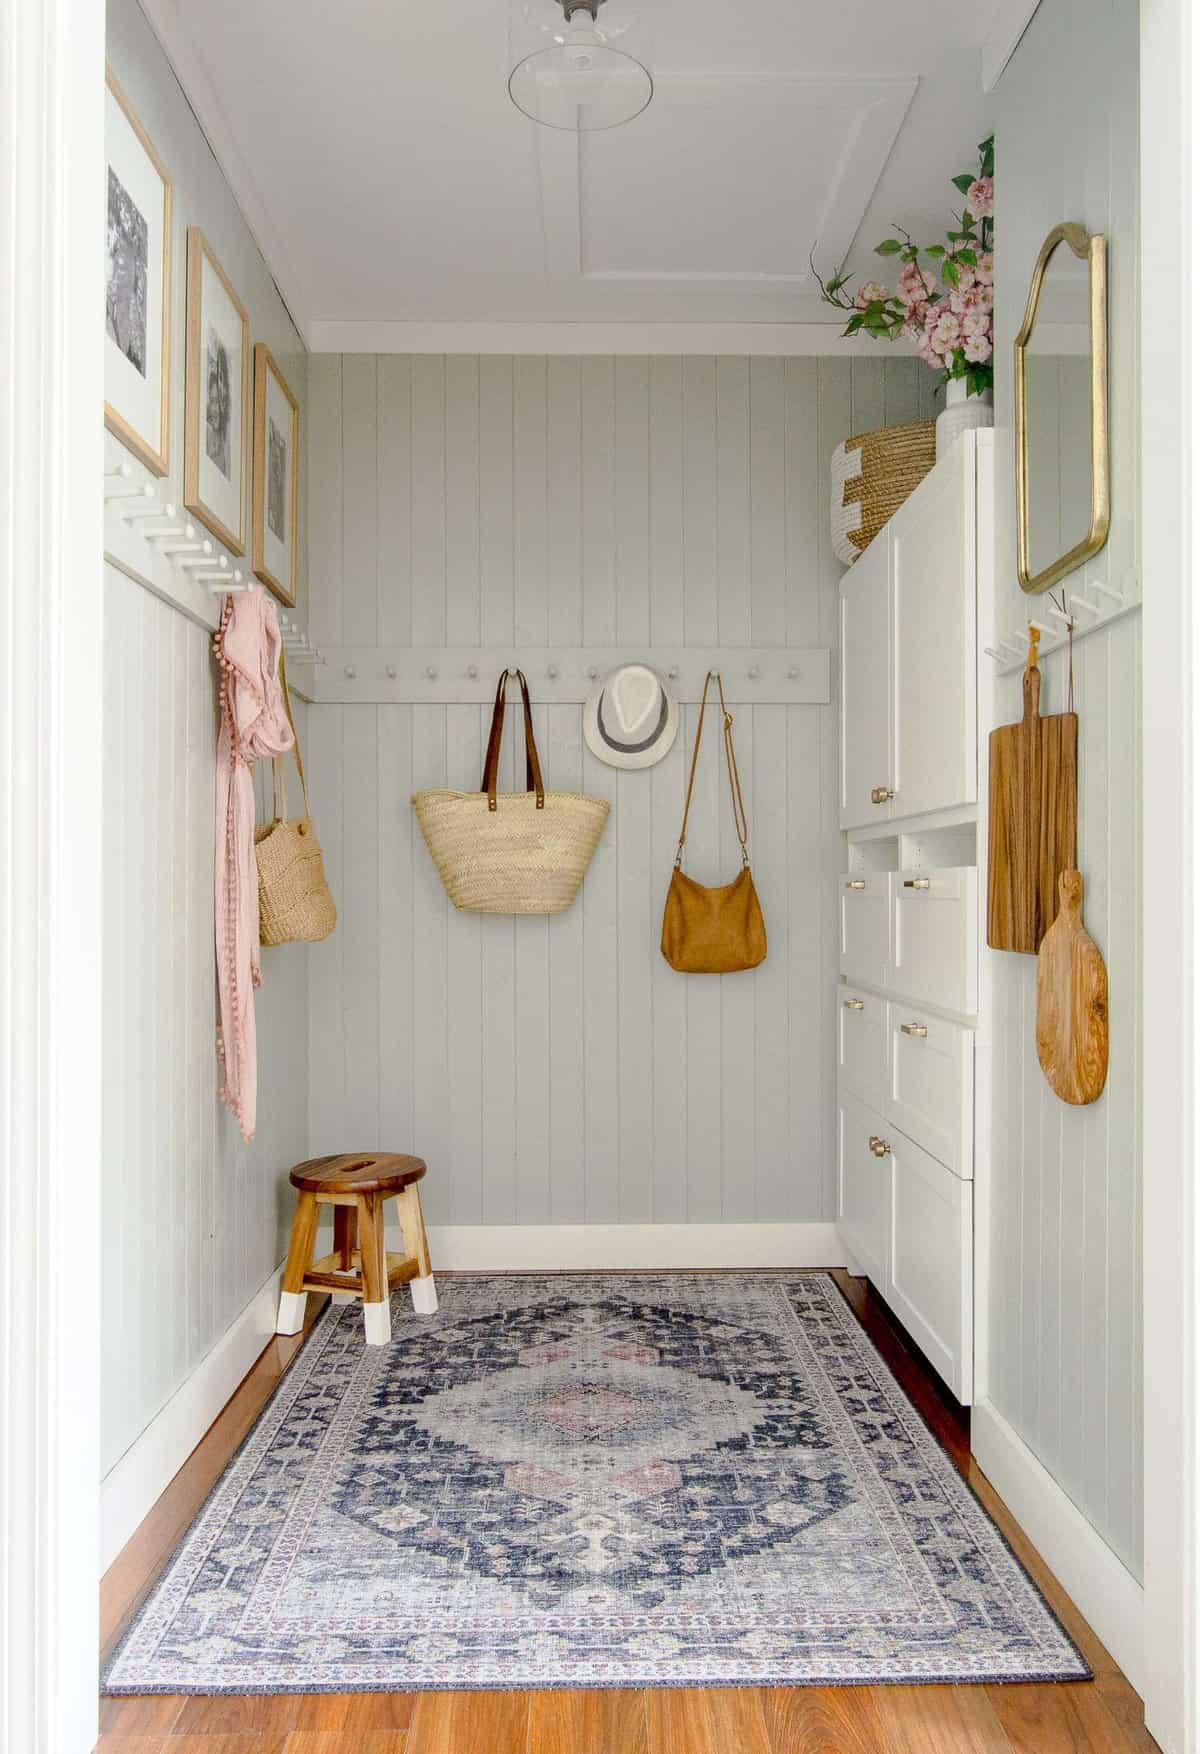
I couldn’t help but style it for winter and spring for this post. I am so excited for spring!

I placed my DIY peg rail at about 5 feet off the ground.
Since that is a little too high for my daughter to reach, I gave her a small section of purchased peg rack placed lower.
I simply painted it to match the rest of the room. By next summer I’m sure she will be able to reach the higher rack, so this will be a sweet little spot for gardening tools!
I shared how I made the 130″ of peg rack in this post!
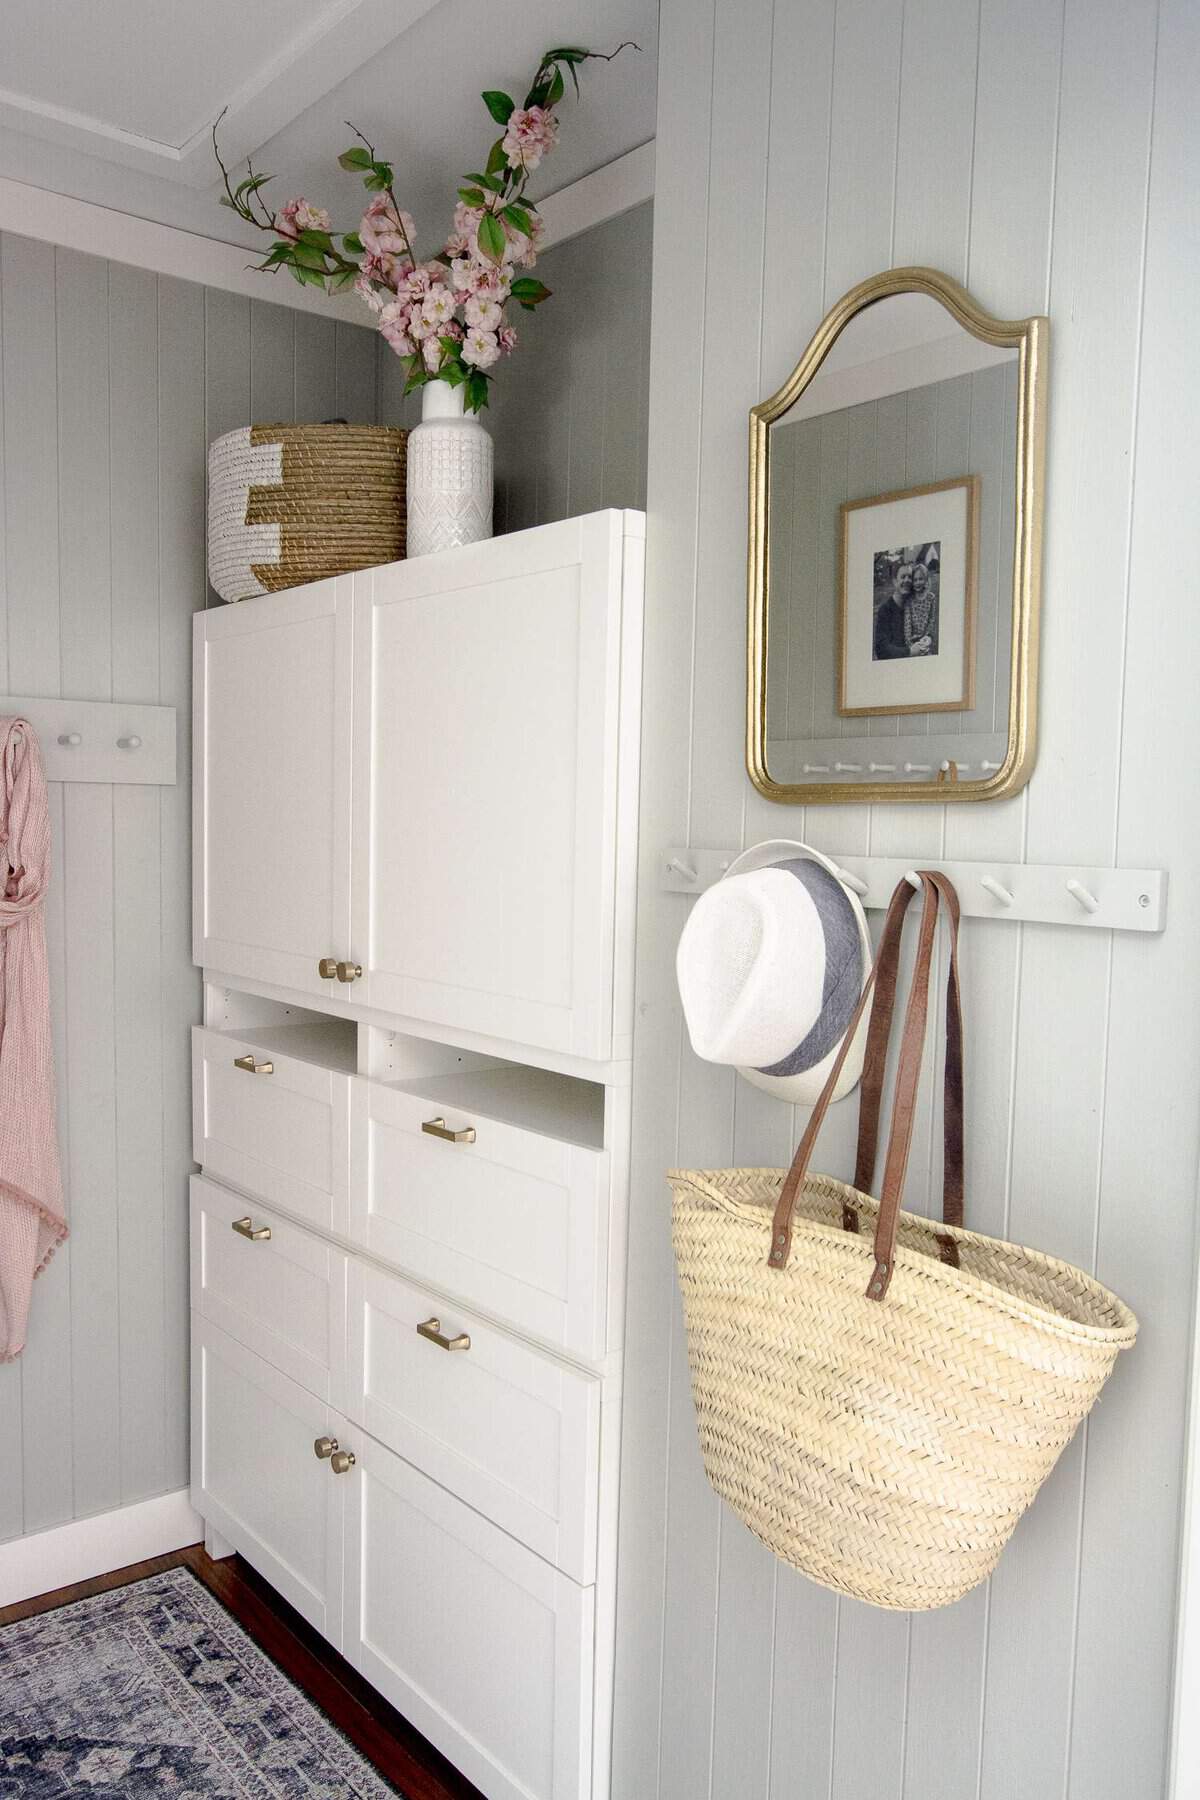
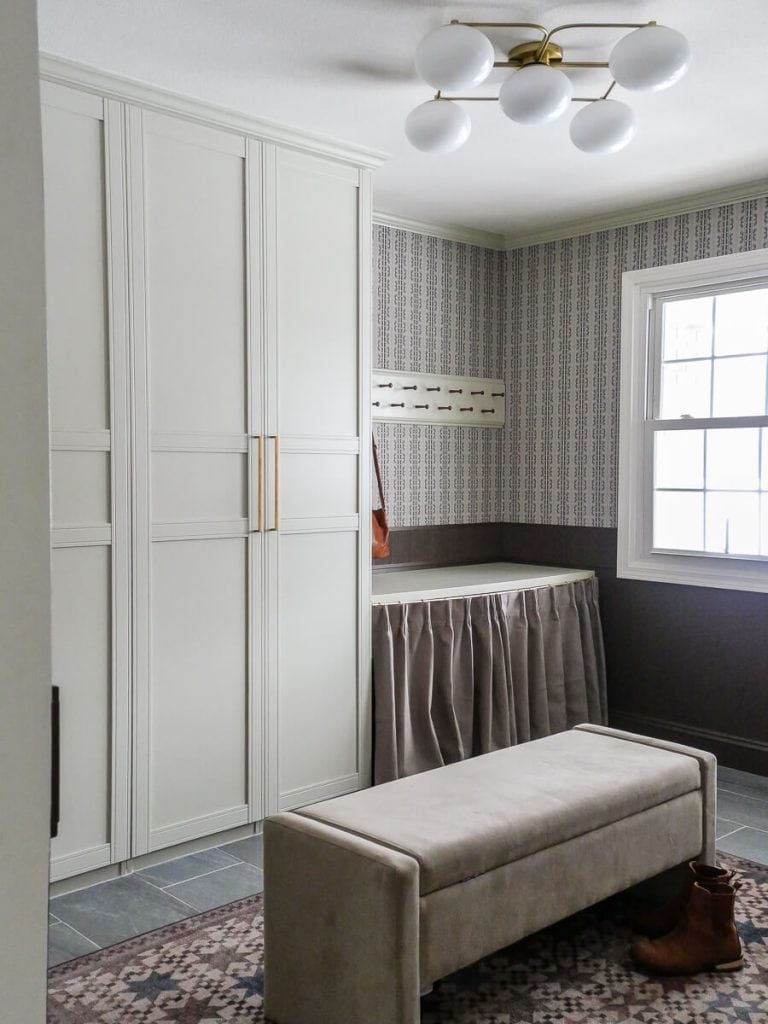
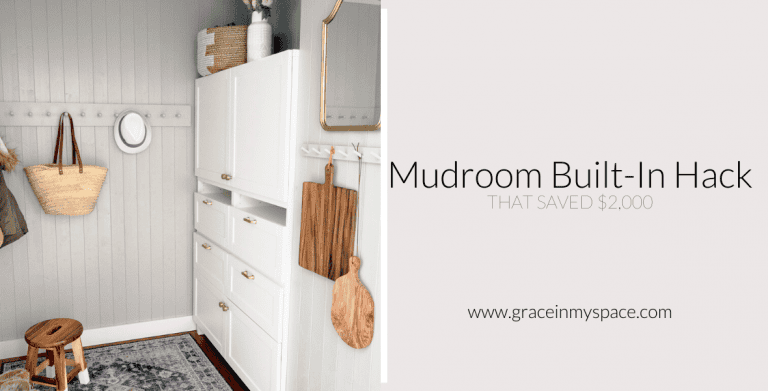
Faux Ikea Hack Built In
Next to her little section, I added the “built-in”.
I give that quotes because it isn’t actually built in. There is a slight gap on the farthest wall. I was so blessed to find a conglomeration of Ikea pieces to fit together in this shallow space.
This cupboard gives us all the hidden storage that the previous cubbies and shelves did not. I added these beautiful brass pulls and knobs that really pop against the white!
I shared more details on how I built this piece in this post.
Mudroom Features
One special feature I added, that you can’t actually see in a photo, is the motion sensor light bulbs!!
When the previous owners built this house, they added the mudroom light switch onto the same circuit as the hallway.
Which means, we have to come into the house, close the entry door, and turn backward from the mudroom to turn the light on. While this is certainly not the end of the world, it made it extremely difficult to come in with an armful in the dark.
So, I added motion sensor bulbs and they have been working perfectly!
No more fumbling for the switch in an already congested area!
They have to be installed with a fixture that is not enclosed for the sensor to work. I chose this flush mount and they work perfectly together.
They turn off on their own within 90 seconds of no motion so they will also be an economical solution!
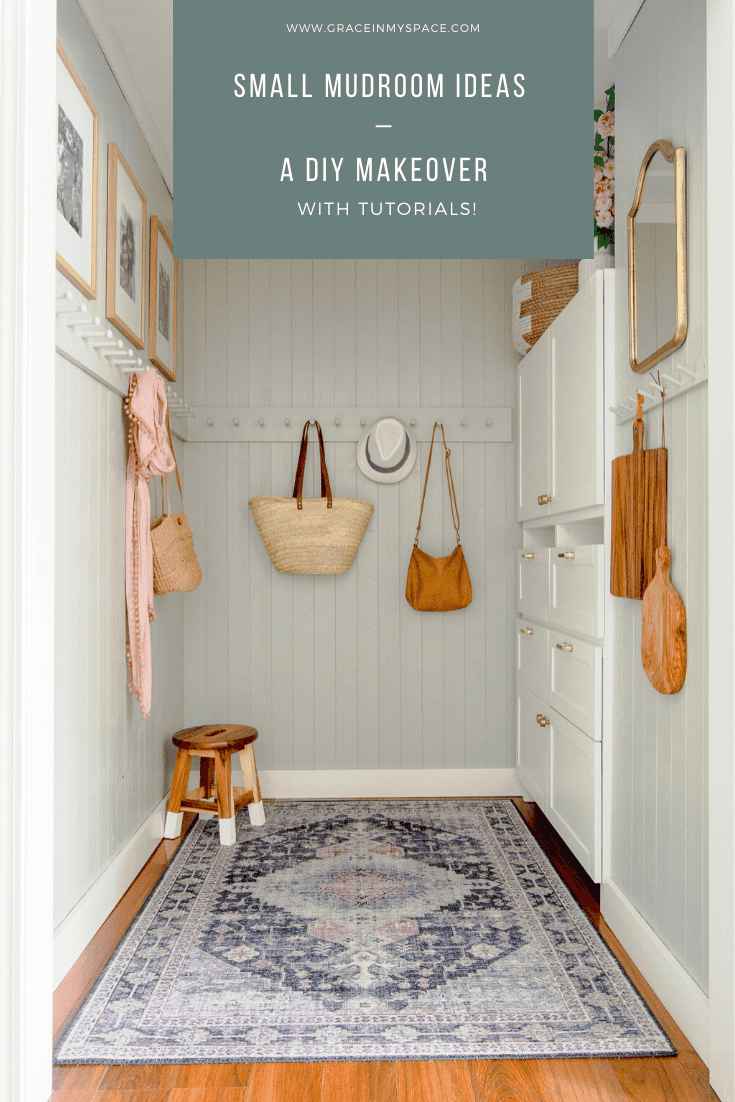
How to Decorate a Small Mudroom
Next, I added decor!
The finishing touches were to personalize the space and make it feel cozy.
I wanted to add some family photos since this is the first thing we see when we leave each morning. It’s a lovely way to start the day!
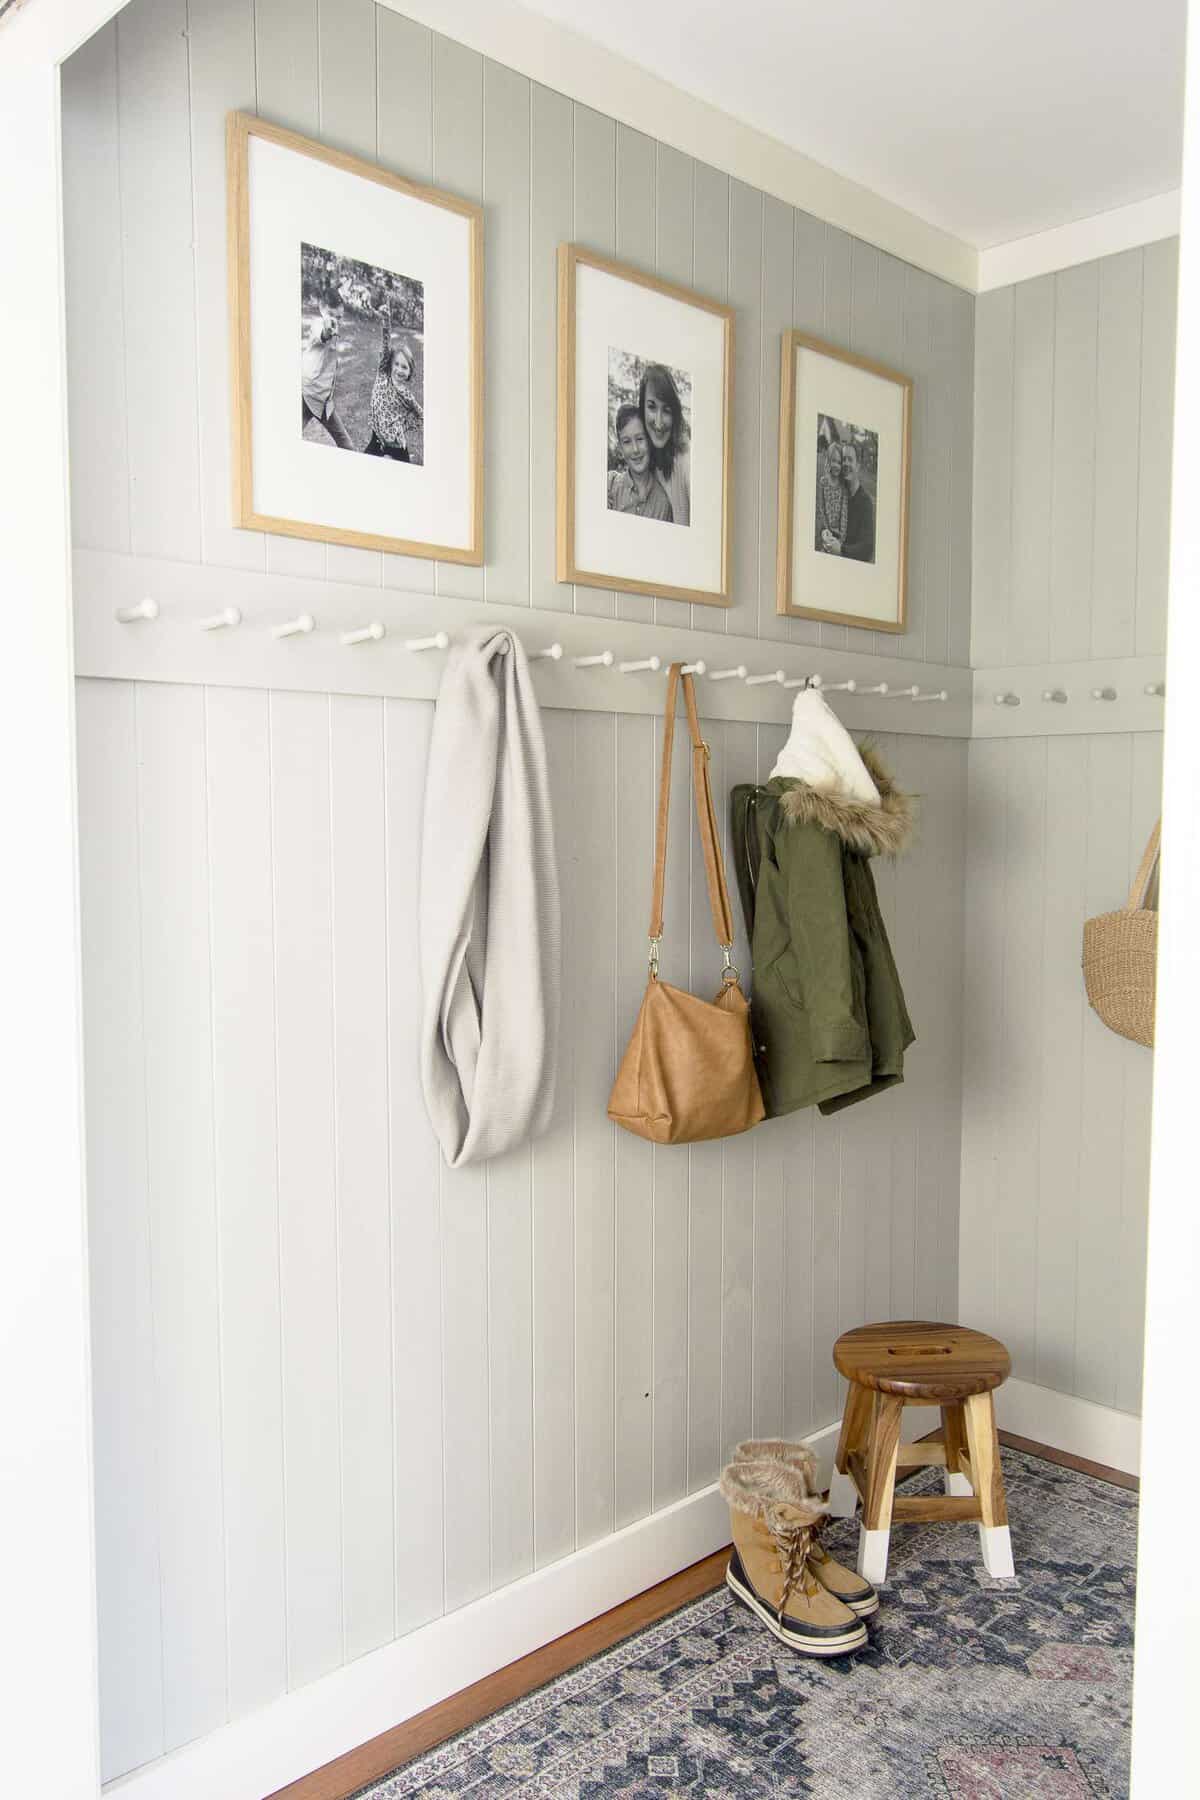
I used these frames with an oversized mat to make them feel more high end.
The rug is the show stopper though! Now, I just need to make sure it can hold up to Michigan winters and country living.
I added this cutie dipped-leg stool from Home Goods to make it easier to put shoes on. You can find similar ones here or make your own with an affordable stool!
Above the built in, I added a cute vase with faux stems and another basket for extra storage.
SHOP THE LOOK
And I’m loving it! The pegs make it so much easier to hang coats up rather than cramming them into small cubbies. And the drawers and cupboards are perfect for small mudroom storage.
It is a much better use of space for a small mudroom to have the entire 4 foot wide room open for standing, with the built in section for storage. Plus, it’s super cute now!
This room is completely open to the entire house and goes with my aesthetic much better than the previous mudroom did.
Want to see how it looks a year later? See the changes I made to the mudroom in this post.
Stay Connected
So, what do you think of these small mudroom ideas that don’t involve mudroom cubbies!? I know that is the number 1 desire of most families, but it didn’t work for ours. And that’s all part of making my OWN haven.
My biggest hope from sharing all the behind the scenes on projects like these is that you walk away saying, “I could totally do that too.” Because YOU CAN!
It just takes believing in yourself to take that first step, learning from failure instead of letting it overcome you, and lots of practice to be, not fearless in DIY, but able to do it through the intimidation and fear.
I hope that you have an adventure creating a haven in your home!
Thanks so much for stopping by the blog today. Check out how I’ve designed our current home’s mudroom in the articles below!
Make sure to subscribe to get my Grace Notes directly to your inbox and to access all my insider perks. You can also follow along daily on Instagram and weekly on YouTube!
~Sarah
More Mudroom Design Ideas

i really loved this post! we’ve been struggling with our tiny entryway for months and honestly felt stuck because we don’t have room for those big mudroom lockers you see everywhere. the idea of doing a diy peg rack instead is genius – it’s so much more manageable for a small space and honestly looks way more charming than a generic cubby system. i’m especially excited about the tongue and groove pine idea – it adds so much character without being overwhelming. we’re definitely going to try the ike hack too since we’ve been looking for ways to maximize our limited square footage. thanks for breaking this down into doable ideas rather than making it feel like we need a whole renovation team. can’t wait to see how our little entryway transforms!
Beautiful! Could we get the link for the rug please? Love it
These mudroom tips are so helpful for organization! I love how you think about layout and space. As someone who enjoys designing spaces in sandbox games like Hytale Game, I find real-life DIY projects very inspiring for my digital creations too. It’s a great way to bring some of that creative energy from games into the real world. Thanks for the inspiration!
I know this is an old post, but do you remember what size planks you used for the tongue and groove paneling? The link no longer works. Thanks!
How is this holding up? Seems like you’d need more stools for putting on shoes? How did it work in the winter? Do you have trays to hold wet snowy boots?
Held up fantastic! We didn’t have more space for additional stools so we made do with one. Our wet boots stayed in the garage.
This mudroom is to die for!!! I am obsessed with how it turned out. Officially adding it to our list of home project to-dos. We are doing some kitchen cabinet refinishing this next week which I am so excited for, but this is totally next on our list. Thank you for sharing your beautiful home!
this looks great, can you tell me the dimensions of the floor, thanks.
Love your peg rack- what height peg did you use 2 1/2” or 3. 1/2”?
A 3.5!
Wow what a great DIY! What color are the walls? Some photos look like a gray and some look like a light green, I love it.. please share!
They are actually a custom color! I mixed it with colors I had on hand.
Sarah, I love what you did. I am a “Shiplap Junkie” so I am definitely “crushing” on the walls. It gives me so many ideas. Both for my coat closet in the foyer and my walk-in master closet. Thanks for taking the time to post such a “great” project. ?
My pleasure! So glad you liked it!
I love it! I have Tongue and Groove in my kitchen and want to put it in my mud room and bathroom. Do you have a tutorial for how you did it? Or a tutorial you watched to help you?
I actually didn’t create a tutorial! But if you search YouTube there are lots of great tutorials on it!
?
Thank you, I will! Yours is very inspiring! ?
I love the locker less idea in mudrooms!!
Thank you sweet friend!
The after looks bright & airy which I love. But, the before was something I’d loved just as much. The separate cubbies & bench is a must for me with toddlers in the house. Thanks for sharing!
So glad you liked it both ways!
This space is AMAZING!!!! Such a wonderful and beautiful transformation. Look everything about it. Thank you for sharing. Take care and Happy Valentine’s Day.
Thank you so much Tracy!
Love everything about you mud room, willingness to try. Thanks for being a shining light! Loved your light fixture addition to the room.
Thank you Diane! I’m so happy you like it!