
How to Make DIY Reeded Chair Rail Moulding
Decorative chair rail moulding is an easy way to customize the look of a room. However, sometimes you can’t find exactly what you envision in your head. I converted our traditional dining room into a mudroom, and created my own DIY reeded chair rail moulding. Here is the simple tutorial to create your own reeded chair rail.
This post may contain affiliate links for your convenience.
Are Chair Rails Out of Style?
First, let’s answer a common question. Are chair rails out of style?
While design trends come and go, chair rails are still very much in style. However, if you are wanting to keep up with design trends, I would avoid the basic builder grade chair rail. Instead, create your own!

SHOP THE ROOM

Chair rails offer a huge variety of designs when you create your own customized chair rail. The combination of different mouldings can create limitless designs. One simple tweak can take a chair rail from modern or contemporary to traditional or ornate.
It all depends on how you combine and build out your design.
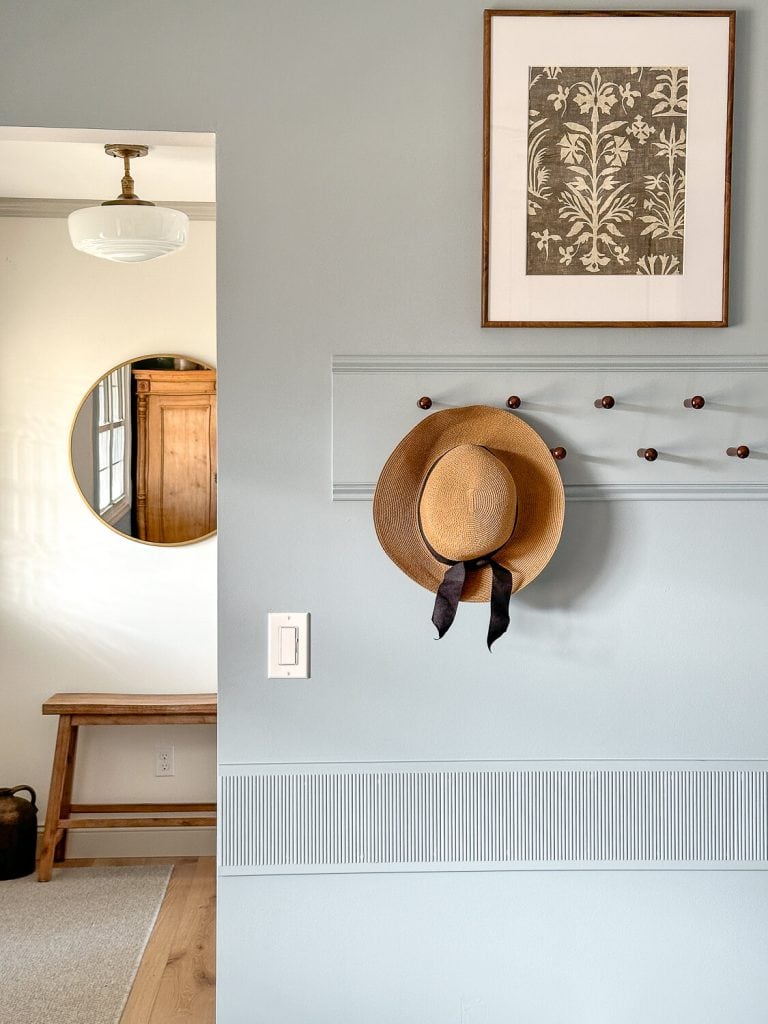
Reeded or fluted wall mouldings are very much in style as they offer a different look than traditional chair rail. Here’s how I created my own.
Reeded V. Fluted
One common misconception is the difference between reeded and fluted mouldings.
Reeded moulding offers convex grooves while fluted moulding offers concave grooves.
Another way to say this: reeded has hills, fluted has valleys. The are the exact opposite of each other, though they offer a similar appearance.
How to DIY Reeded Chair Rail
When we converted a traditional dining room into our mudroom, I wanted to use chair rail to jazz up the design.
Reeded chair rail was the vision I had in my head, but I was unable to find something substantial enough to feel modern rather than victorian.

Additionally, I wanted my reeding to run vertically rather than horizontally. I wanted to replicate the vertical look I have in my bathroom vanity to continue the same style throughout the house.
So I made my own!
Materials for Reeded Chair Rail
Here are the materials used in this project:
- Narrow reeded accent moulding also available at Home Depot and Wayfair
- Craftsman Shoe Moulding (measure X2 for top and bottom)
- Brad Nailer
- 120 grit Sandpaper
- Wood putty
- Paintable caulk
- Miter saw
- Primer & Paint of choice
- Tape measure
- Level
- Safety Glasses
Build Process
1. The first step is to measure the perimeter of your room. Then, decide if you will be installing your reeded chair rail as it comes (horizontally) or vertically. This will impact how much you have to order.
I chose to install vertically, with a 5″ height.
This reeded moulding comes in 5″ wide boards. So, when switching to a vertical installation, you will then have to measure how many 5″ wide pieces you need to cut to go around your entire room. Order based on this measurement, plus how tall each piece will be.

Cut your reeded moulding to the desired height and width on a miter saw, or similar.
2. Sand all of the edges smooth before installation.
3. Draw a plumb line onto your wall to ensure that your reeded chair rail stays level.
Using a brad nailer, install each cut piece to the wall with an X nailing pattern. Shoot one nail in angled out, then change angles to shoot the next angled in.

Doing this rather than shooting all nails straight in will provide more stability and eliminate the need for construction adhesive.
4. Once all of your reeded moulding is installed, cut your craftsman shoe moulding to length and nail in on top and on bottom of your reeded moulding.
5. Fill and sand smooth all nail holes with wood putty. Caulk all seams.

6. Prime and paint! (I painted prior to installation, but I think a better process would be to paint after.)

Congratulations, you’ve created your own custom reeded chair rail.
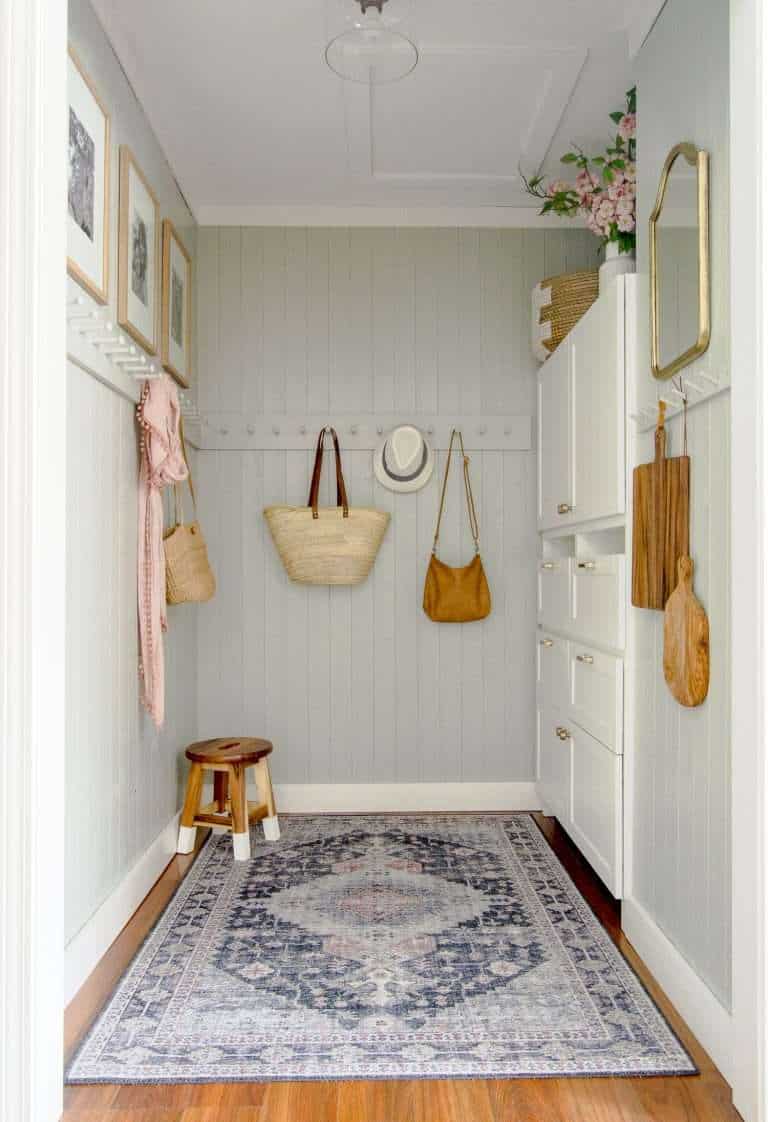
Also, you can make this custom peg rail (pictured above) yourself while you’re at it!
Video Tutorial
If you are a visual learner, you can see how I built my reeded chair rail in this mudroom makeover video.
Reeded Chair Rail Customizations
Since you are making a custom designed chair rail, you can truly customize this however you’d like.

Here are some options:
- Horizontal v. vertical reeding
- Double stack horizontal reeded moulding for a 10″ thick chair rail
- Rip the reeded moulding in half for a much thinner chair rail
- With or without the craftsman shoe moulding caps
- Use different moulding caps for top and bottom to dress up and make the moulding more ornate. Just ensure that the depth is the same as your reeded moulding so it doesn’t hang over. Some options:
- Alternate same width cuts of horizontal and vertical reeded moulding. This would create a fun pattern!
If you want less “building” and more installing, consider this pre-made option for reeded chair rail. It’s much less substantial than my version, but a similar beginner friendly option!
What other customizations would you consider?
Things I Would Do Differently
At the end of this process I really just wanted to be done. We’ve all been there.
I wish I would have taken the time to sand my nail holes more thoroughly.
Some of the holes were overfilled and not sanded flush with the rounded edge of the reeding. And you can tell. It was very hard to get into those grooves.
Alternatively, another way I’ve filled tricky nail holes in the past is by dabbing a small bit of caulk into the hole, then wiping clean with a wet wipe.
This isn’t the traditional method of filling nail holes because it can sink and be visible. However, for ease of the finishing stage, I think I’d rather have slightly sunken holes than overfilled and hard to sand holes.
I’d recommend testing a few options on your reeded moulding to see which option will work better for you. Because there are A LOT of nail holes to fill in this project.
Other Wall Moulding Ideas
If you’re looking for other ways to create a custom look with wall moulding, check out these fan-fave tutorials from past projects.
- How to Install Modern Board and Batten
- How to Install Wainscoting
- Simple Modern Box Moulding Tutorial
- How to Install Shiplap
Grab Your Free Guides
Thanks so much for stopping by the blog today! I hope this tutorial on how to build a DIY reeded chair rail was helpful to you!
Make sure to subscribe to get my Grace Notes directly to your inbox and to access all my insider perks. You can also follow along daily on Instagram and weekly on YouTube!
~Sarah


Your blog is a constant source of motivation for me.