
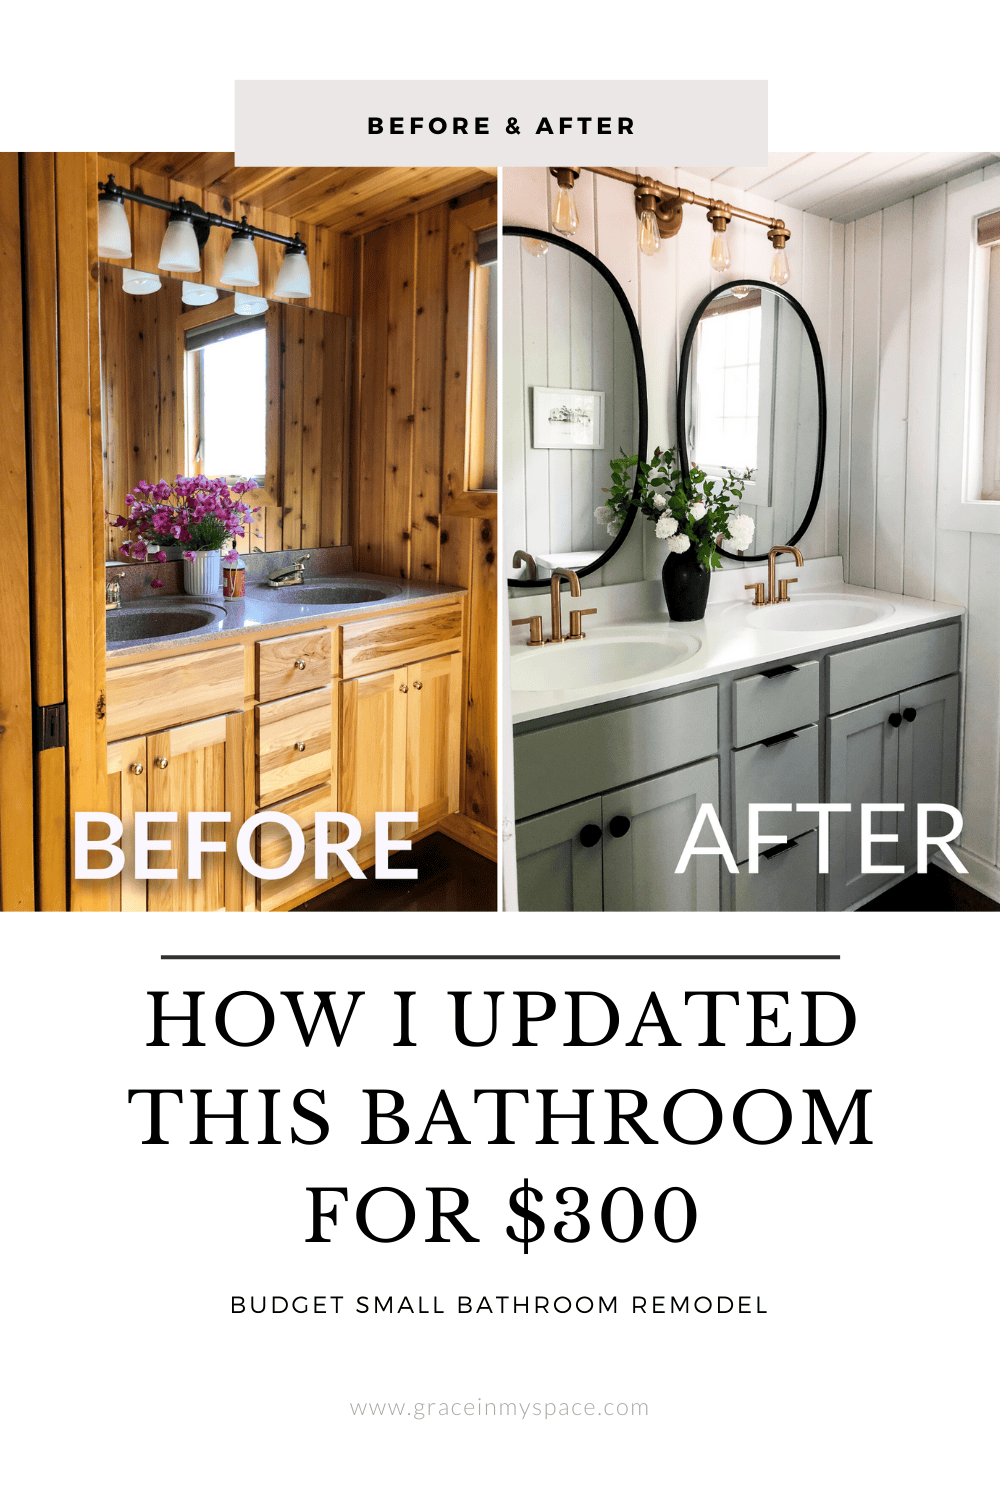
Budget Small Bathroom Remodel for $300
Do you have an outdated bathroom that could use some love? Our guest house remodel has been a large project, but the bathroom transformation is easily the most impressive part of the project so far! Learn how to complete a budget small bathroom remodel with creativity! Here are five budget friendly ways to update a small bathroom affordably.
One Room Challenge Week 5
If you’ve missed our guest house remodel project, make sure to catch up on the previous posts! I’m participating in the One Room Challenge and we’ve made a lot of progress so far! Make sure to check out the other designers participating in the challenge here.

- Week 1: Before photos. How it all started.
- Week 2: Design Plans
- Week 3: Mantel Update
- Week 4: How to Hide a Mini Split
Budget Small Bathroom Makeover
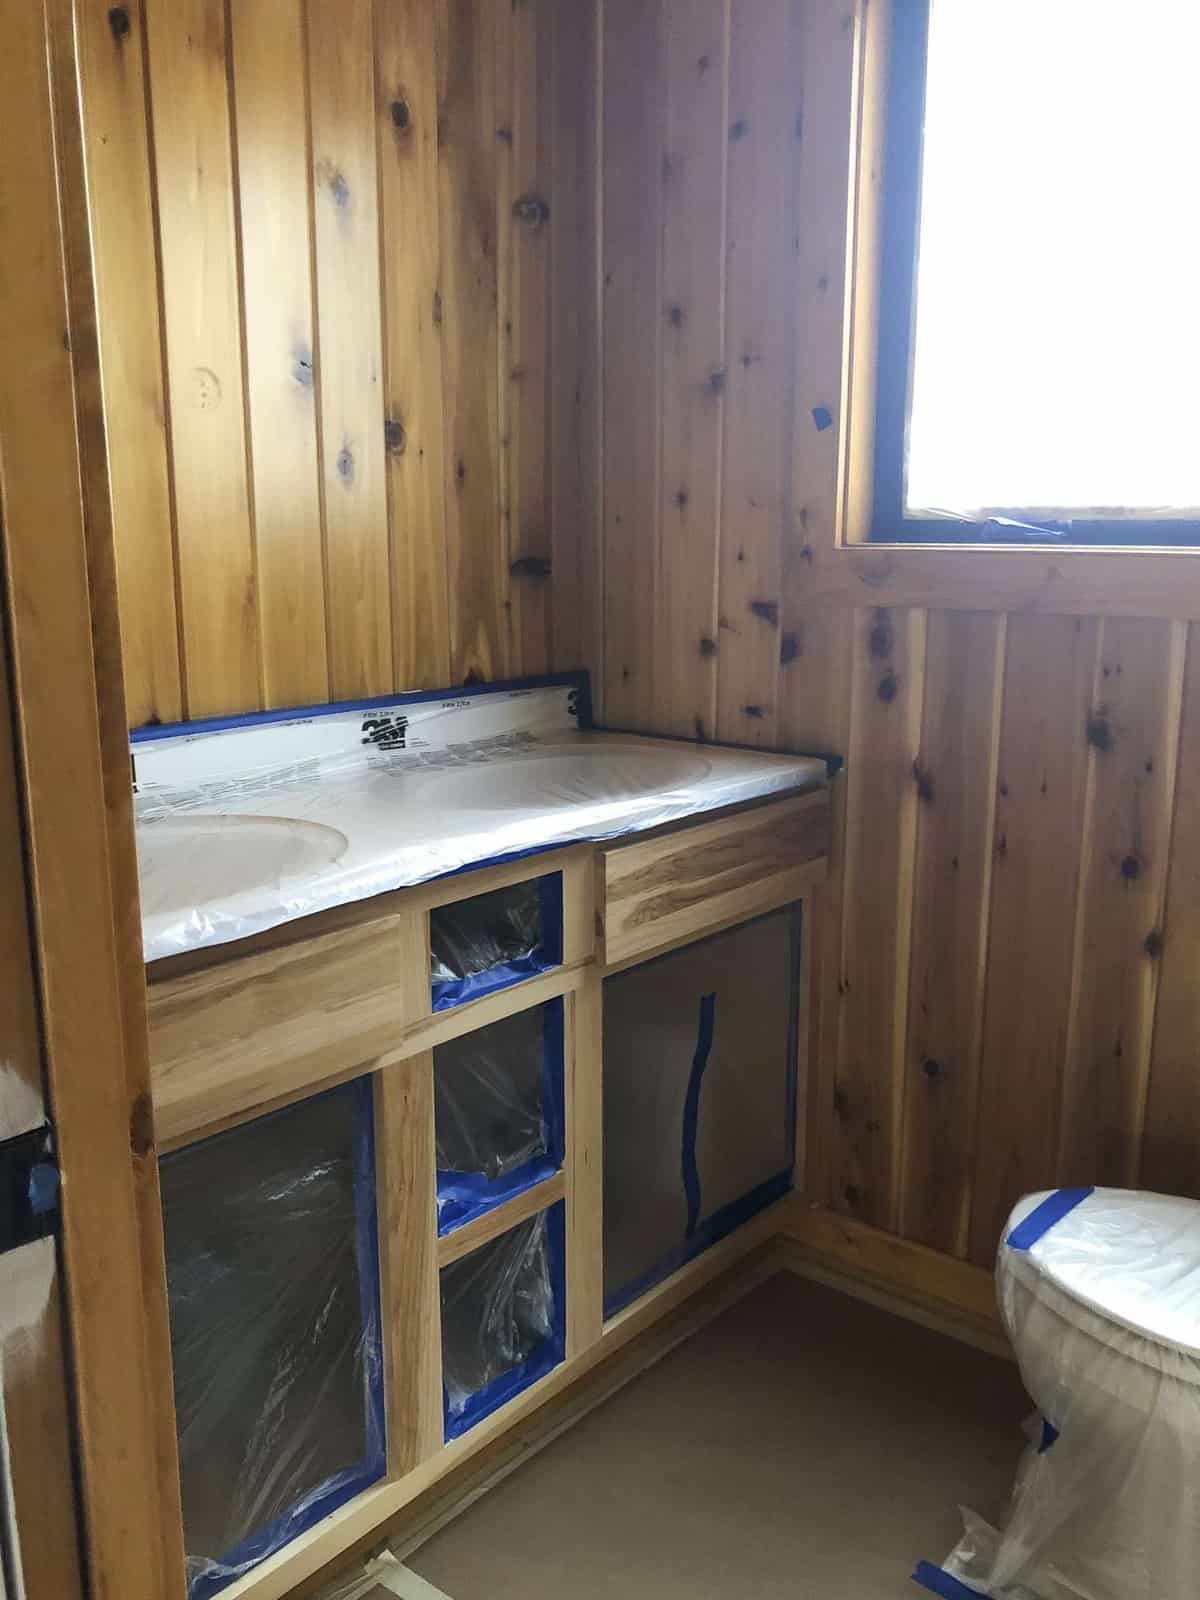
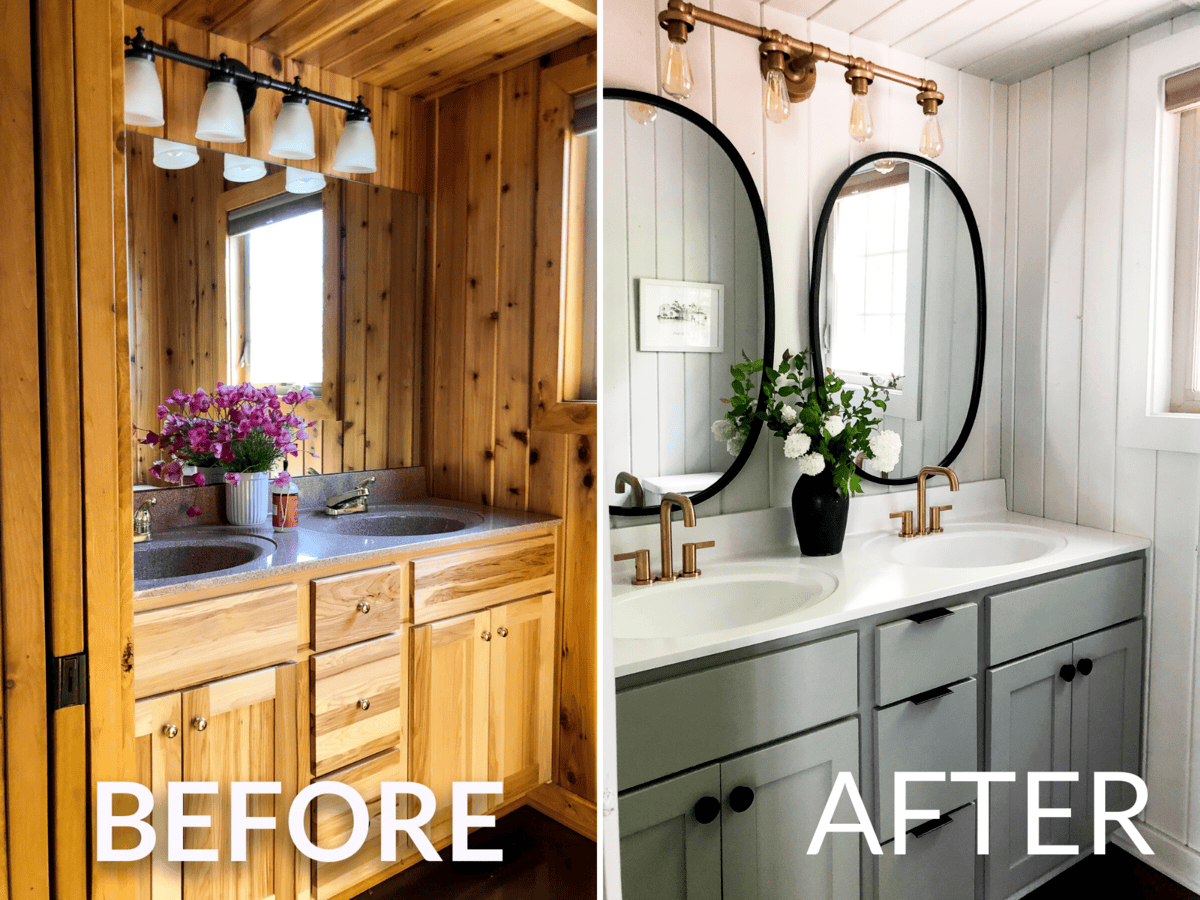
Let’s take a look at our guest house bathroom before I started the makeover. It’s always good to be reminded of where we’ve started and how far we’ve come!
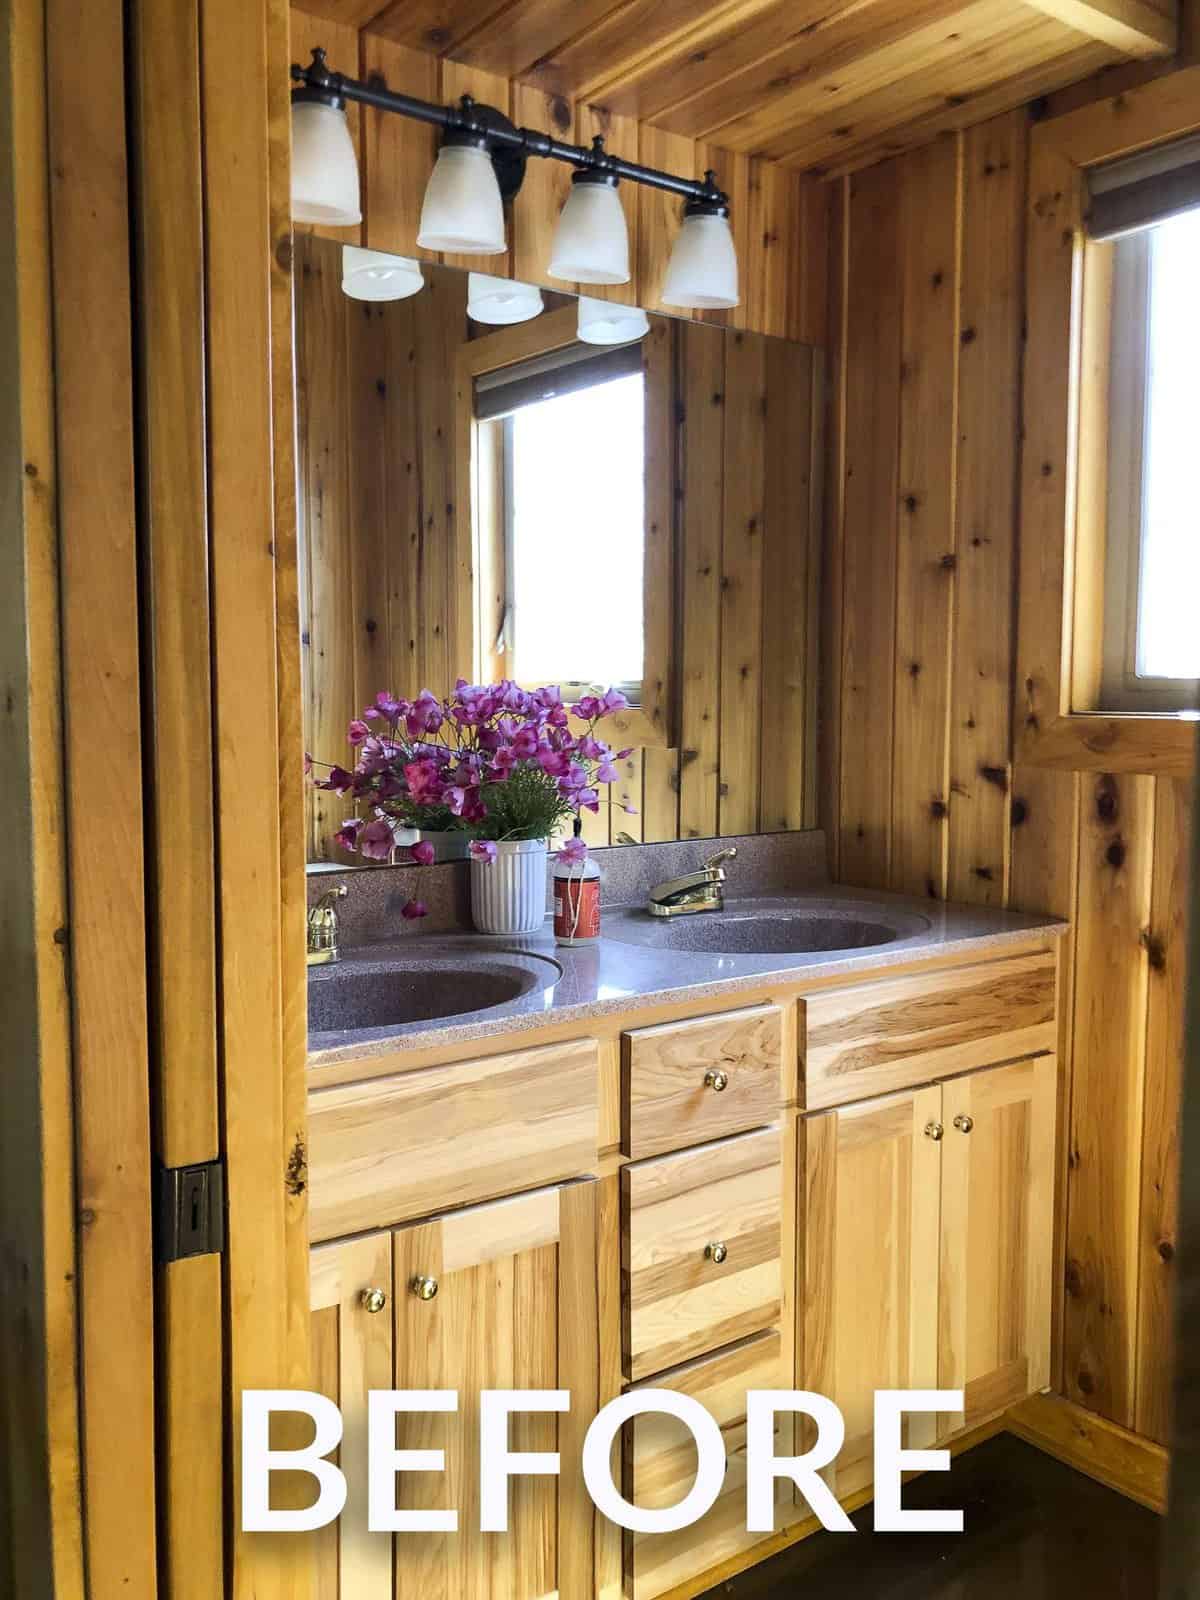
The all encompassing knotty pine made it feel like a dungeon! Plus, those fancy pink countertops were not my favorite. So let’s break down all of the updates I made during this budget friendly bathroom remodel.
- Update Walls
- Update Countertop
- Update Vanity
- Update Light Fixture
- Replace Hardware
- Replace Mirror
- Replace Faucets
You might look at that list and wonder how I did it all for $300! I love a good budget remodel.
DIY is a huge part of my blog and how we’ve been able to do so much to our home in such a small amount of time. If you can dream it, you can DIY it! Make sure to join my blogging community for members-only freebies like my must have DIY tool list download!
Budget Countertop Makeover
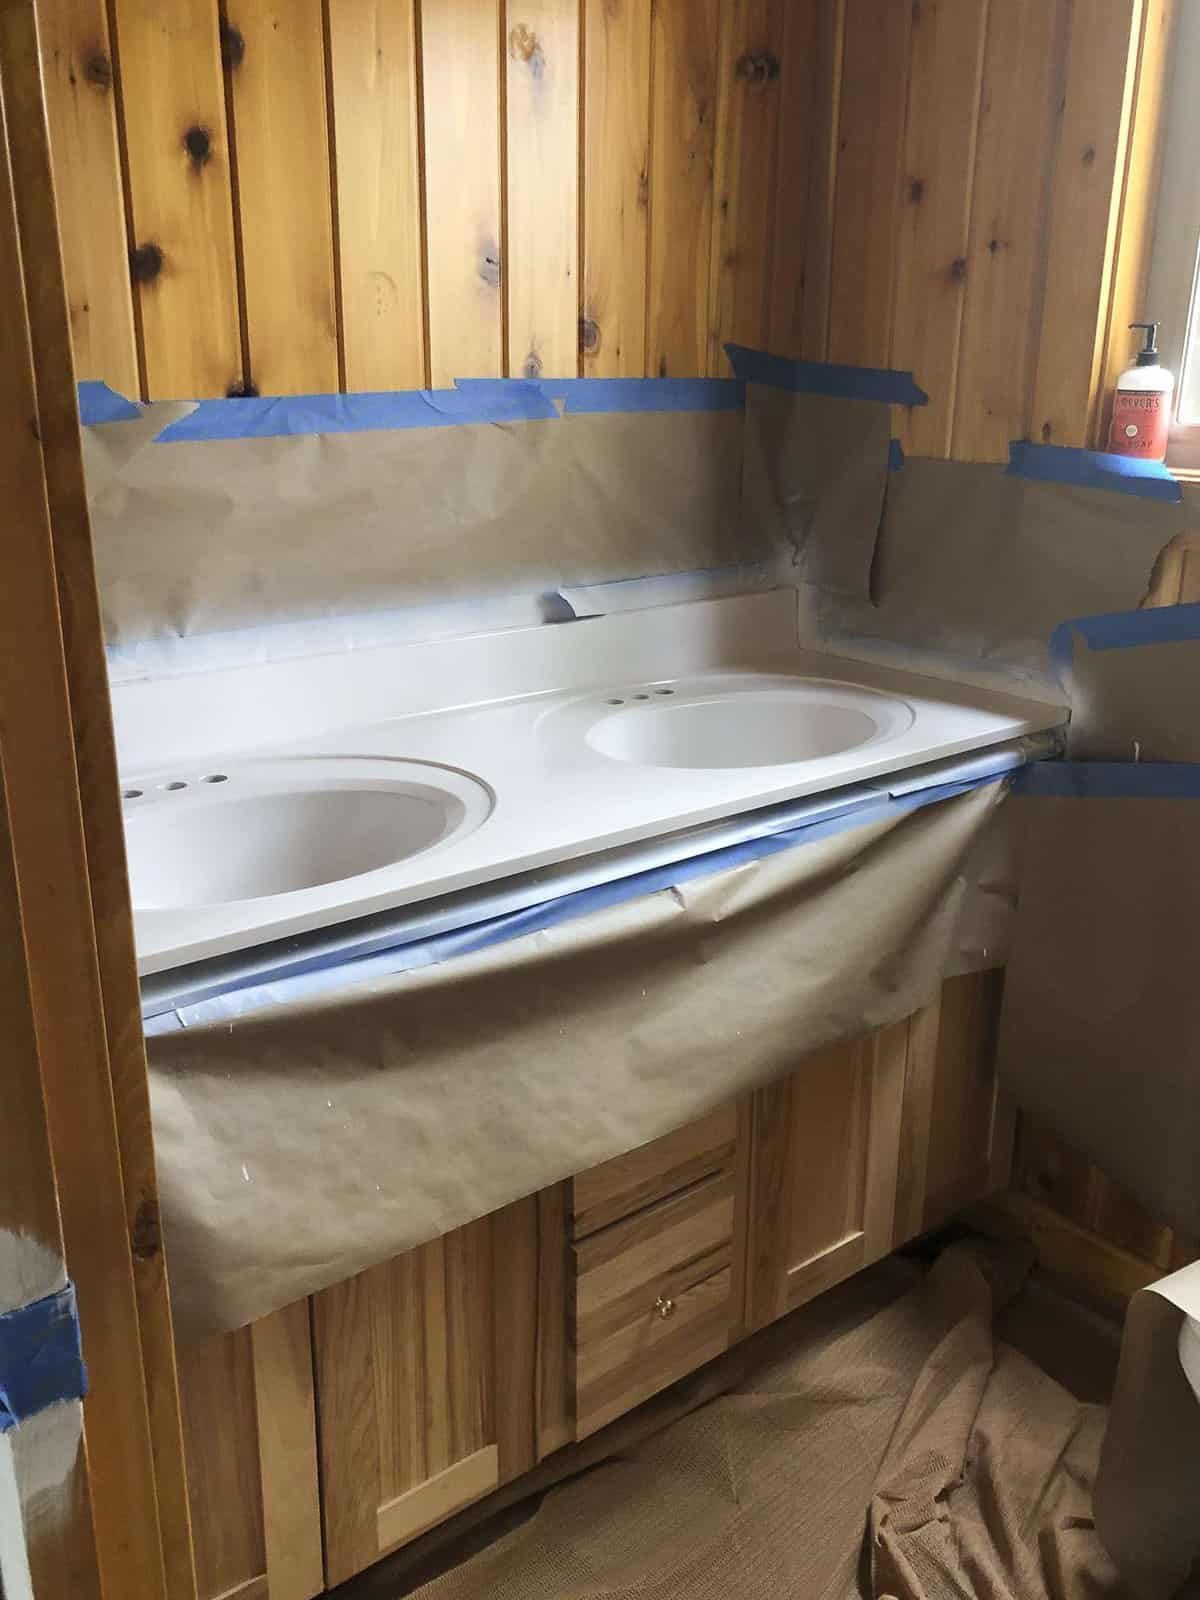
First, I decided to try my hand at updating the pink countertops rather than replacing them.
I used this appliance epoxy to spray the existing countertop and cannot believe the transformation! And, it only cost $4!
I shared this process on Instagram stories and many wanted a full tutorial. It really was very simple.
- Sand the countertop lightly. (Take care with softer countertops like marble as you don’t want to create sanding marks that will show later.)
- Clean the surface thoroughly
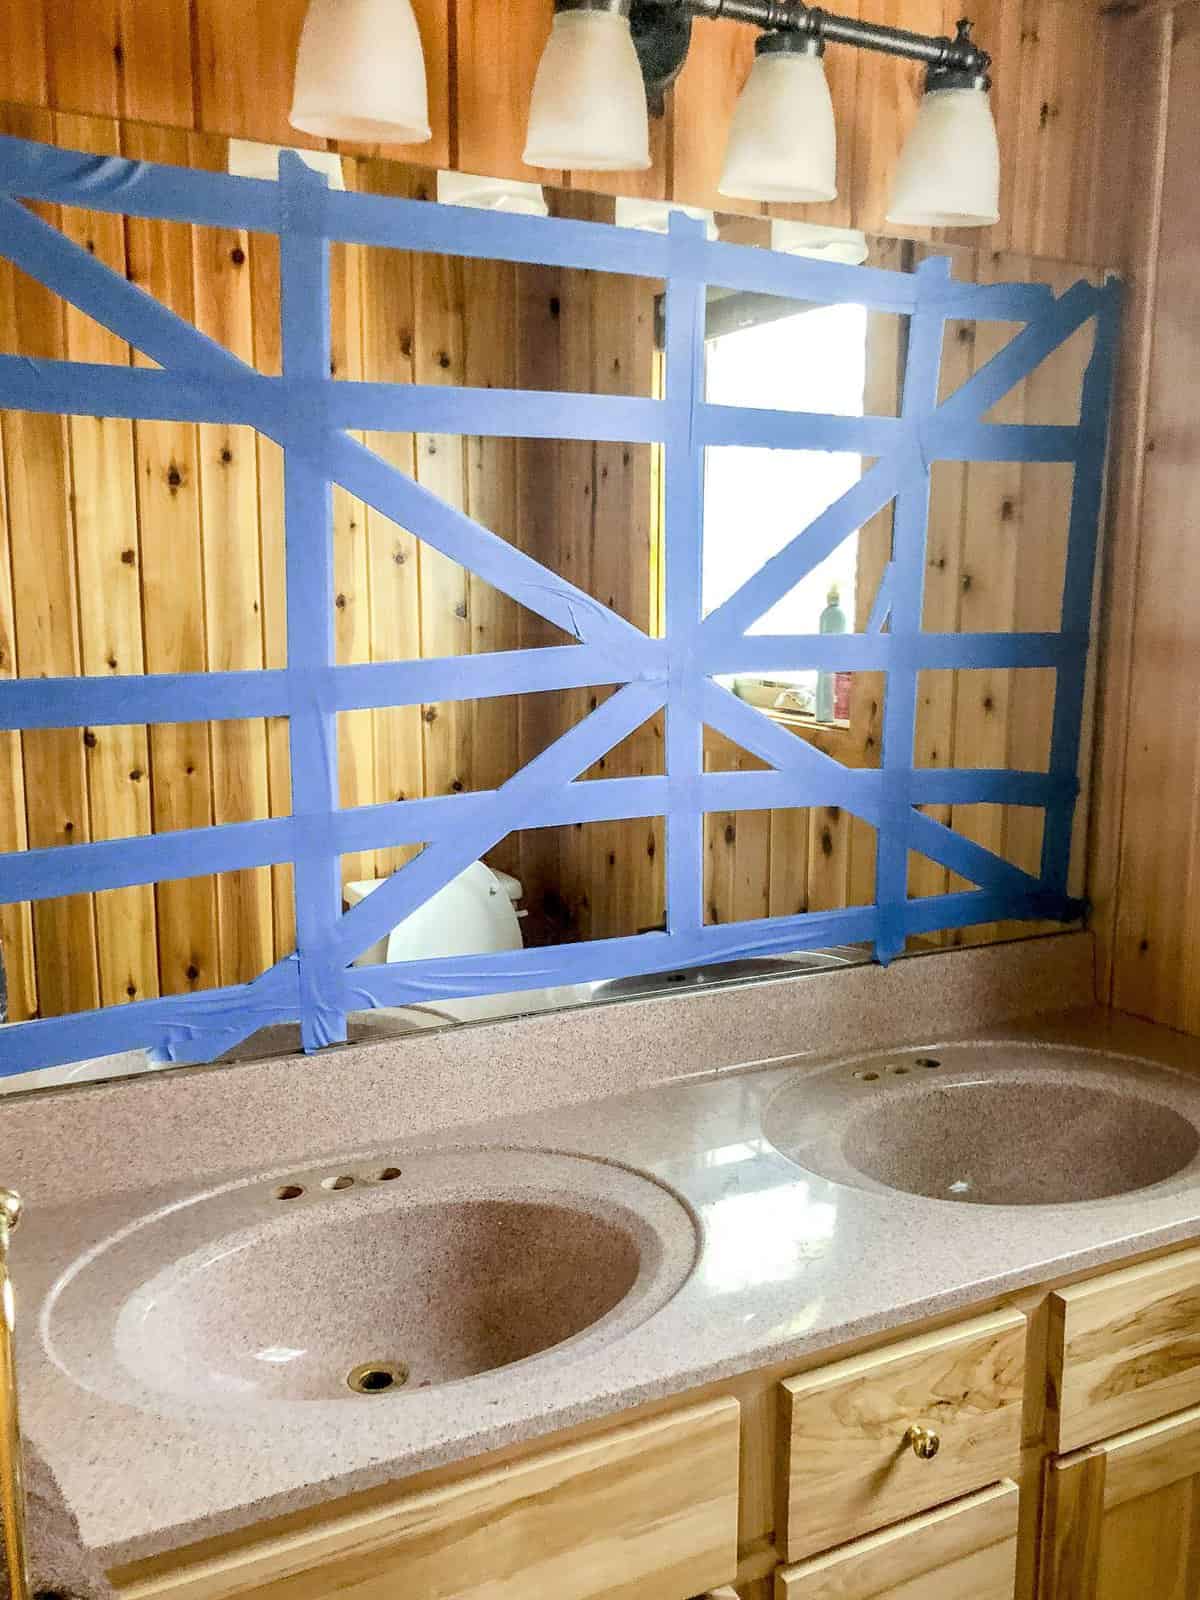
- Tape off surrounding areas. This epoxy went EVERYWHERE. So no surface should be left uncovered. If I did it again, I think I would try the roll on version to avoid the mess.
- Apply the appliance epoxy as directed.

That’s it!
Do I think it will last forever? No.
However, it was a $4 fix on a countertop that I hated anyway! So even if it hadn’t worked I wouldn’t be out anything other than $4 and a little knock to my ego. 😉
We have since used the sink many times and it has held up so far! I’ll update on the durability once we’ve lived with it longer.
UPDATE: See how this painted countertop has held up three years later!
Paint Fixes Everything
Paint really does fix everything. When our painter sprayed the main living space in the guest house I also had him spray the walls in the bathroom.
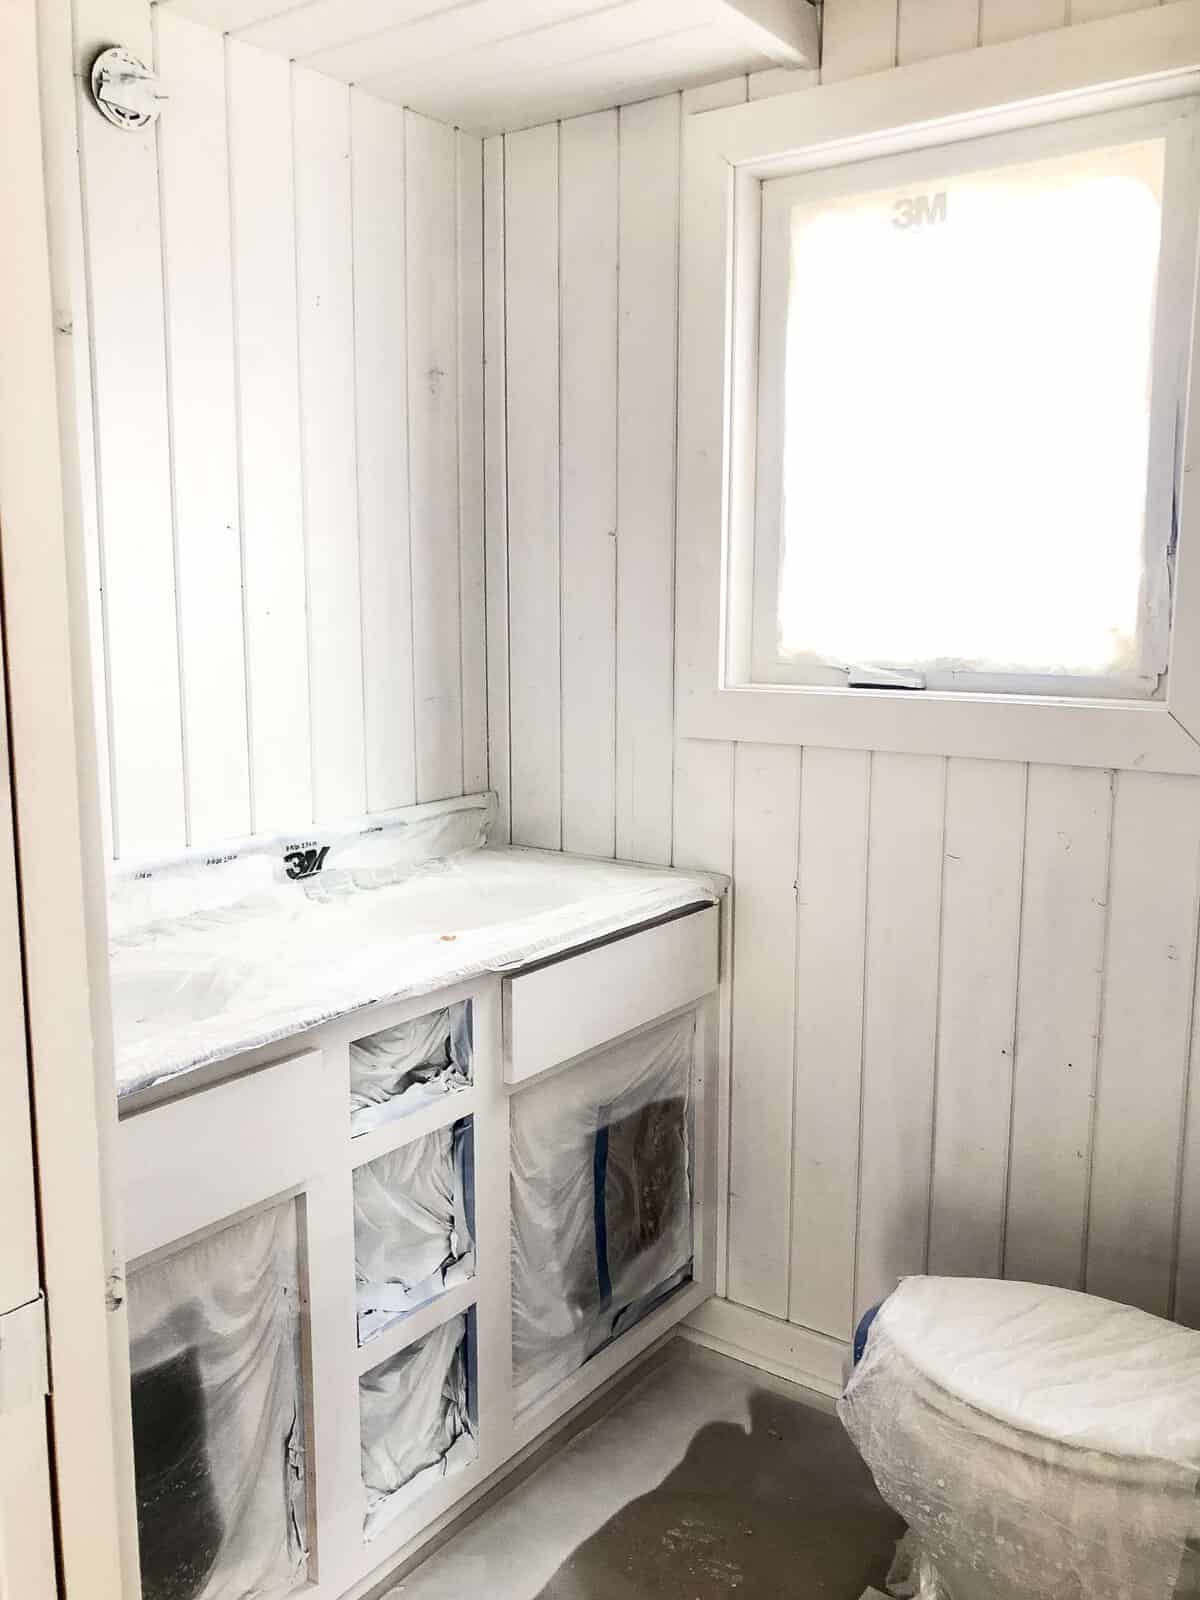
It made such a huge difference to brighten up this mini bathroom and make it feel less dungeon-like.
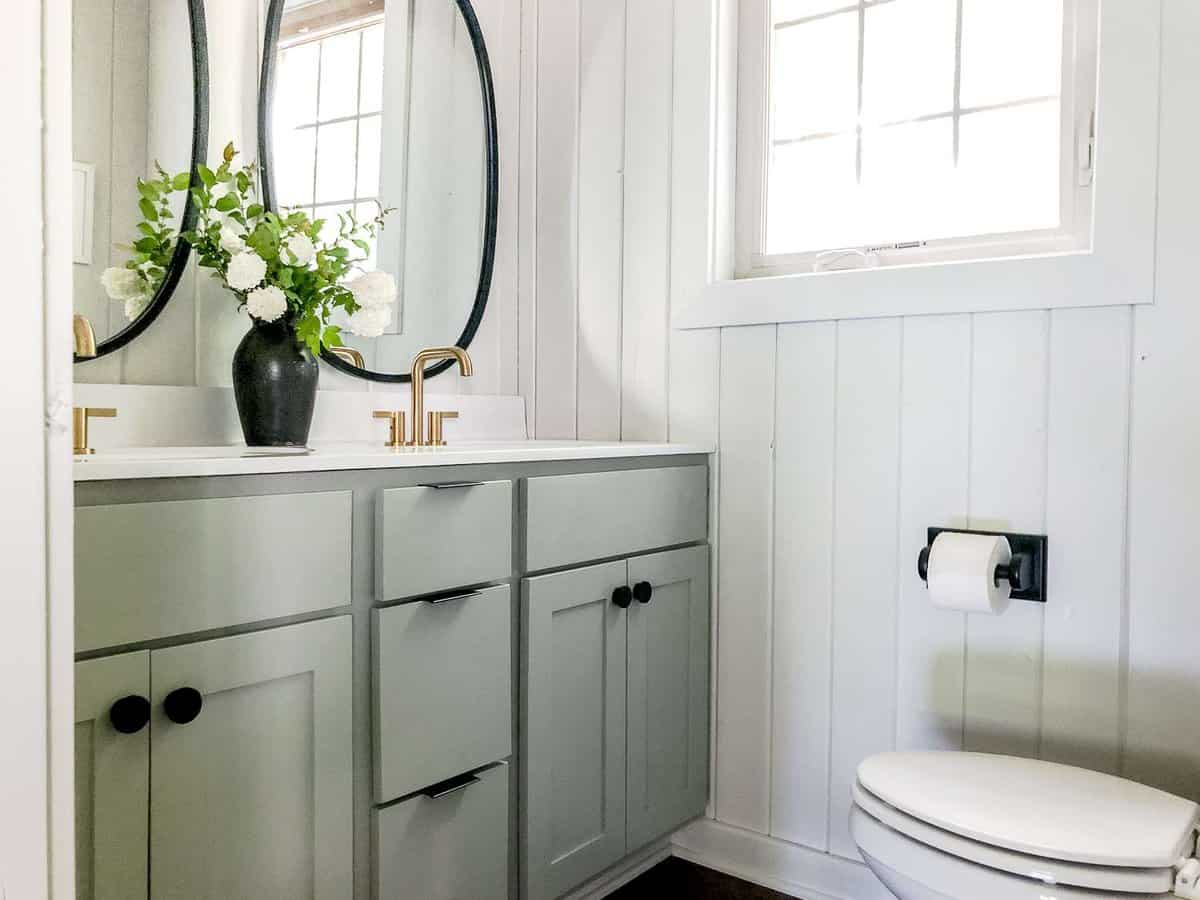
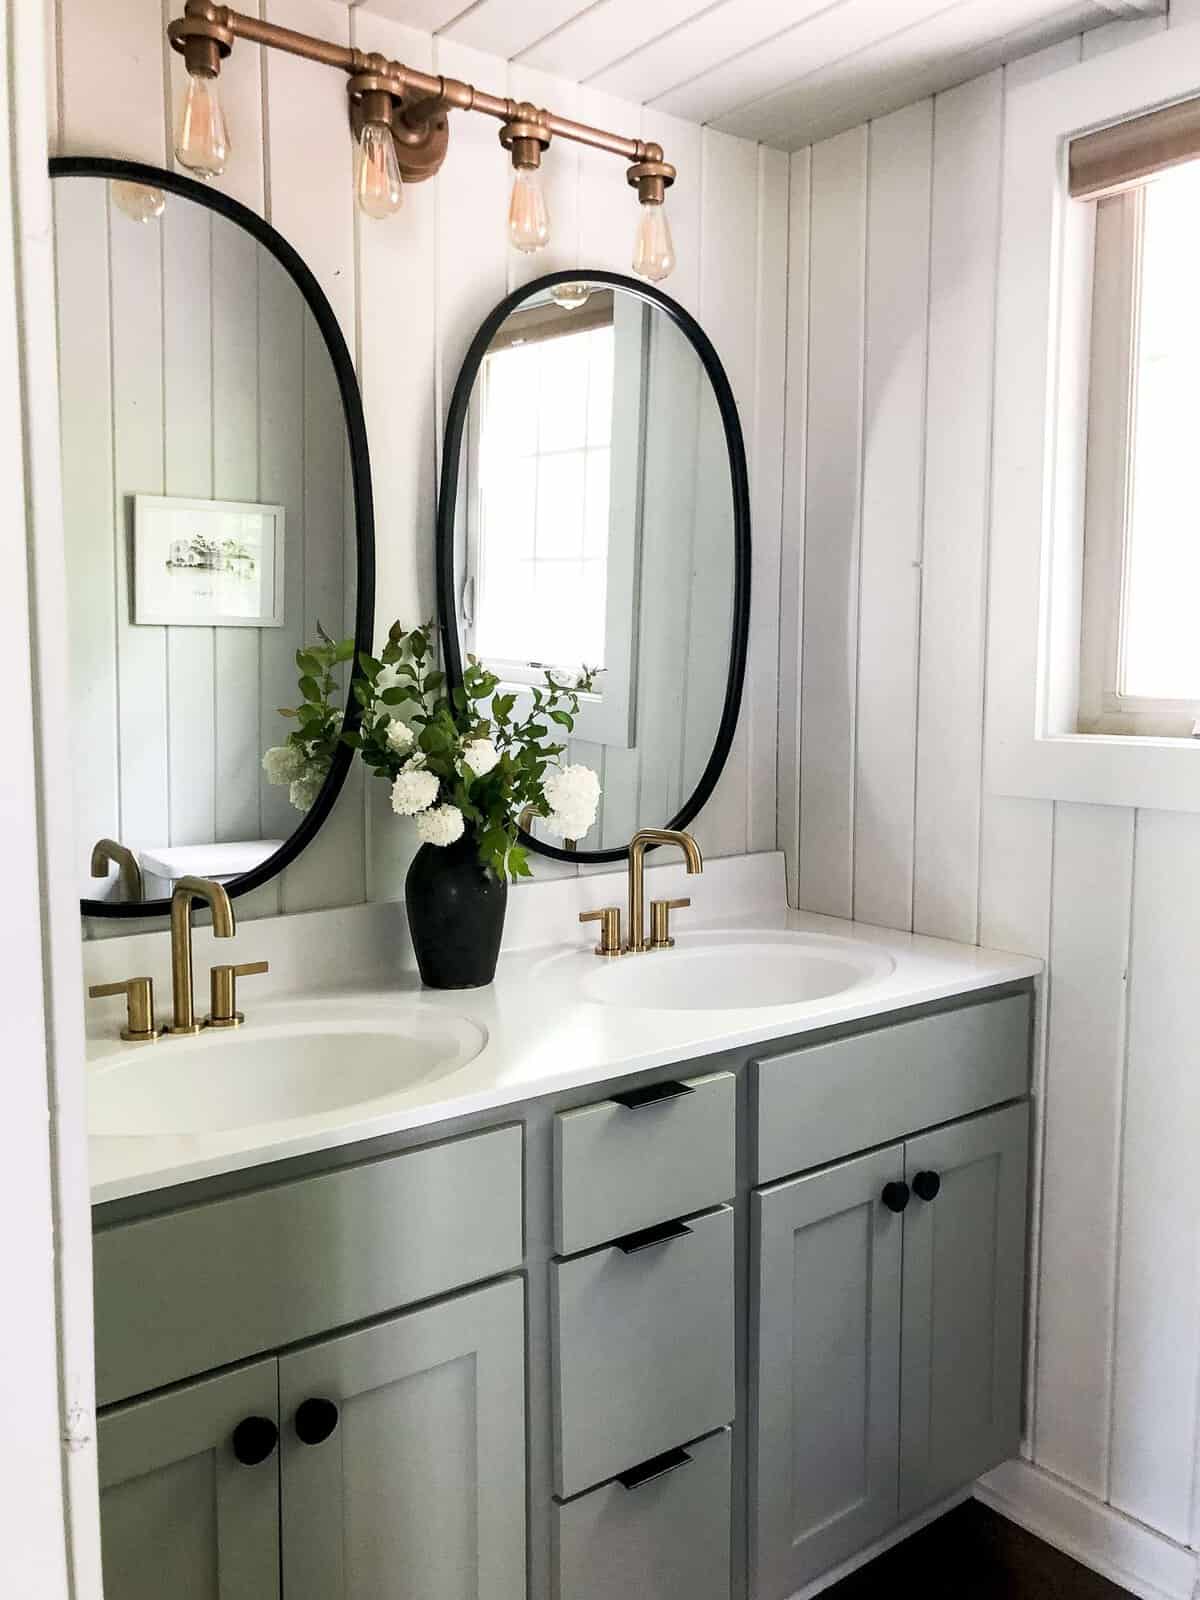
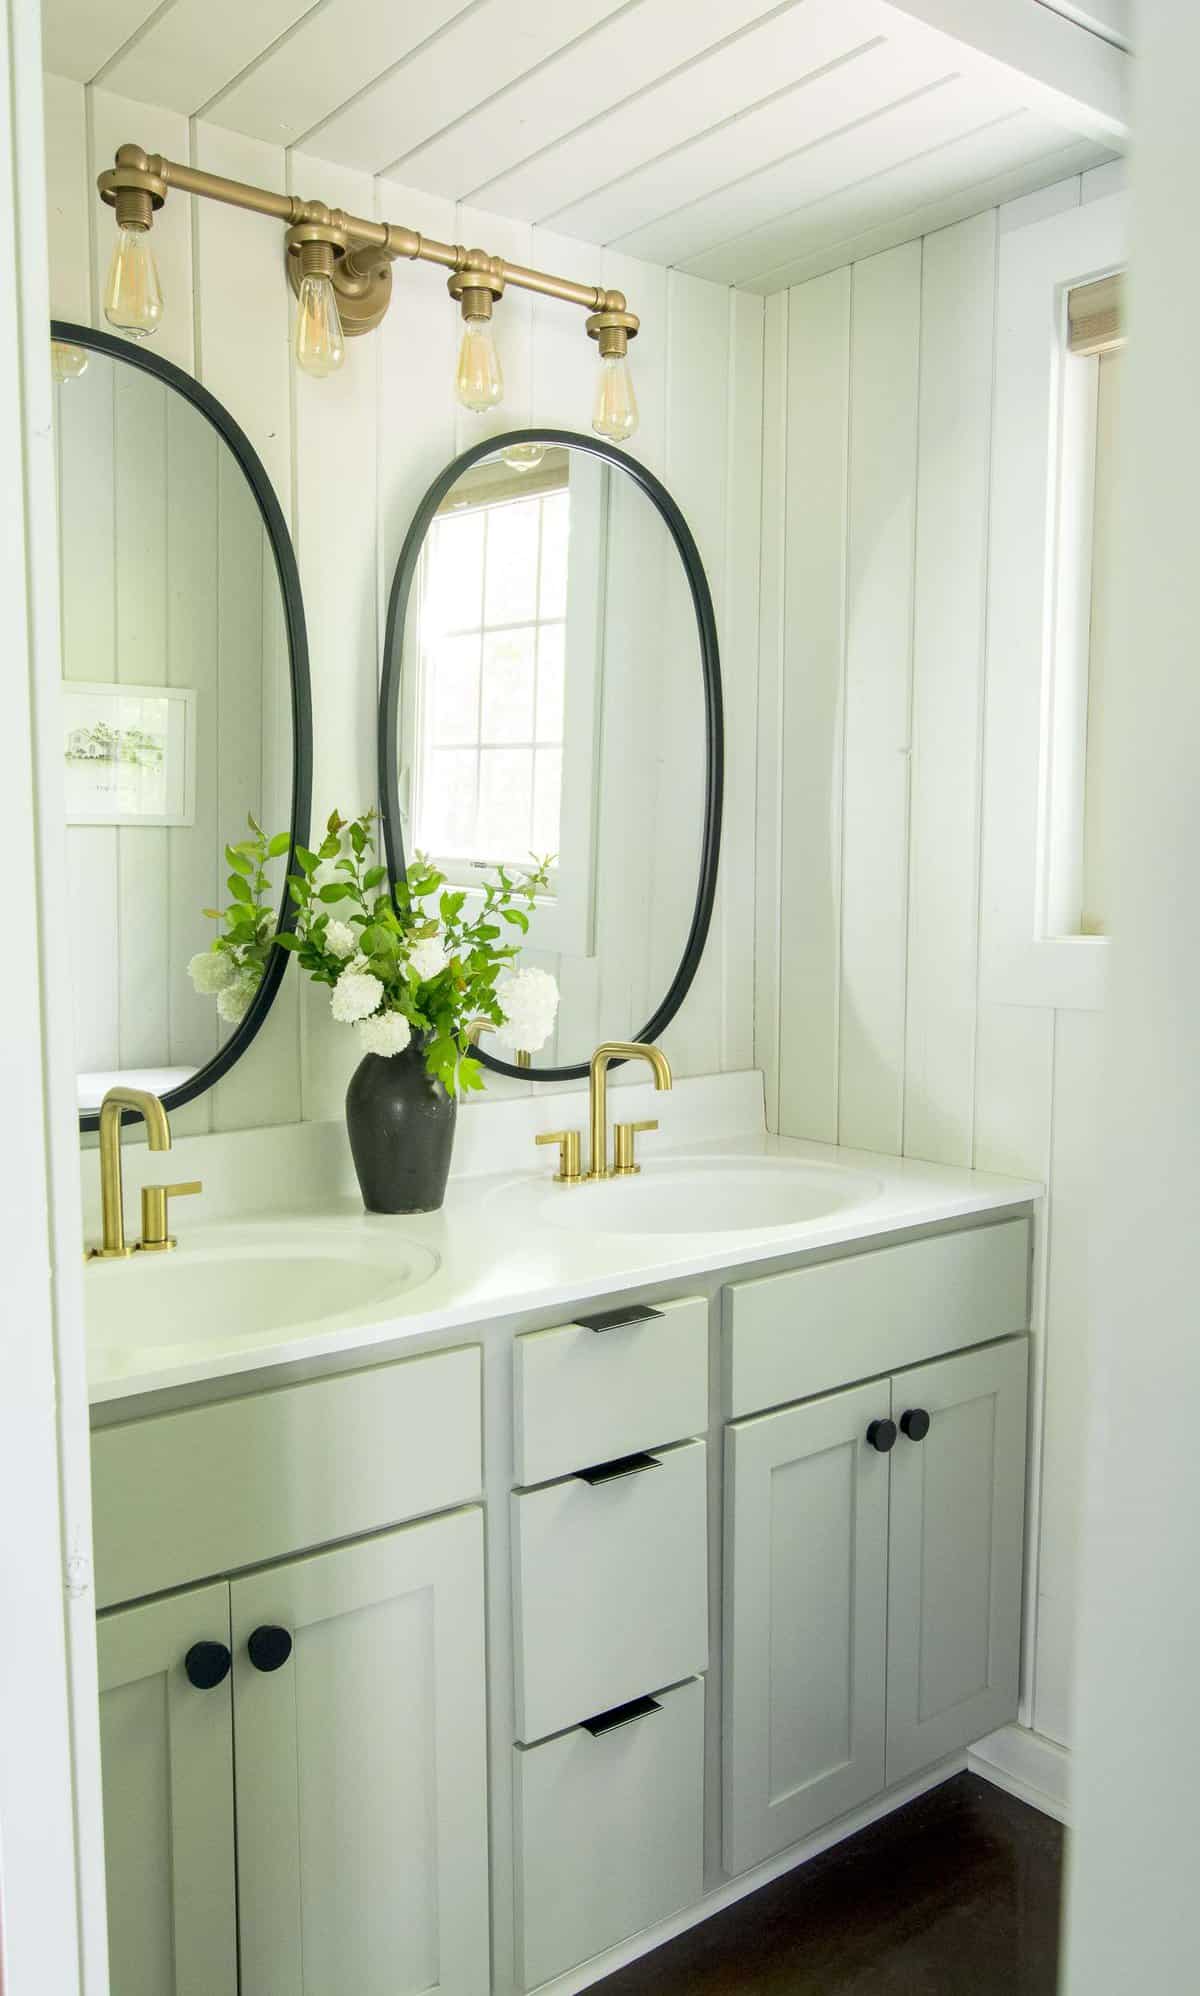
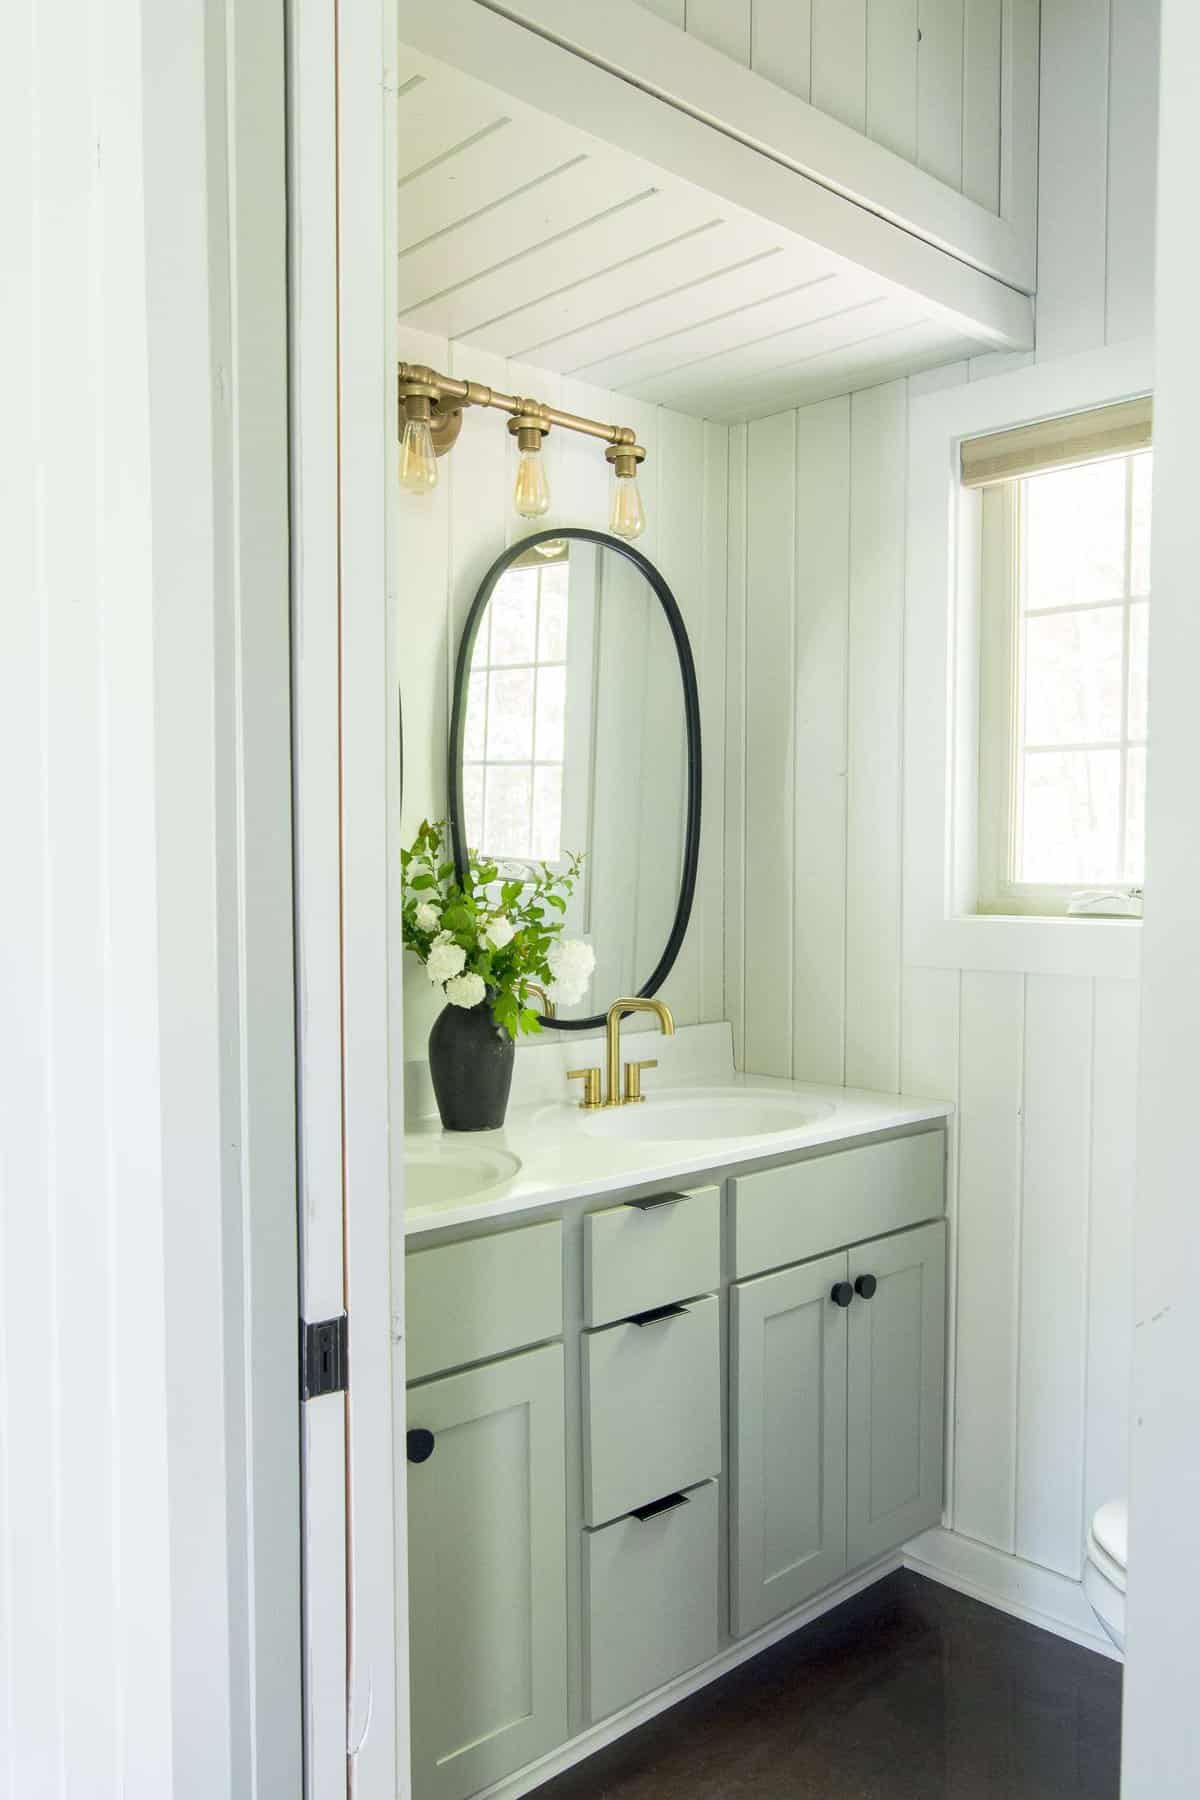
Next, I painted the vanity with a $3 sample jar in Old Celadon and LOVE this beautiful color. It really brought some warmth and sophistication to the space without it feeling overwhelming.
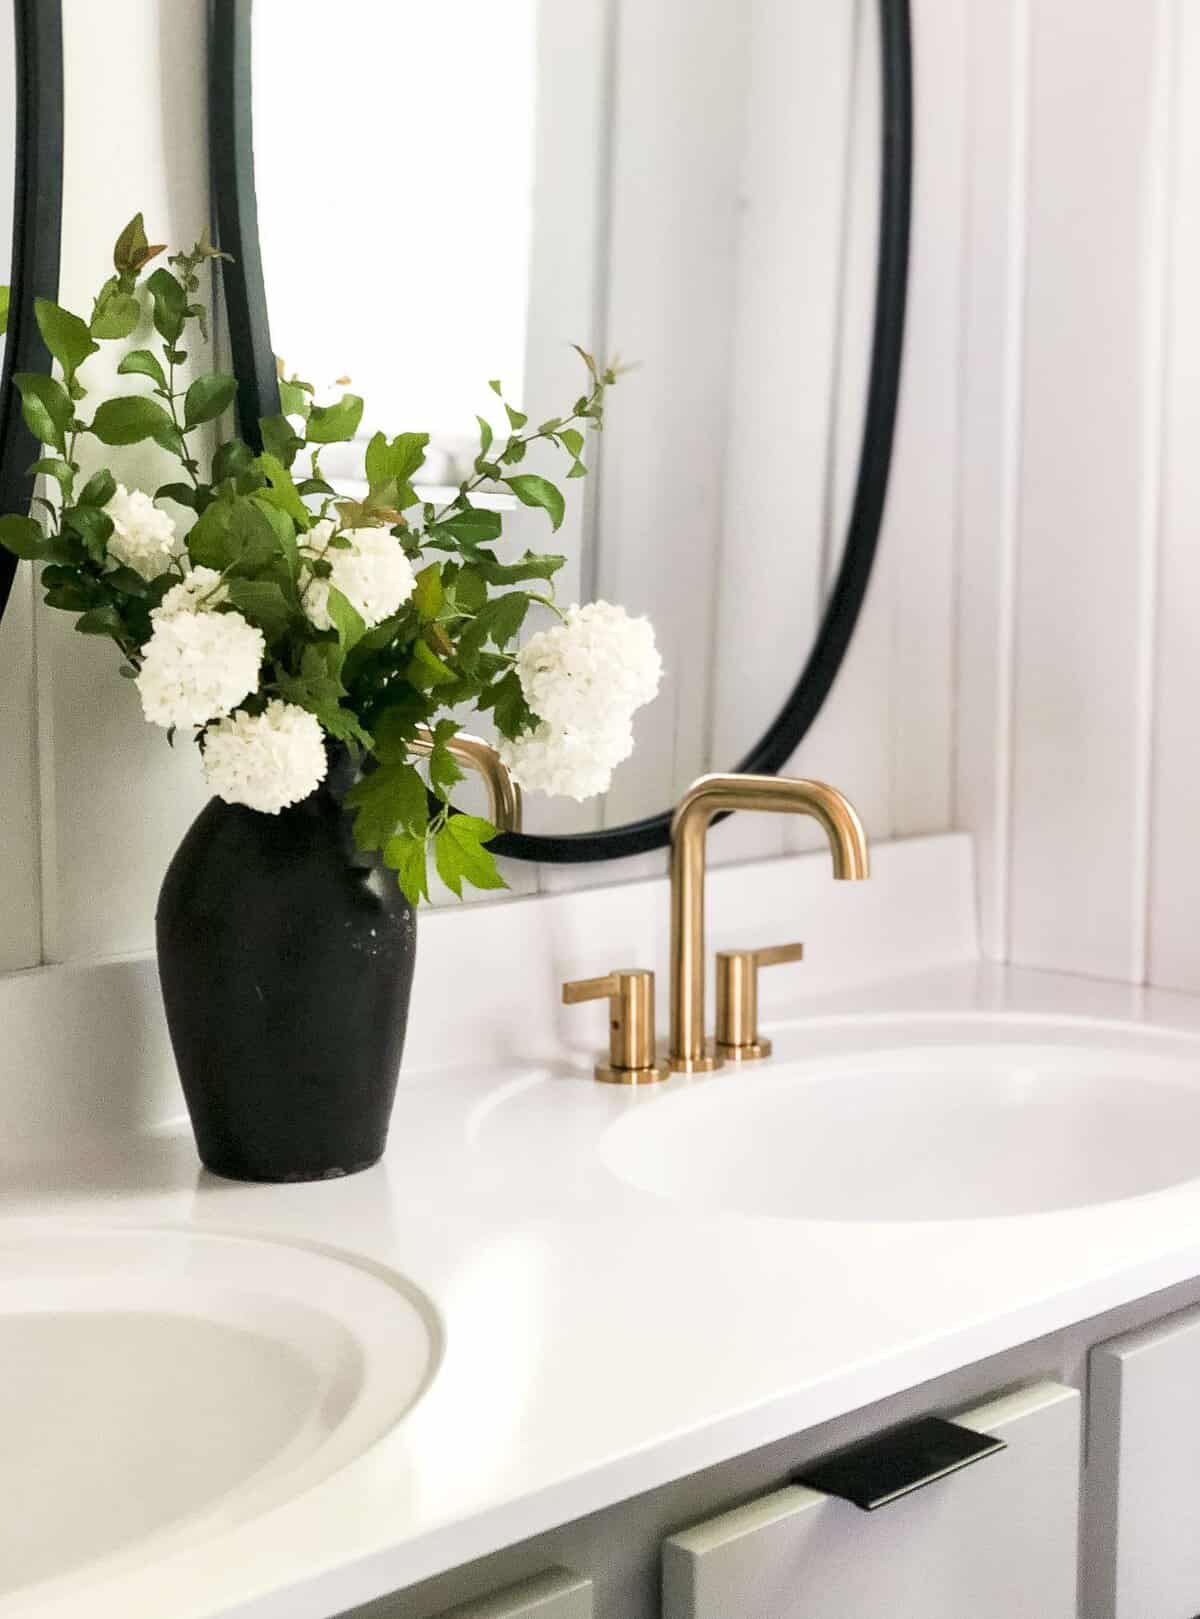
Update Mirrors, Hardware & Faucets
Once all of the painting was done, it was time to actually replace some of the jewelry of the bathroom: mirrors, faucets and hardware.
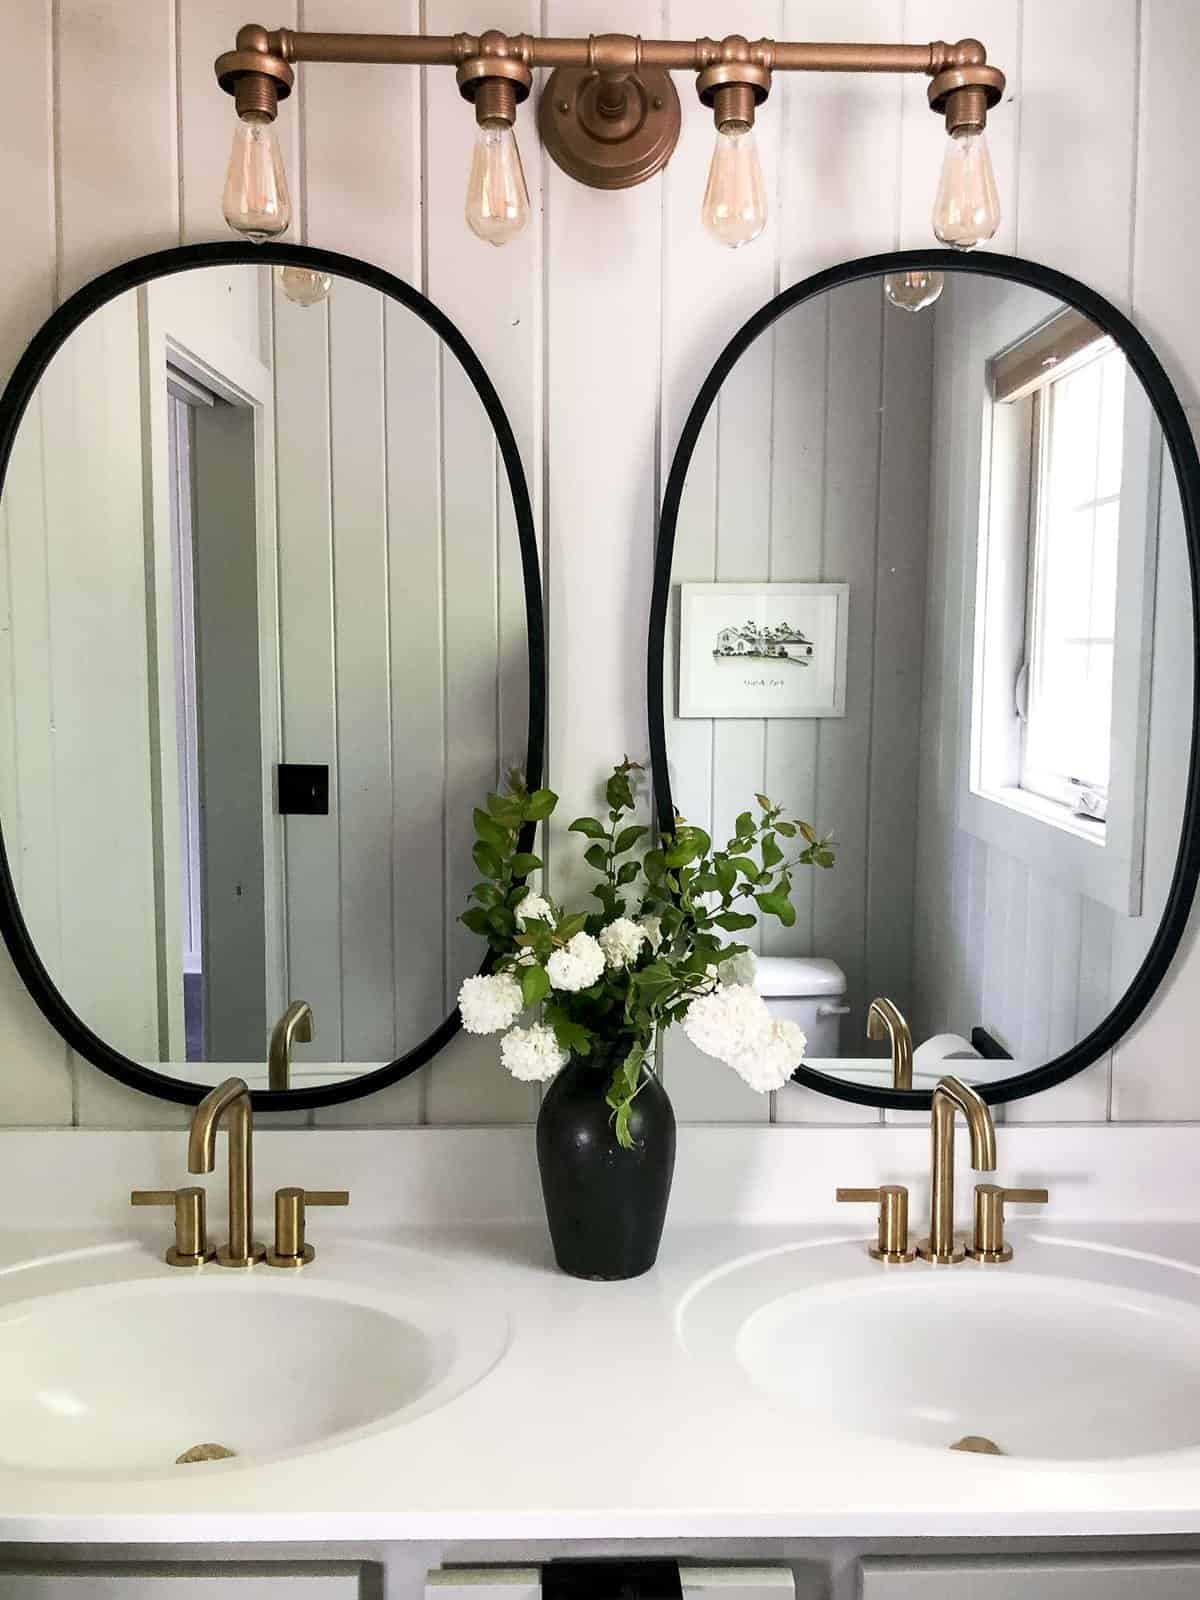
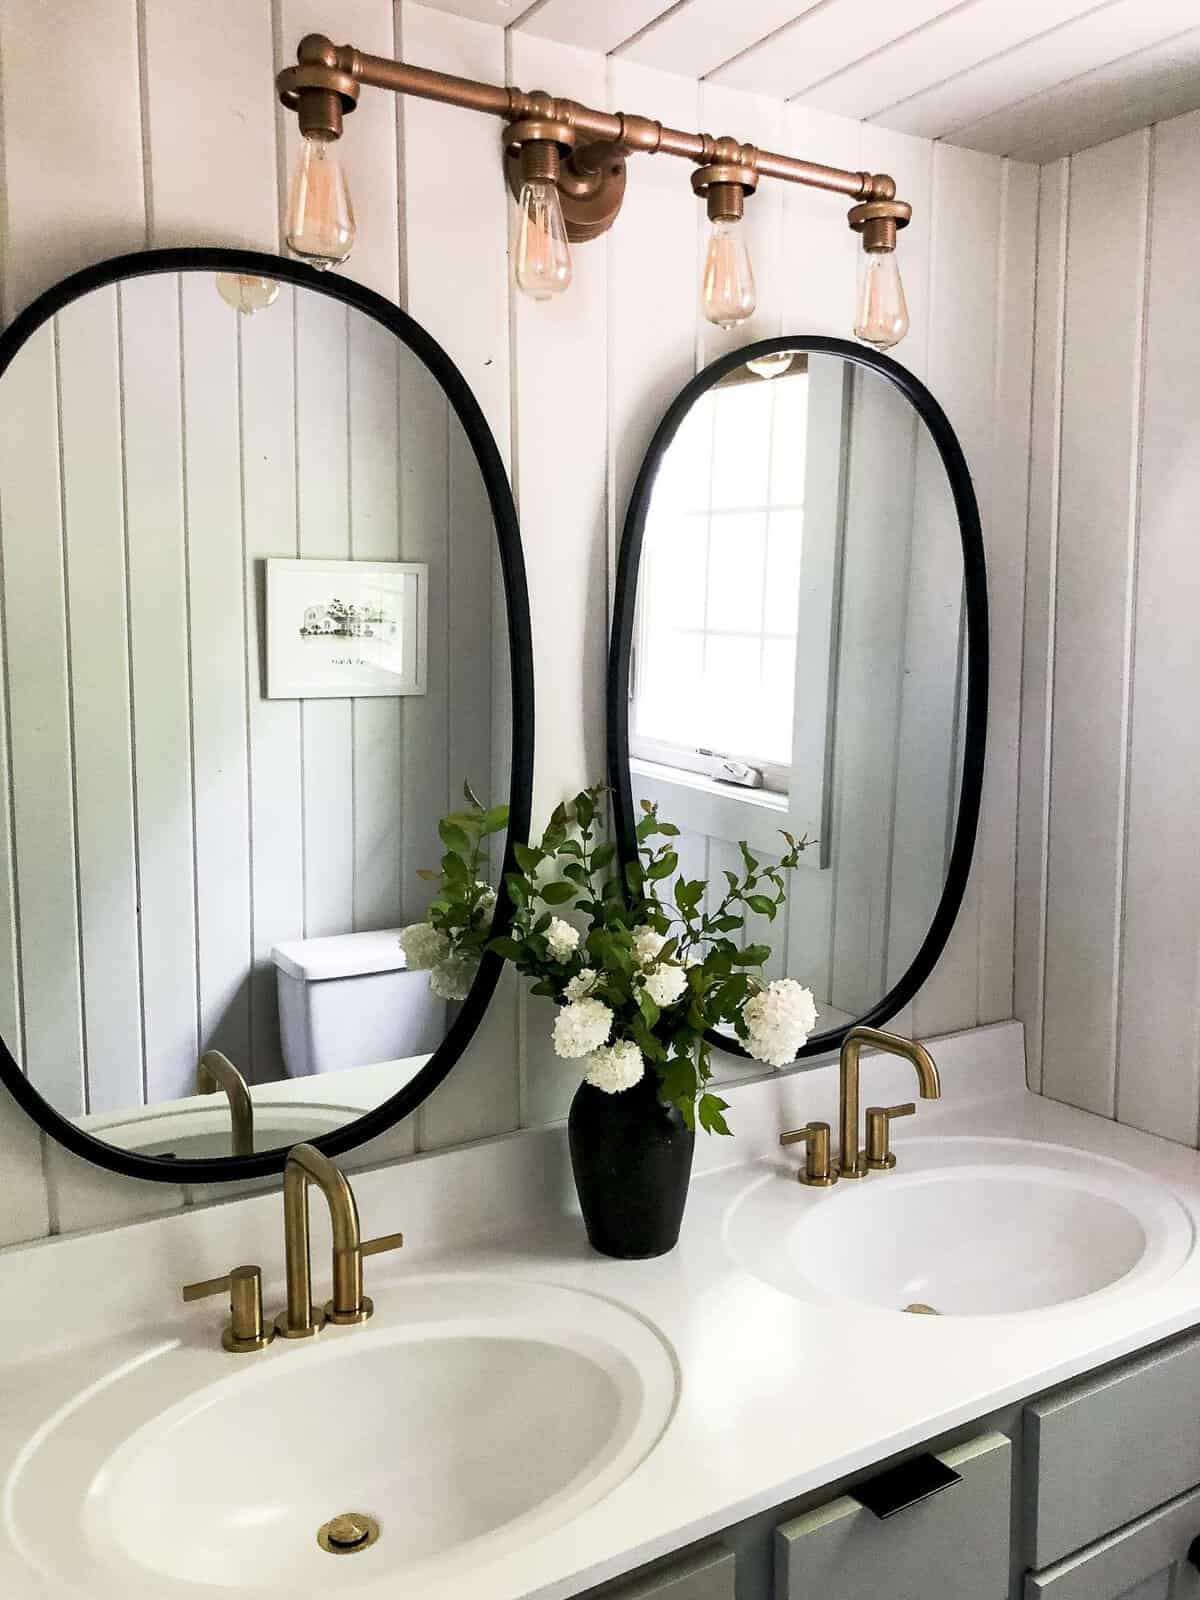
Oh, and did you spy the updated vanity lighting? It is the same light fixture that was already there. I simply removed the globes, took off the many finials it had, and spray painted it brass!
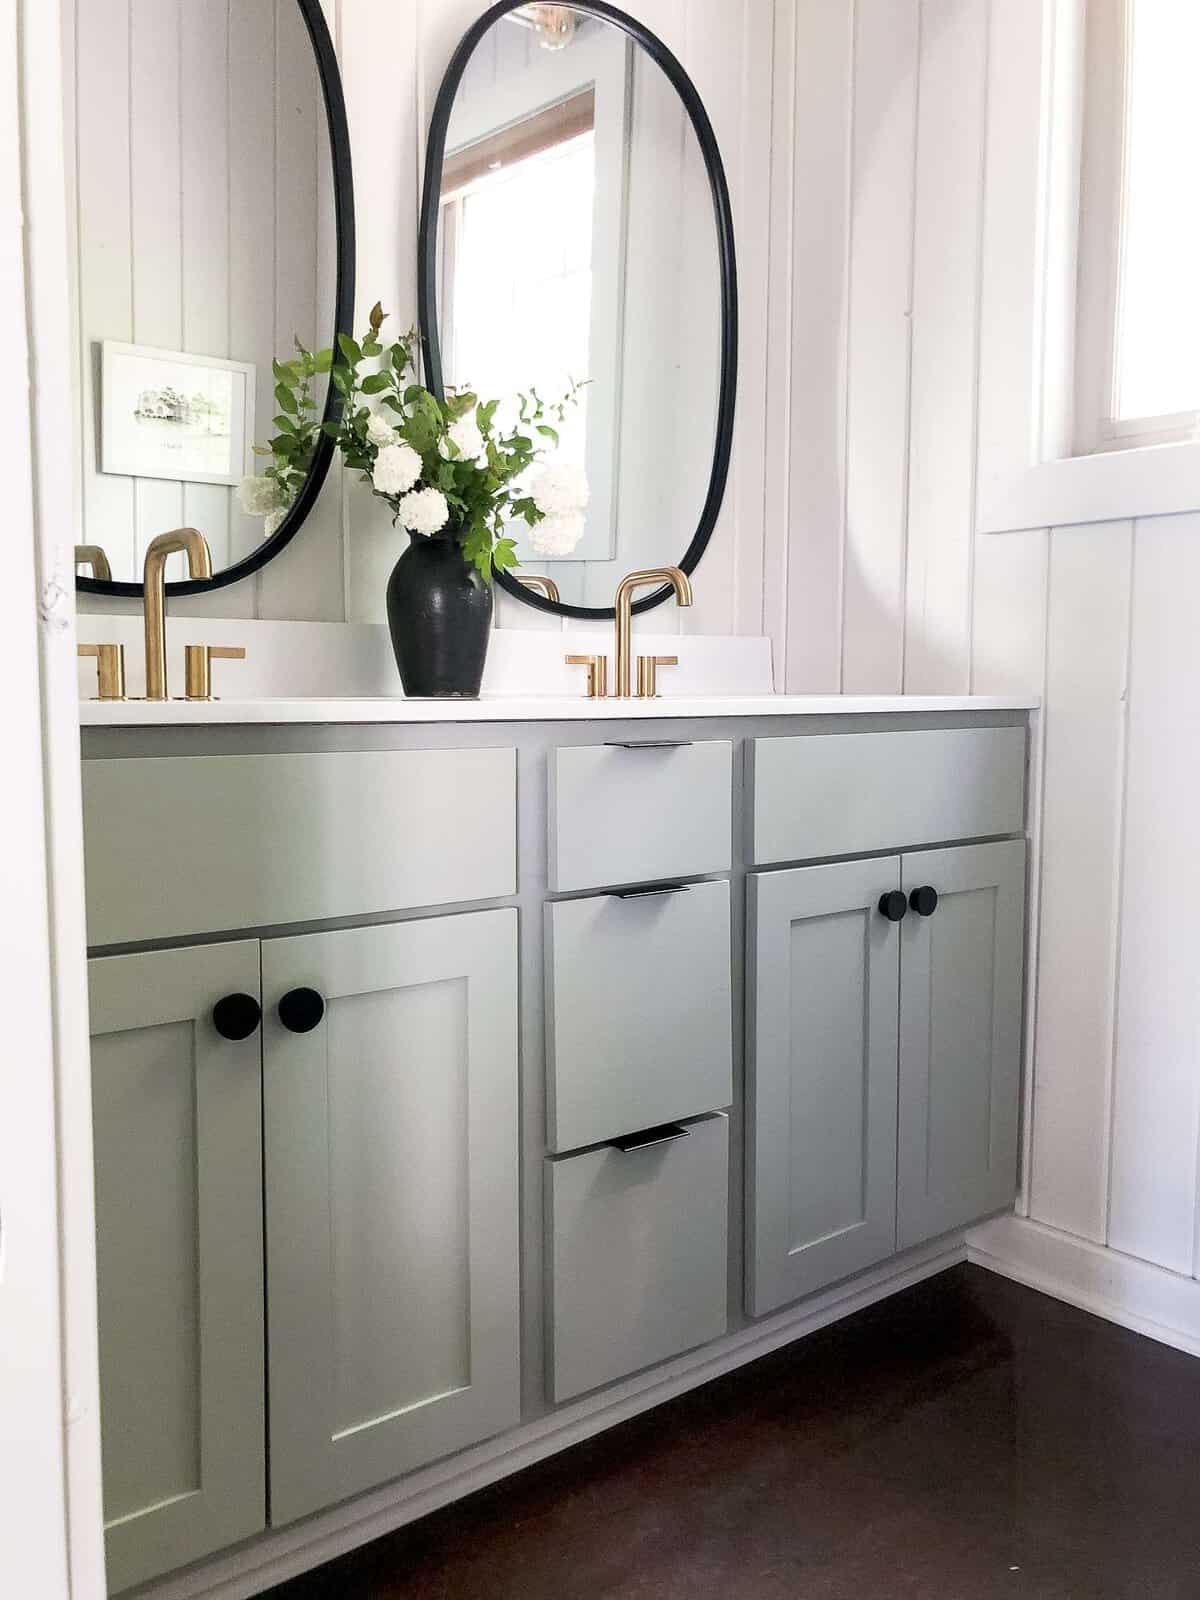
For the hardware, I wanted simple and clean. I love the flat drawer pulls and chunky cabinet knobs for their classic and modern style.
Replacing hardware makes a big difference in updating a vanity. It’s a very affordable way to modernize cabinetry easily.
For the faucets, I went with these affordable brass faucets.

And finally, I replaced the large vanity mirror with two sleek oval mirrors.
Shop The Look
Can you even believe it is the same space?
5 Simple Ways to Budget a Small Bathroom Remodel
This budget remodel cost approximately $300. I’ll list my costs below.
The five areas I always encourage others to focus on when budgets are tight are:
- Paint walls & vanity ($3 vanity + $5 walls)
- DIY countertop options ($4 epoxy paint)
- Update Hardware ($27) and Lighting (free paint + $10 bulbs)
- Update Mirrors ($120)
- Update Faucets ($150)
As you can see from my budget makeover, updating the “jewelry” of a bathroom doesn’t have to mean replacing it and buying new. You can do a lot with paint, creativity, and courage!
Creating Cohesive Flow
Since this makeover is part of the One Room Challenge, I wanted to share why I remodeled this room in addition to the main living space of the guest house.
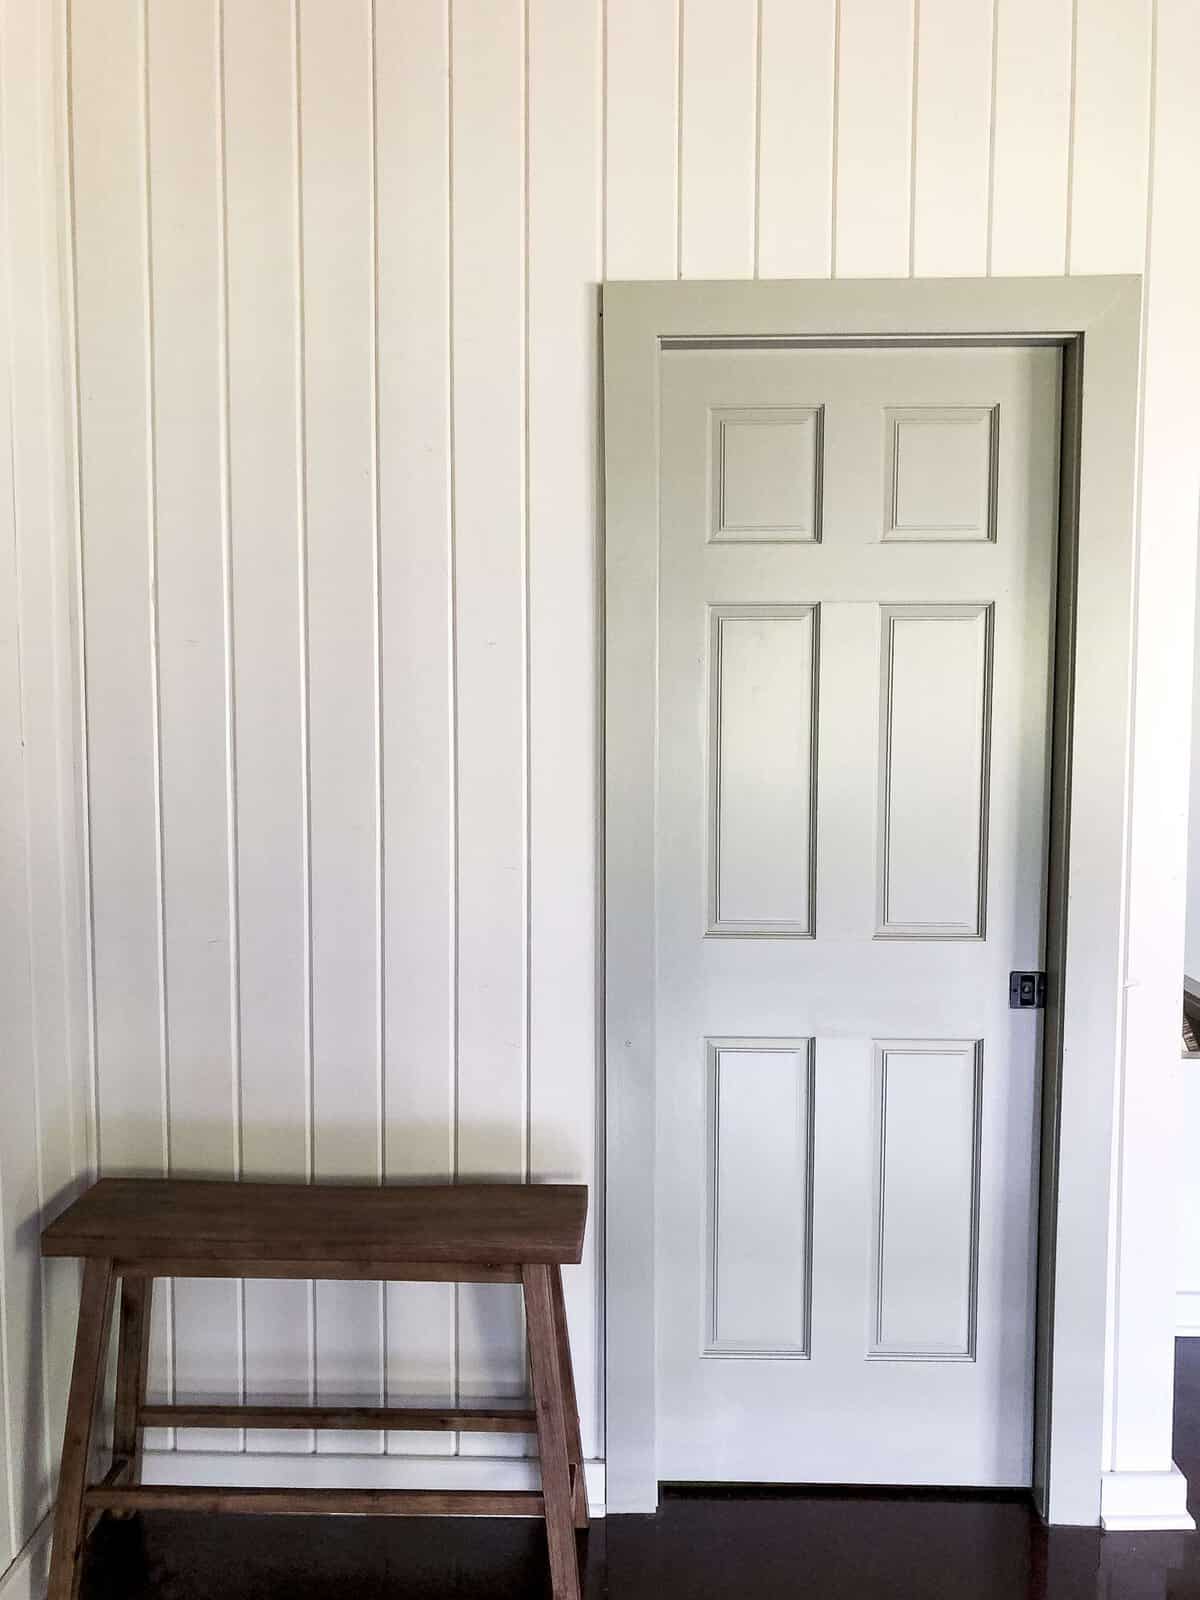
The bathroom is directly off of the main living area behind this pocket door. The majority of the time, the door remains open and visible from the living space. So, I wanted to do a budget makeover so that the outdated bathroom didn’t detract from all the work I’m doing in the other room.
I created a cohesive flow by painting the door the same color as the vanity. I also carried that color to the other side of the room by painting the main entry door.
Drawing those colors throughout the room helps it flow better and feel like one space.
Stay Connected
Thanks so much for stopping by the blog today and staying connected on my guest house remodel project! Can you believe this before and after?!
Stay tuned next week for a major update in the main living area!
One Room Challenge Update
The project is complete! If you missed the 8 week process, catch up with the links below!
- Week 1: Guest House Before Photos
- Week 2: Guest House Design Plans
- Week 3: Mantel Update
- Week 4: How to Hide a Mini Split
- Week 5: Bathroom Remodel for $300
- Weeks 6 & 7: DIY Ceiling Beams
- Week 8: The Big Reveal


Wow! The bathroom remodel is stunning. Love the cabinet color and knobs/pulls. I want so badly to update my bathroom counter top. Like you said, nothing to lose. Thanks for sharing all the details, I’m going to give it a try.
Thank you so much!
It’s been so fun following along this space!
I’m so glad you’ve enjoyed it!
Wow!! Gorgeous!! When I first saw the before picture, I thought….Nice bathroom, why remodel? But when I saw the after picture, it was, Oh My Gosh, gorgeous!! Love the transformation!!
Thank you so much! So glad you like it!
OH. MY. Gosh.
Wow – that transformation is stunning, absolutely stunning!
Never EVER would anyone believe it is the same space. Just wow. Well done!!!!
Thank you so much Michele!
Absolutely gorgeous. Words honestly can’t express how impressed I am. I love how you explained how you tied in the colors with the other parts of the house. Did you go to interior design school at all or earn a degree in interior decorating? If so, where and do you know if it’s possible to do something like that online. Any recommendations for someone wanting to pursue that type of career? Also, any recommendations regarding photography? You seem to really know what you are doing with a camera. Thanks for your time. Your blogs are one of my favorites to follow. I can see why you have won awards.
Thank you so much! I’m so glad you like it! I don’t have any formal schooling. I wouldn’t even call myself a designer. 😉 I’ve done a lot of my own self-teaching on photography but wouldn’t call myself proficient at it yet! But it sure is fun to learn more every day!
I love it! You did a beautiful job! Thank you for sharing and doing this on a budget that most of us can afford!
Thank you Angie! I’m so glad you like it!
I’m working on updating our master bathroom right now and this gave me a burst of motivation! You did such an incredible job! Thanks for sharing!
Yay! Good luck on your makeover!
It looks beautiful. I hope your painter put an oil based primer on the knotty pine walls before painting. We did our kitchen a few years ago and used regular primer and the knots came out a year later. We have to repaint with an oil based primer and paint over it.
Yes he did! That was my must-have, even though oil is horrible to work with! 😉
You did a fabulous job! Everything is beautiful and your update to the vanity lighting is perfection! Who would have thought? Great job!
Thank you so much! I appreciate that!
OMGosh the bathroom turned out beautifully! I wish I had the decorator talent that you have. BRAVO!!
Thank you so much Teresa!
This looks WONDERFUL! So bright and beautiful……..and the main living area looks great too. You’re doing a nice job. God bless.
Thank you so much!
This is such a beautiful l transformation
So glad you like it!
This is so beautiful now, I am dying to see how the paint on the sink works out! I might have to try it after your progress report
Yes! I’m anxious to see how it holds up too. So far so good!
looks amazing! Can you update on how the sink has held up?
Thank you!!
What a gorgeous transformation! I love paint! Such a beautiful bathroom…so many things I love about it!
Thank you so much Amie!
What an incredible transformation, Sarah! This looks amazing 🙂
Thank you so much Morgan!
That bathroom came out beautiful. I love what you did with the light. Thanks for the inspiration!?
Thanks Karen! It was a fun update!