
70s Kitchen Remodel Before & After| Modern Traditional Kitchen
Our 70s kitchen remodel before and after is 8 months in the making! I’m so excited to show you all the before and afters from this lengthy kitchen renovation. Plus, learn all of the sourcing details for our modern traditional kitchen (with some organic vintage elements integrated into the design).
This post may contain affiliate links for your convenience.
Originally published 4/2/24. Updated 1/20/26.
Kitchen Design: Organic Modern Traditional
Can a kitchen be designed as an organic modern traditional kitchen? I’m thinking: yes. Because I did it.
It was so fun to detail all of the main kitchen design trends while I was in the process of designing this kitchen. Hop over to that post to see which trends I implemented into my design.
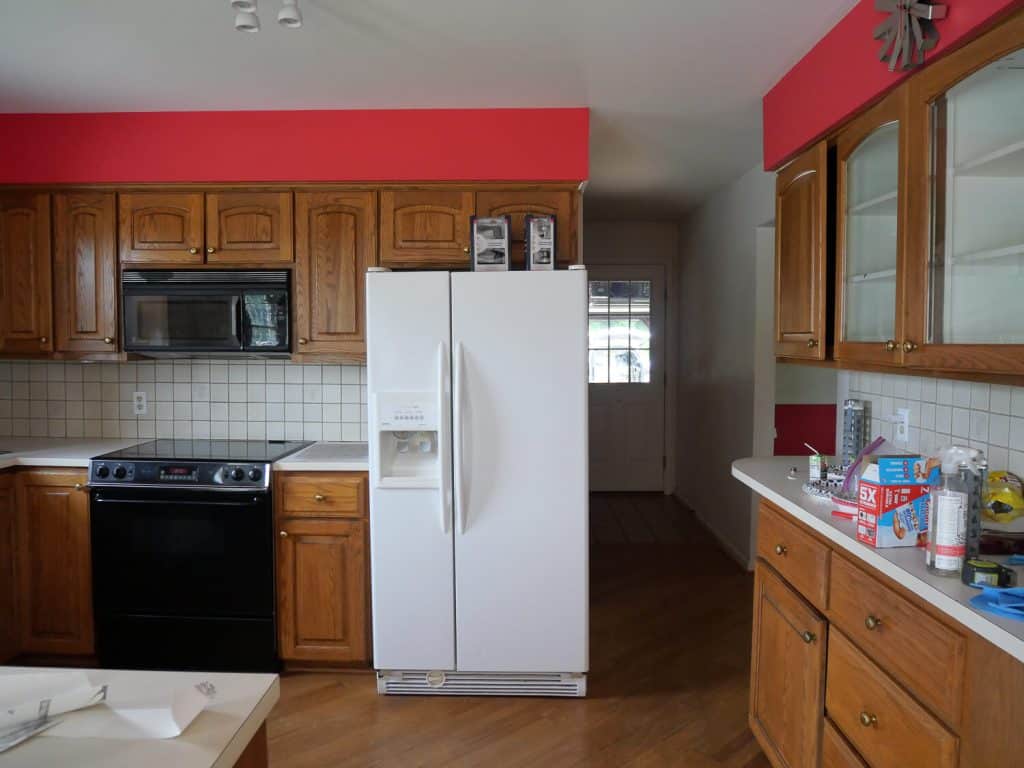
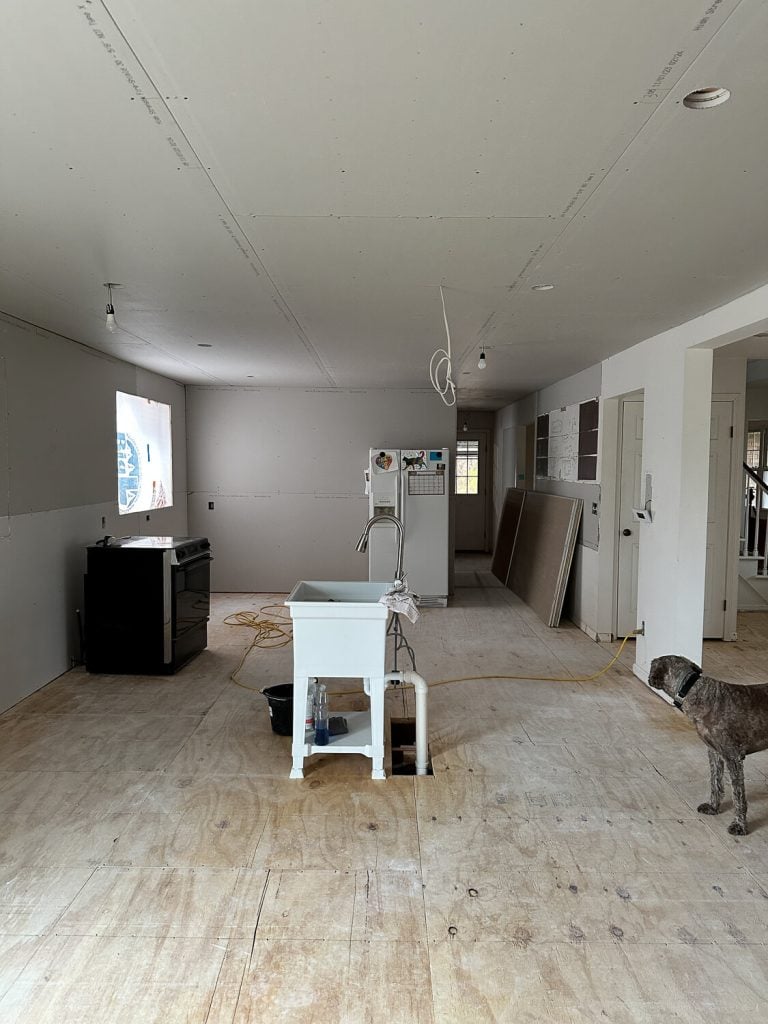
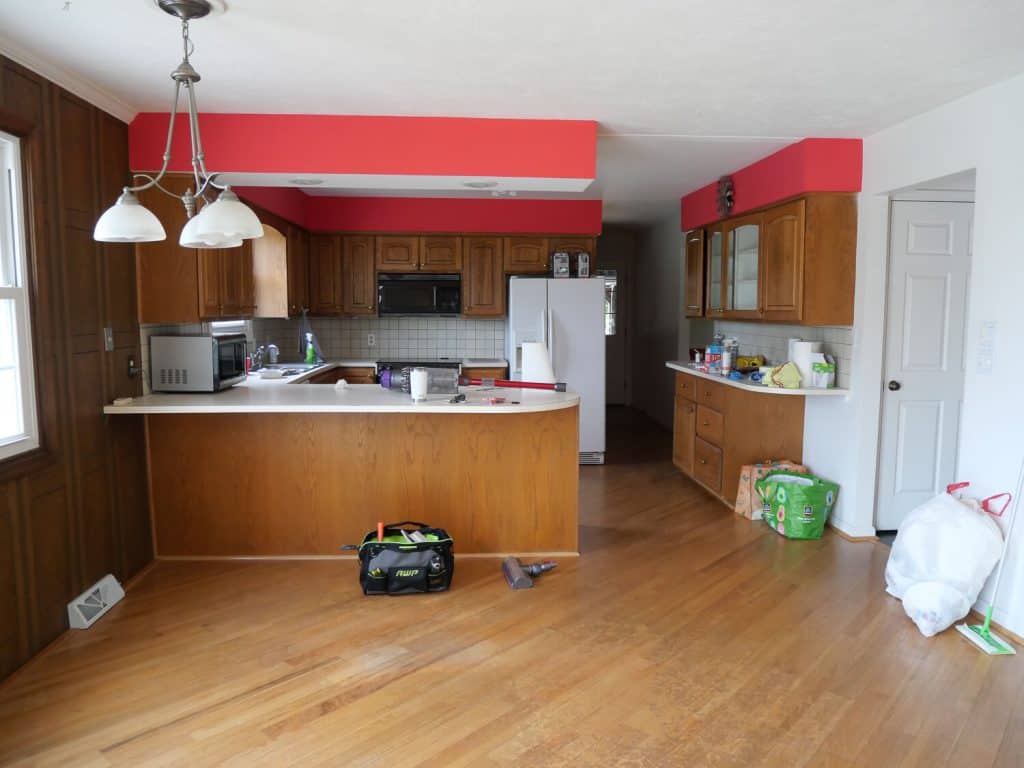
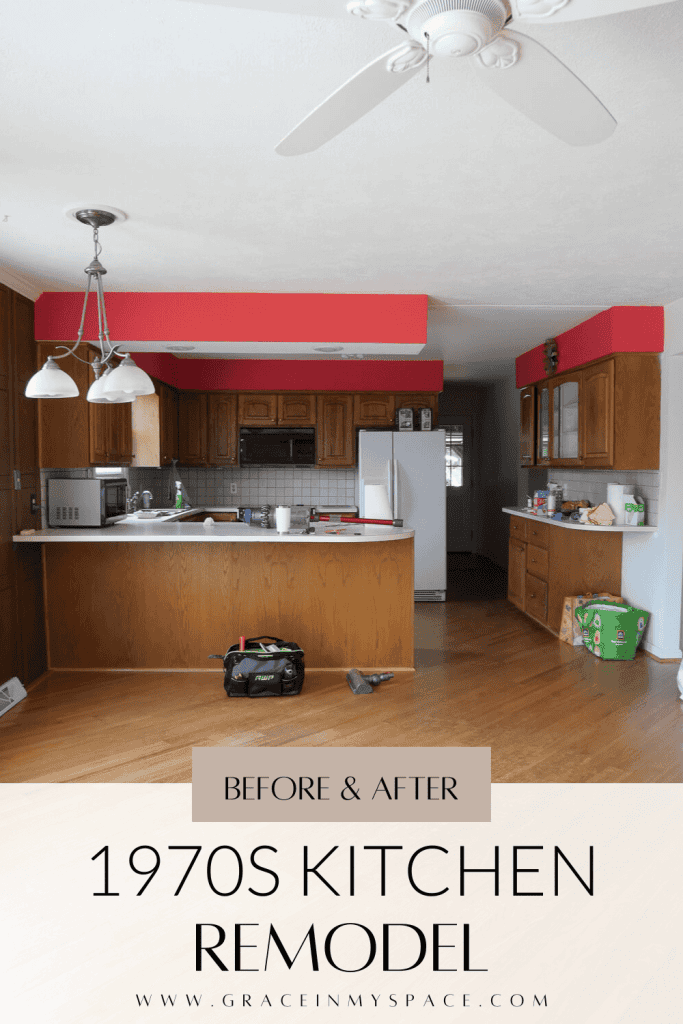
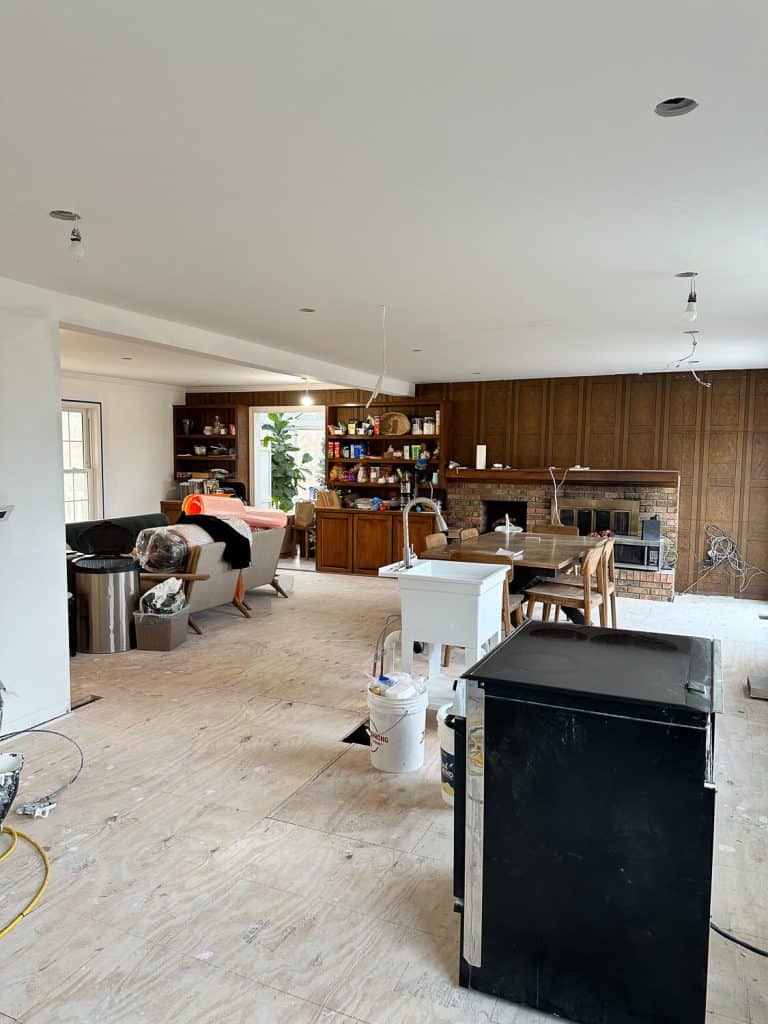
70s Kitchen Remodel: Before
This kitchen was a true labor of love.
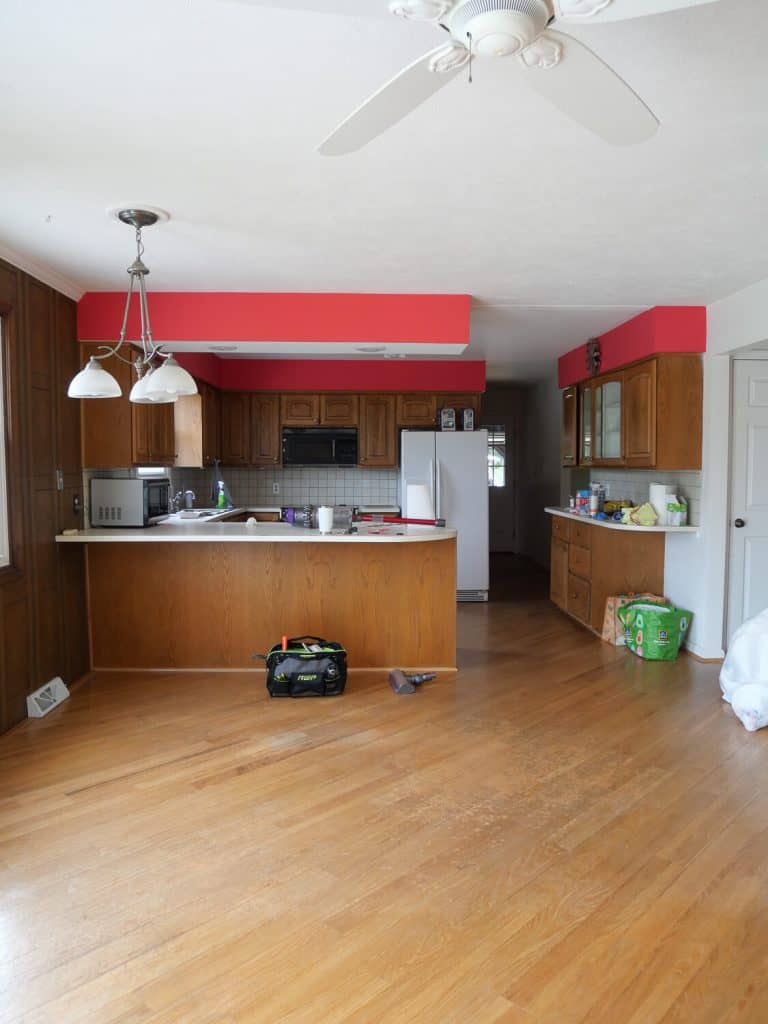
We knew when we bought the house that we would be remodeling. The cabinets were falling apart, the walls had holes in them from past leaks, and the ceiling was sagging from cut up ceiling joists.
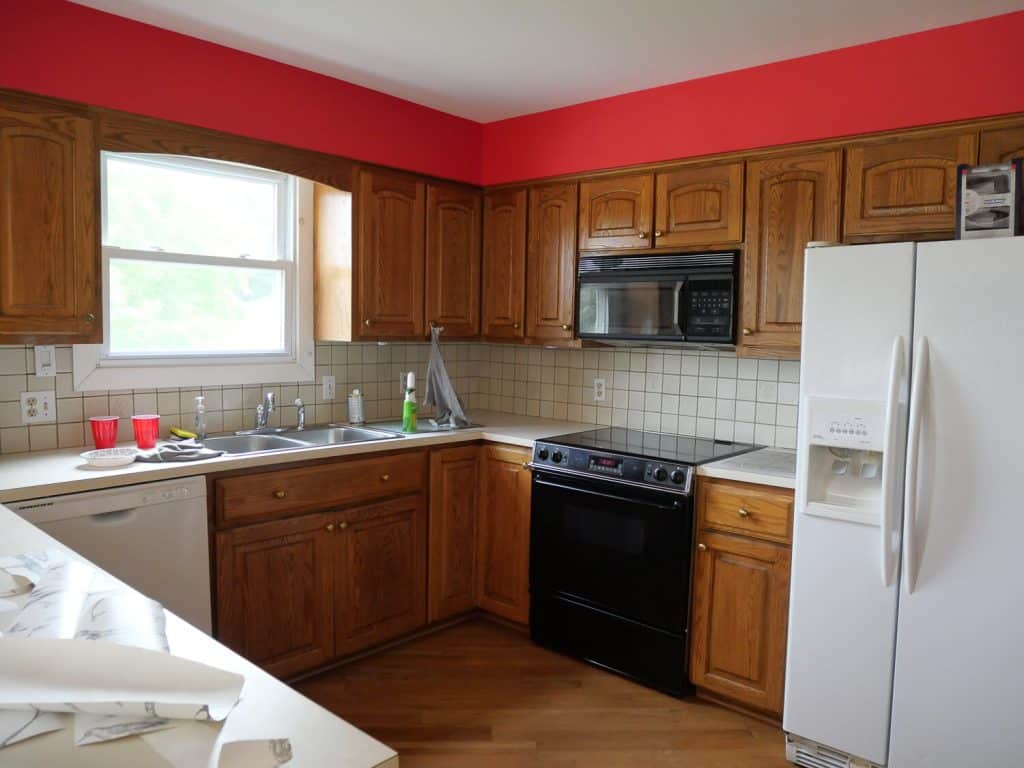
Not to mention, the intrusive bulk heads, lack of overhead lighting and cramped quarters.
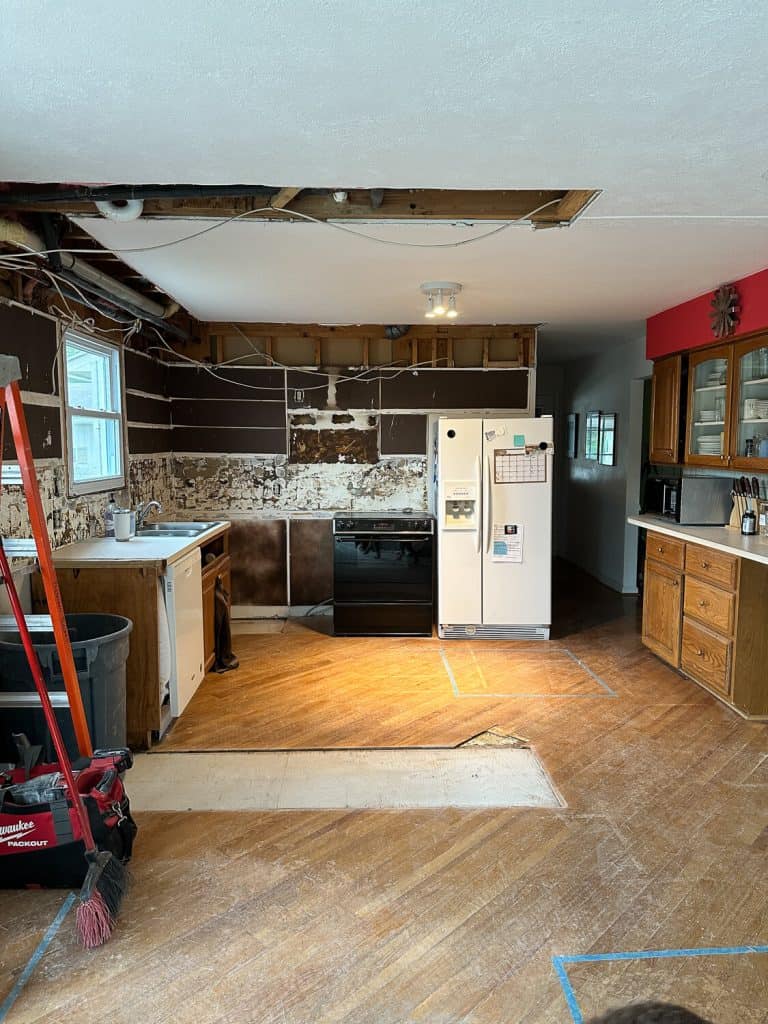
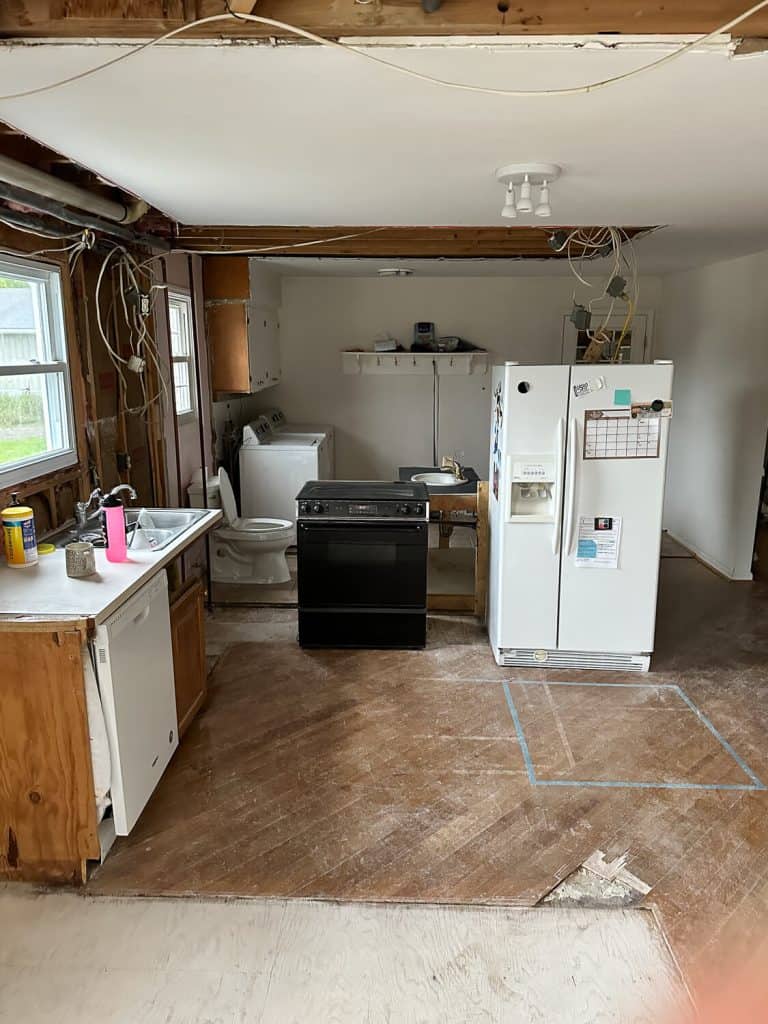
I spent countless hours designing every last detail over 2 months before demo even began. Then, we ran into quite a few roadblocks after demo, due to remodeling a two story house with lots of established heating and plumbing runs.
After my contractor, Aaron and I problem solved, our cabinet maker drew up my designs and we went back and forth multiple times to get all the details just right.
70s Kitchen Remodel: Progress
Over the next 6 months, contractors were here daily.
Months were spent rebuilding walls, moving doors, installing new windows, moving plumbing, reworking heating runs, shoring up ceiling joists, rewiring all the electrical, adding insulation and drywall, painting, installing flooring, setting cabinets, installing counters, tiling, and much much more.
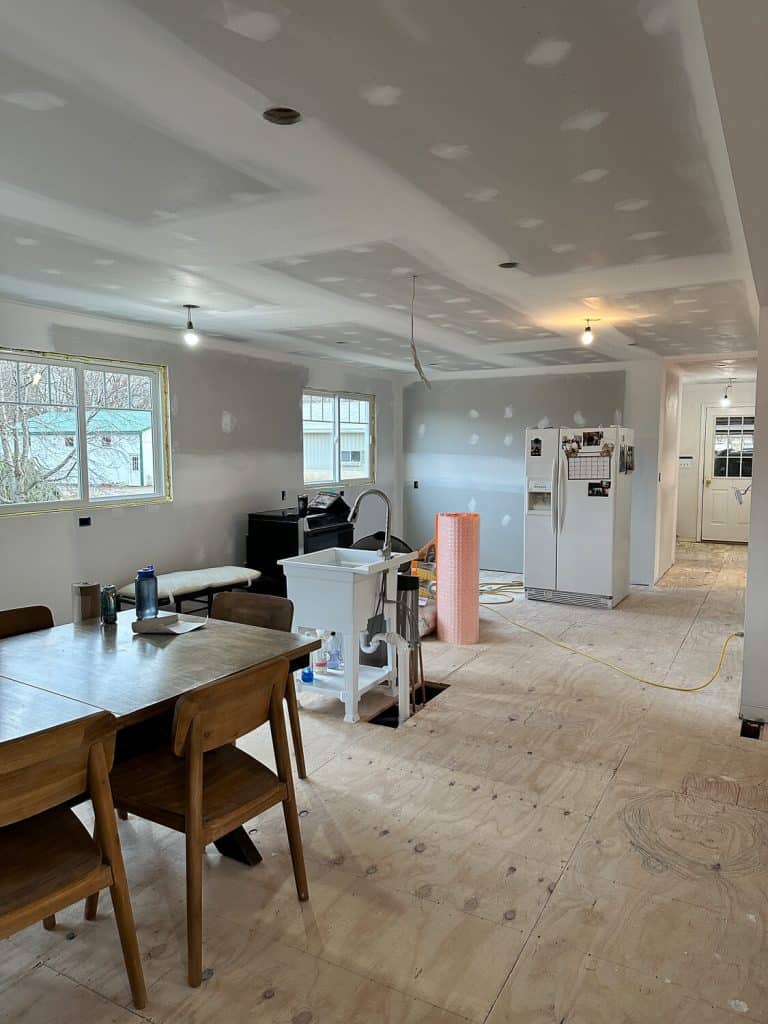
Not a spec was left untouched. And the results, an organic modern traditional kitchen of our dreams. I’m excited to give you a tour!
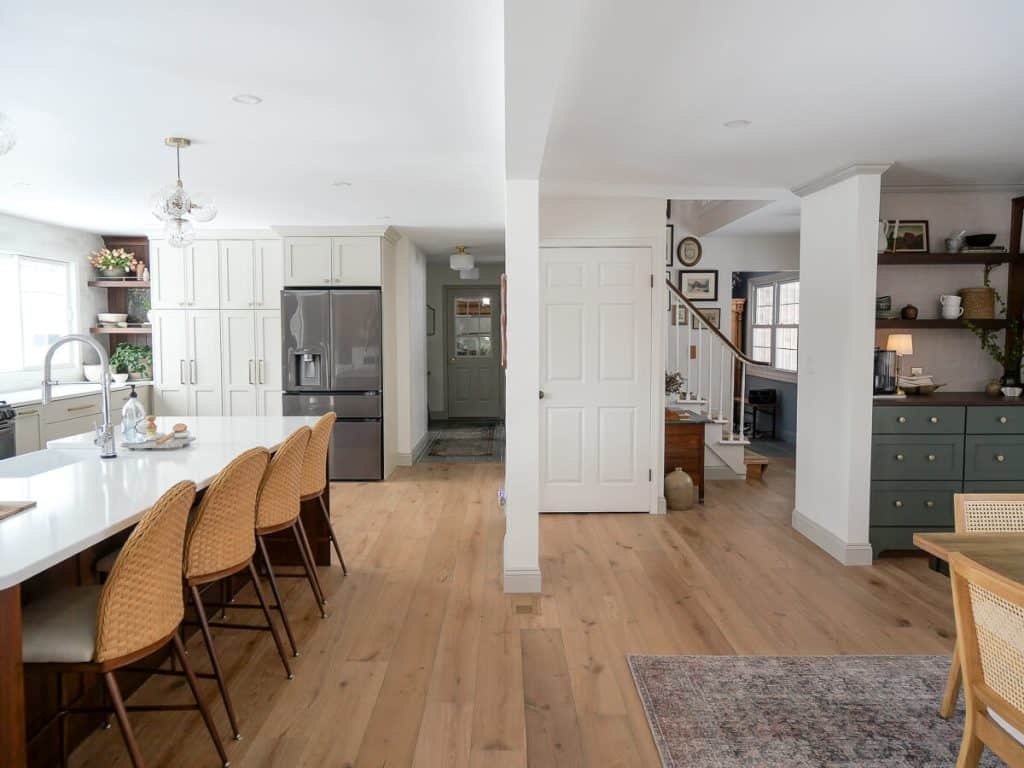
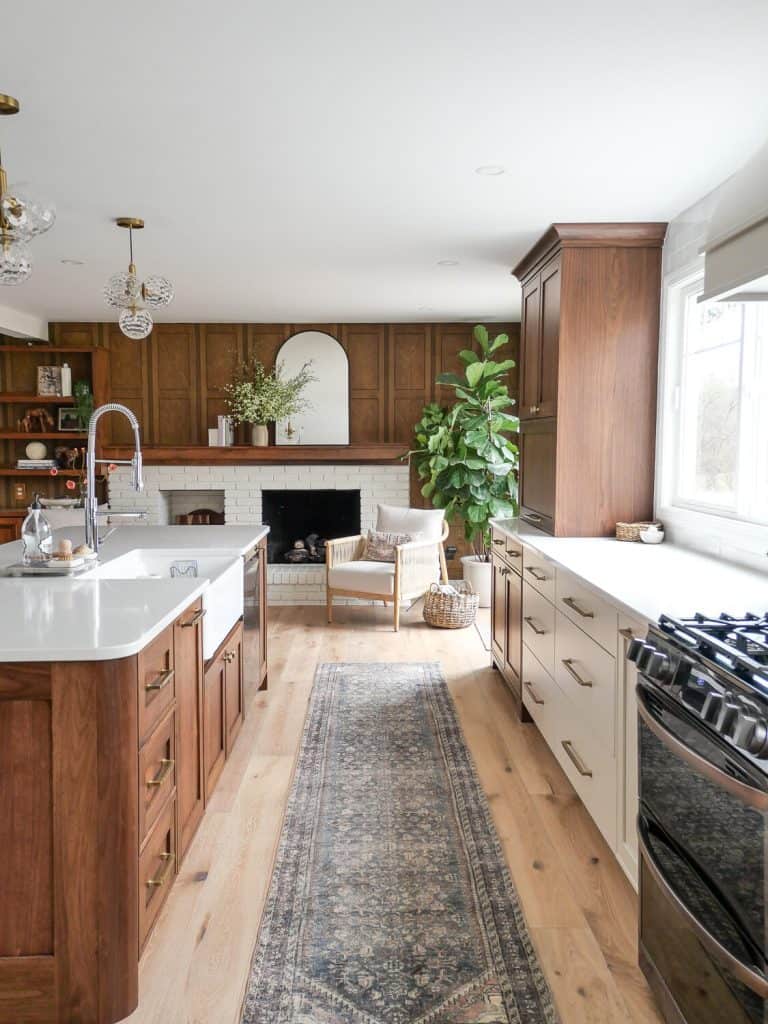
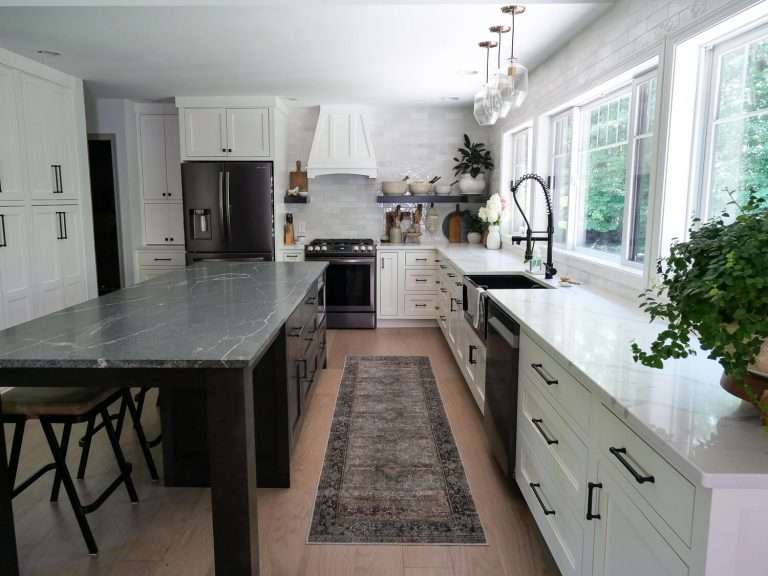
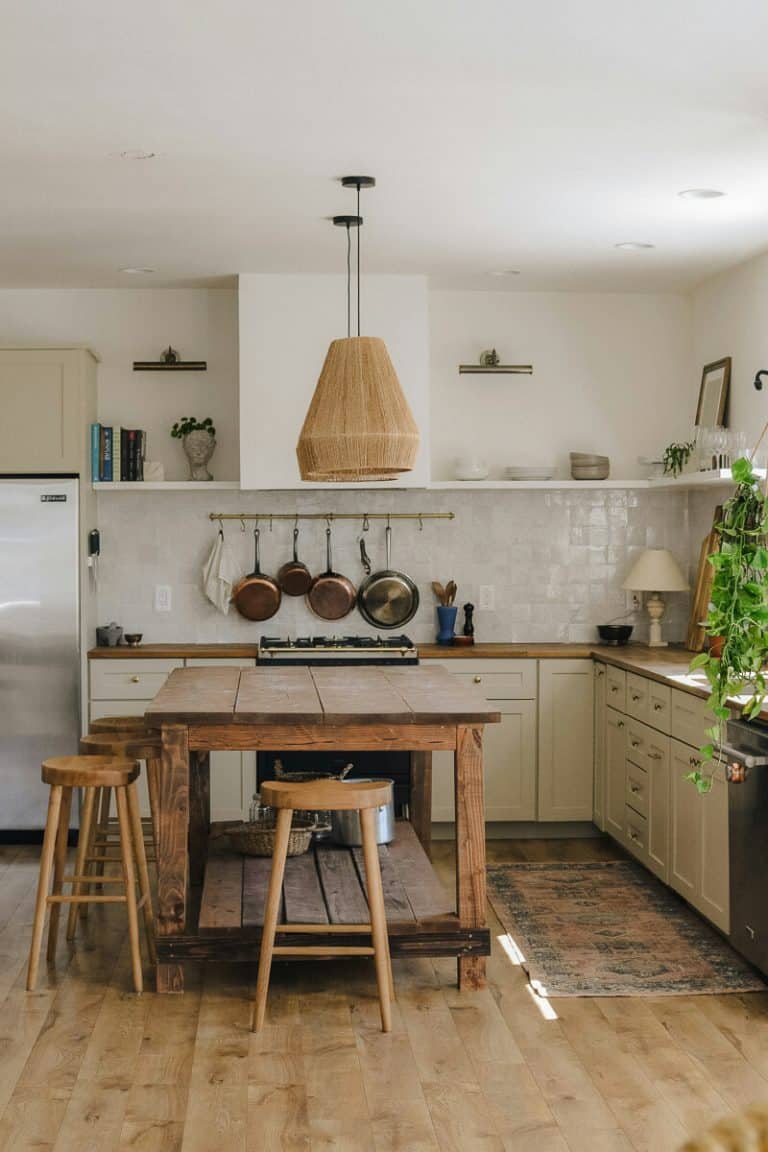
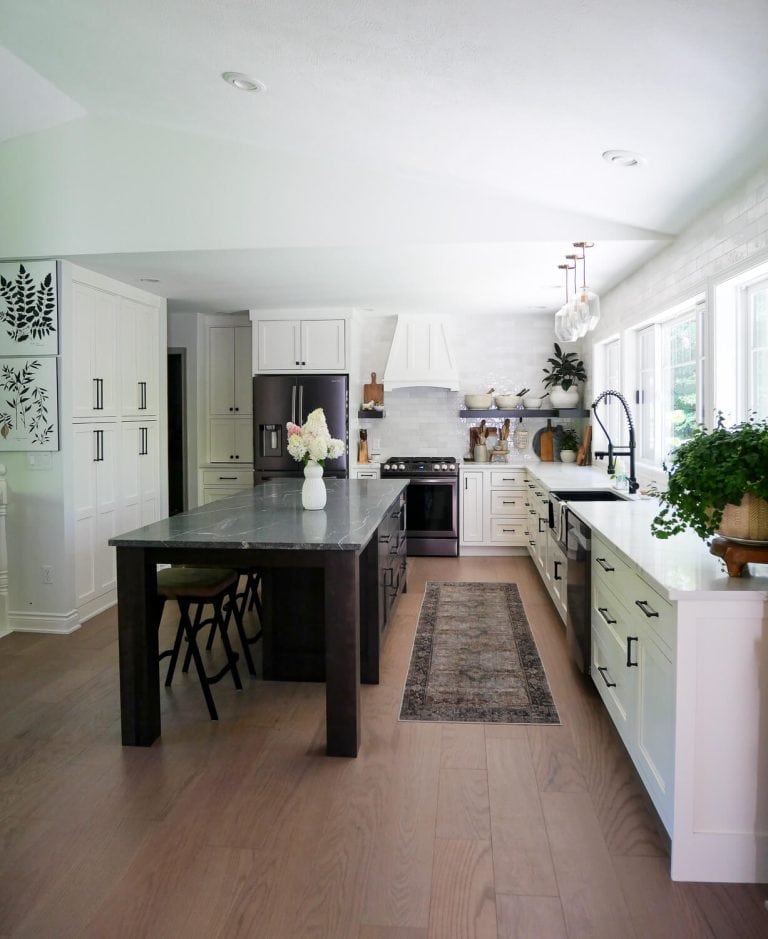
Kitchen Layout
The first thing I did in my design plan (which you can see detailed in this post) is configure the layout.
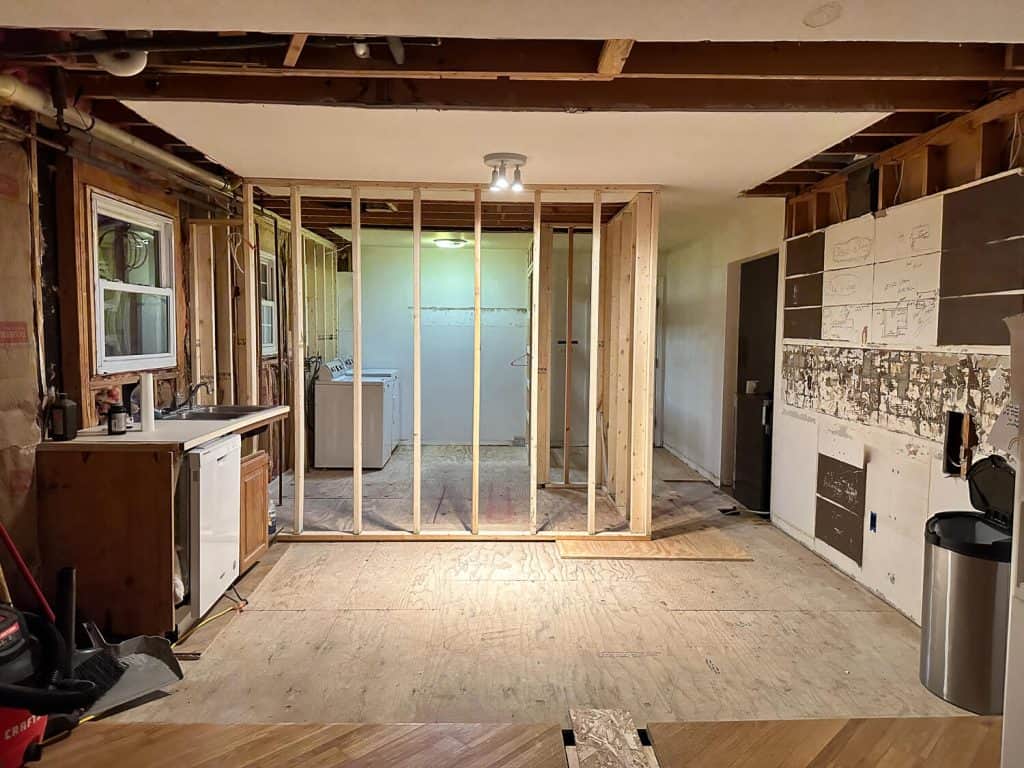
As you can see from the images above, we rebuilt the wall where the refrigerator sits.
We moved this wall in 5 feet to allow space for the new bathroom on the backside.
Working with a long and narrow room was a challenge. Plus, I had to work my exterior window placement around one drain pipe that wasn’t able to be moved.
I wanted to maintain my work zone triangle between the sink, range and refrigerator. So we used the range wall to encapsulate the drain pipe, and flanked both sides with windows.
The fridge clearance minimums necessitated that it stay on the wall it was originally on. That left the island as the most logical space for the sink.
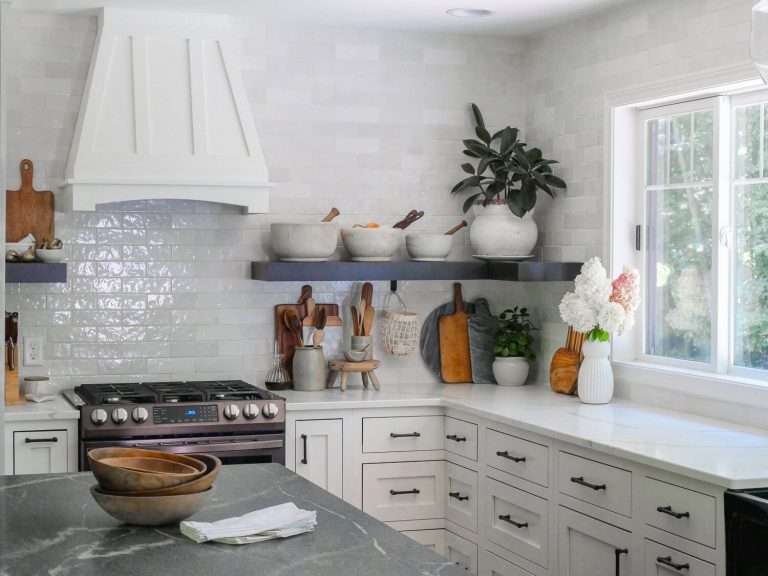
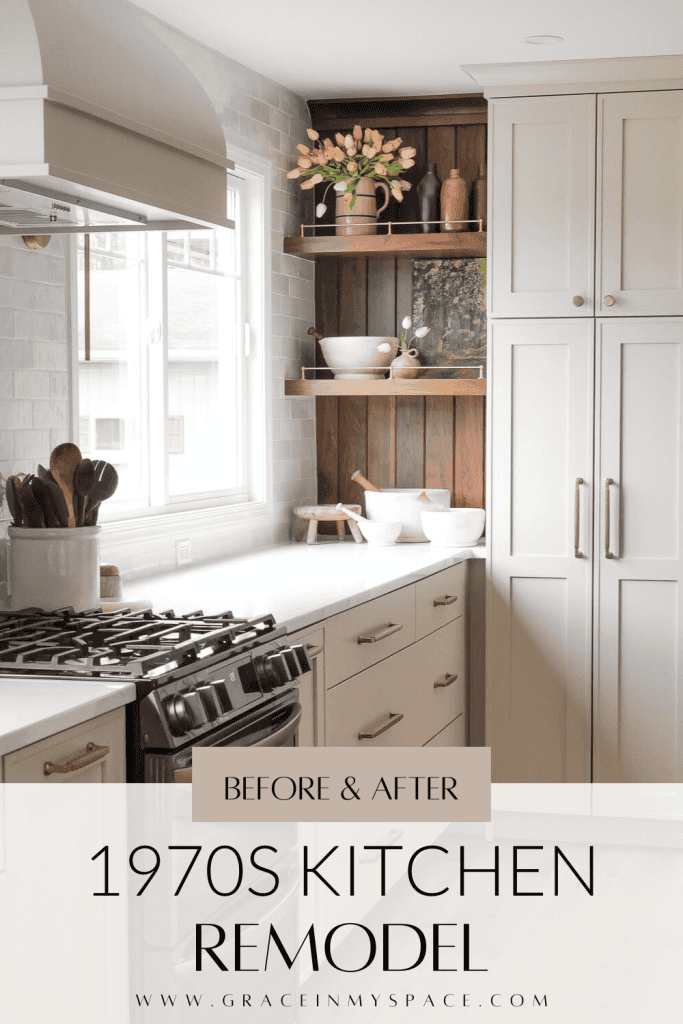
I used the awkward corner by the pantry to add in some floating shelves. This turned that space from useless and hidden to a beautiful design element.
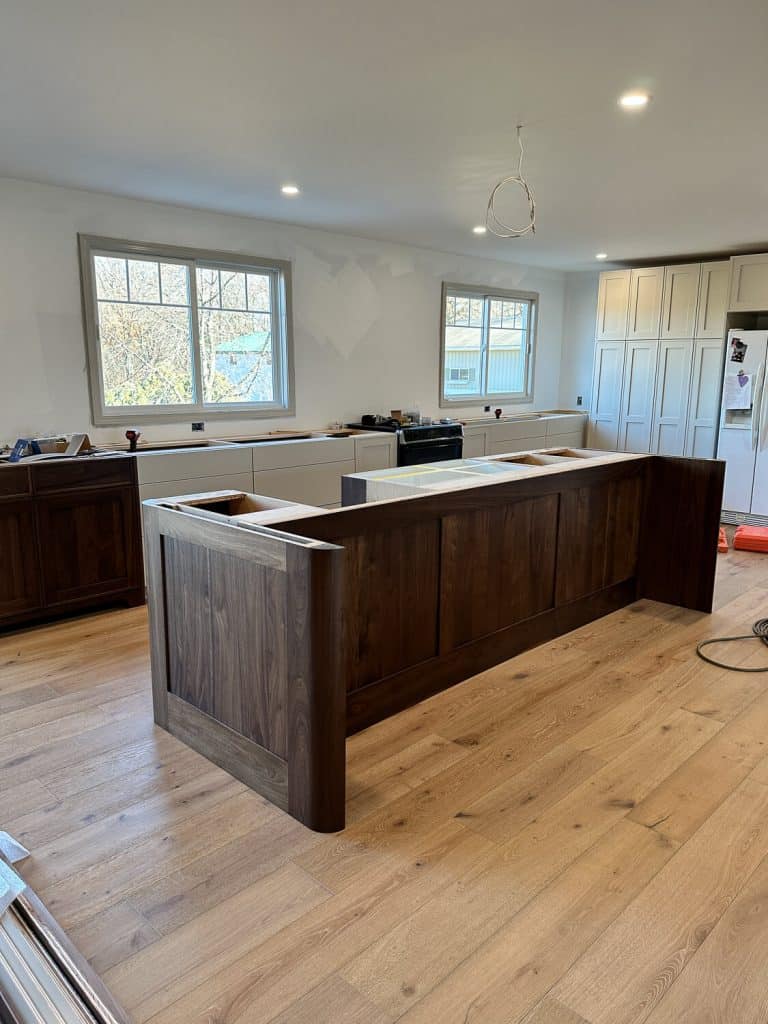
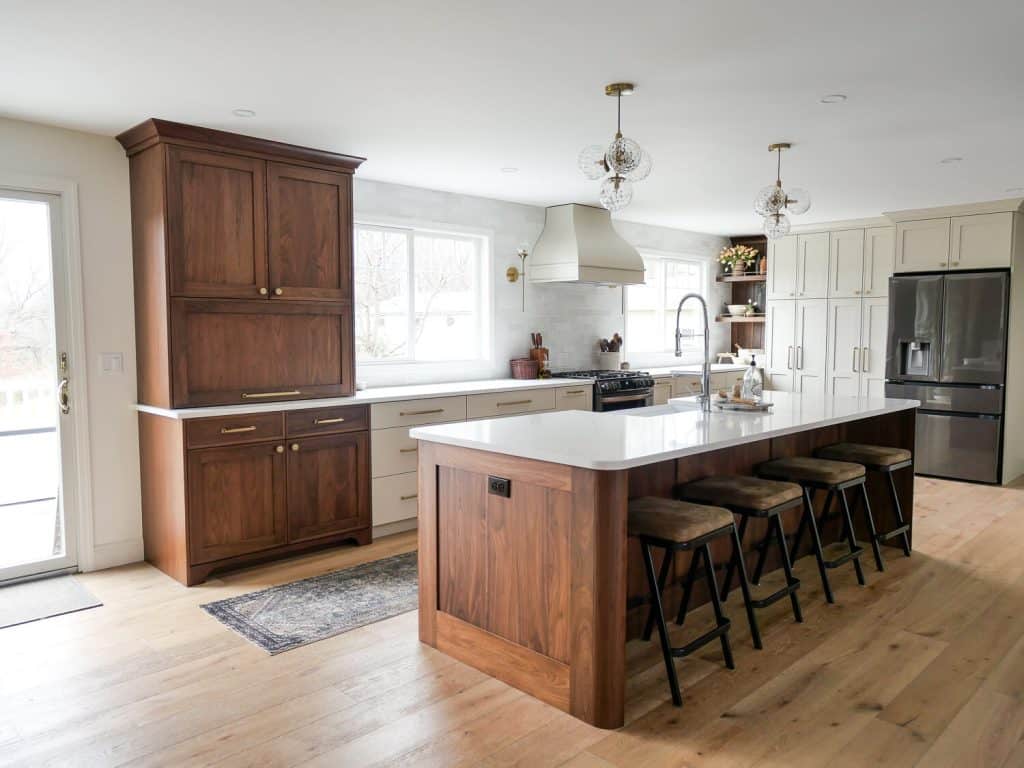
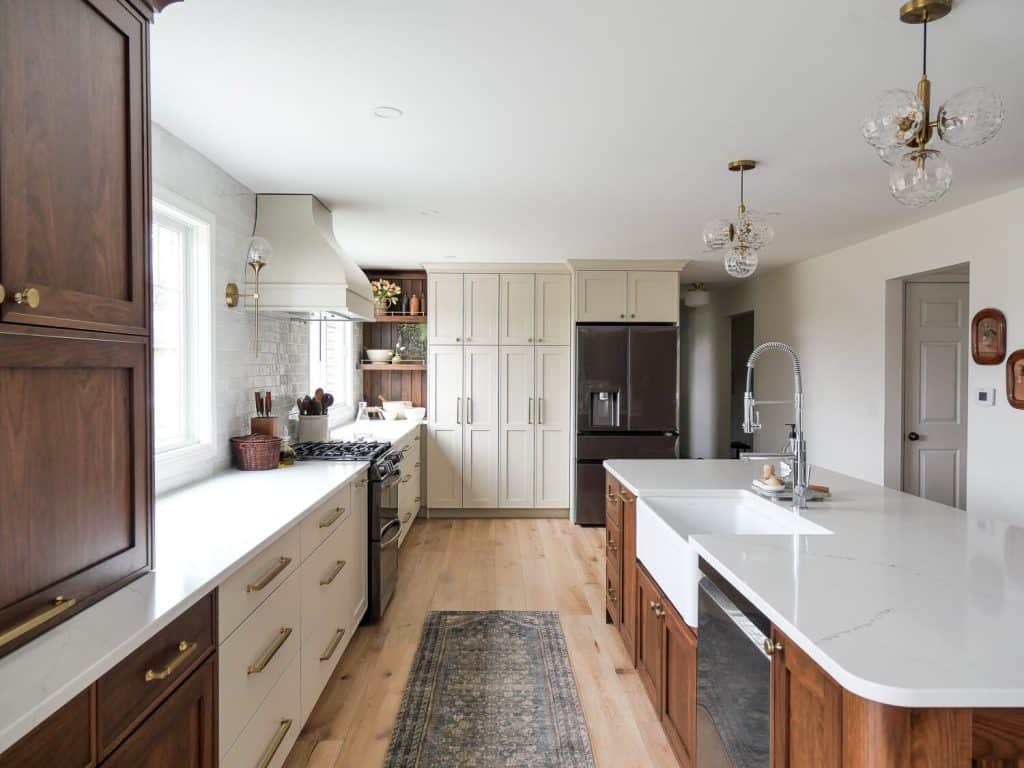
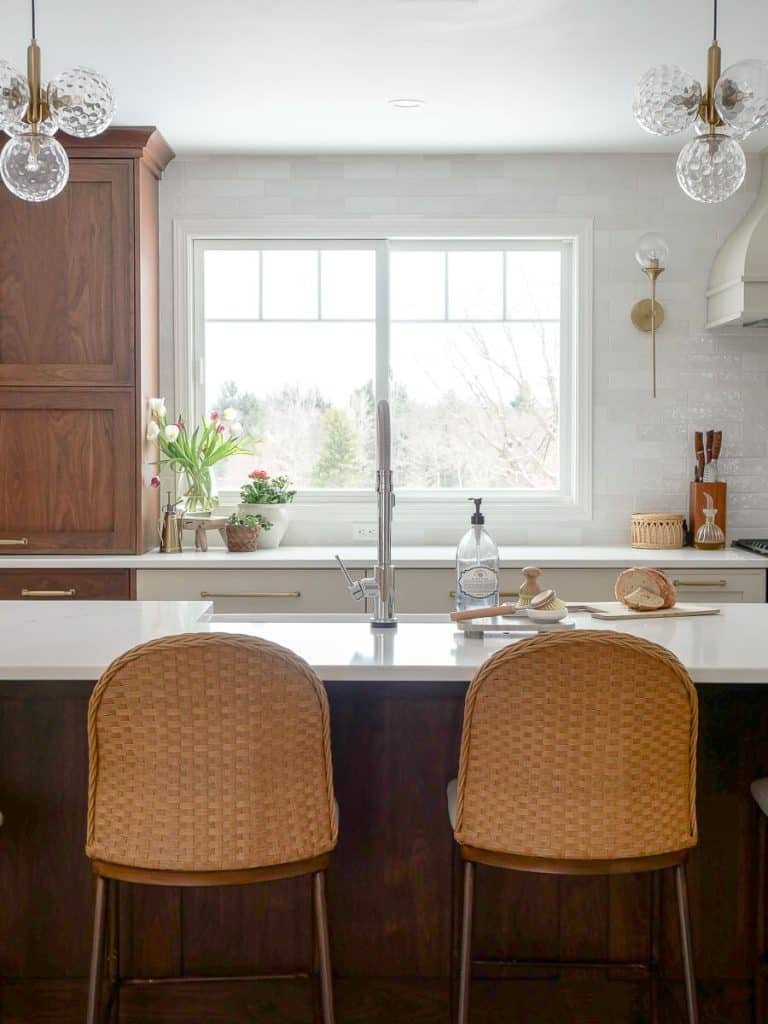
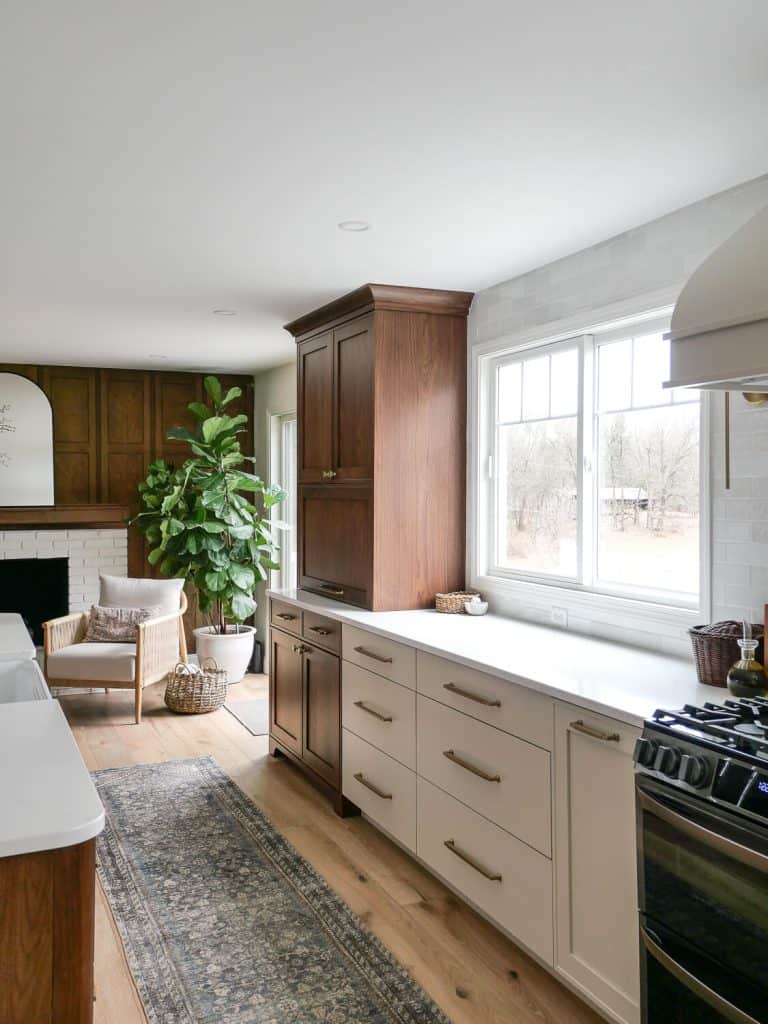
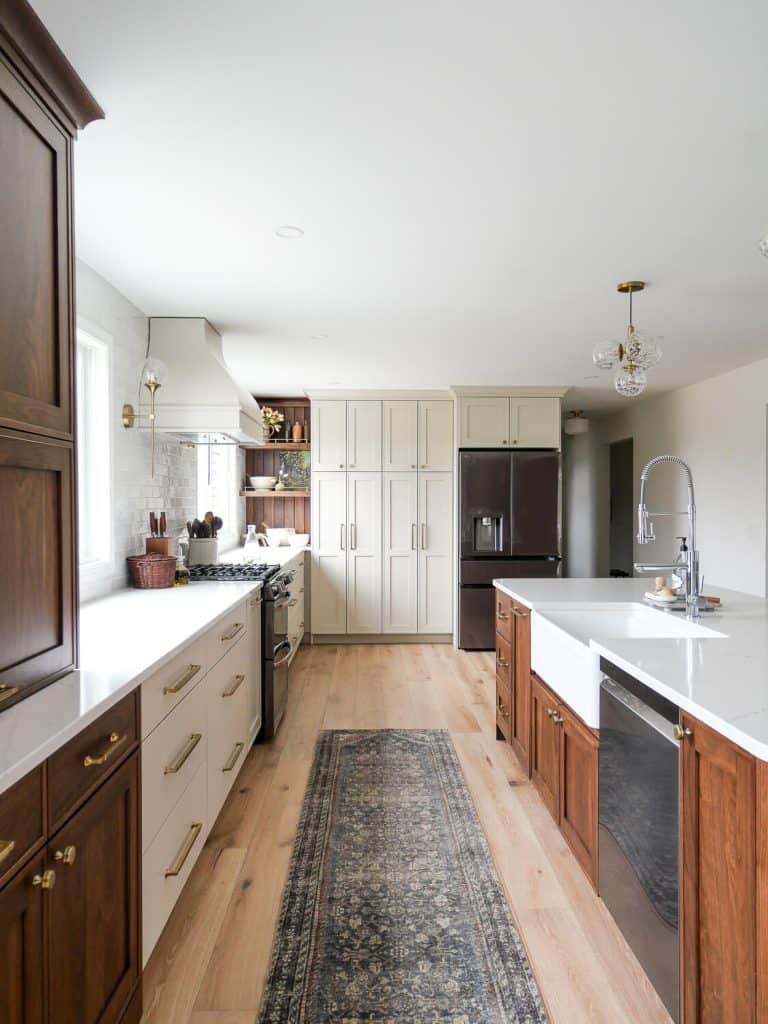
Painted & Walnut Kitchen Cabinets
We worked with a local cabinet maker for our cabinetry, who we used once before in our kitchen remodel after our house fire.
They do a beautiful job and the cabinets are top notch quality.
I chose Revere Pewter from Benjamin Moore for the painted cabinets. It is a warm taupe that is quite a chameleon color. It can vary from light grey all the way to a deeper tan depending on the light.
The walnut kitchen cabinets are natural walnut that has a glaze applied.
This brings out the natural tones and will help prevent fading over time.
I brought the walnut cabinetry throughout the entire kitchen remodel so it was repeated in multiple places. The island, appliance hutch, and open shelving with matching tongue and groove accent.
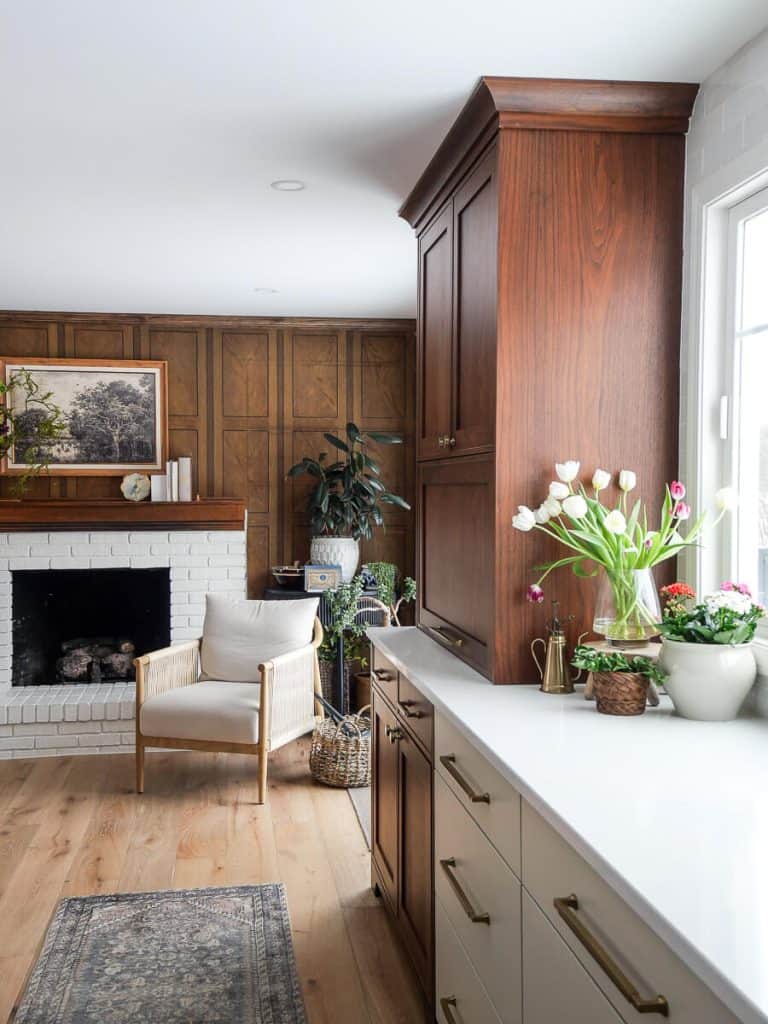
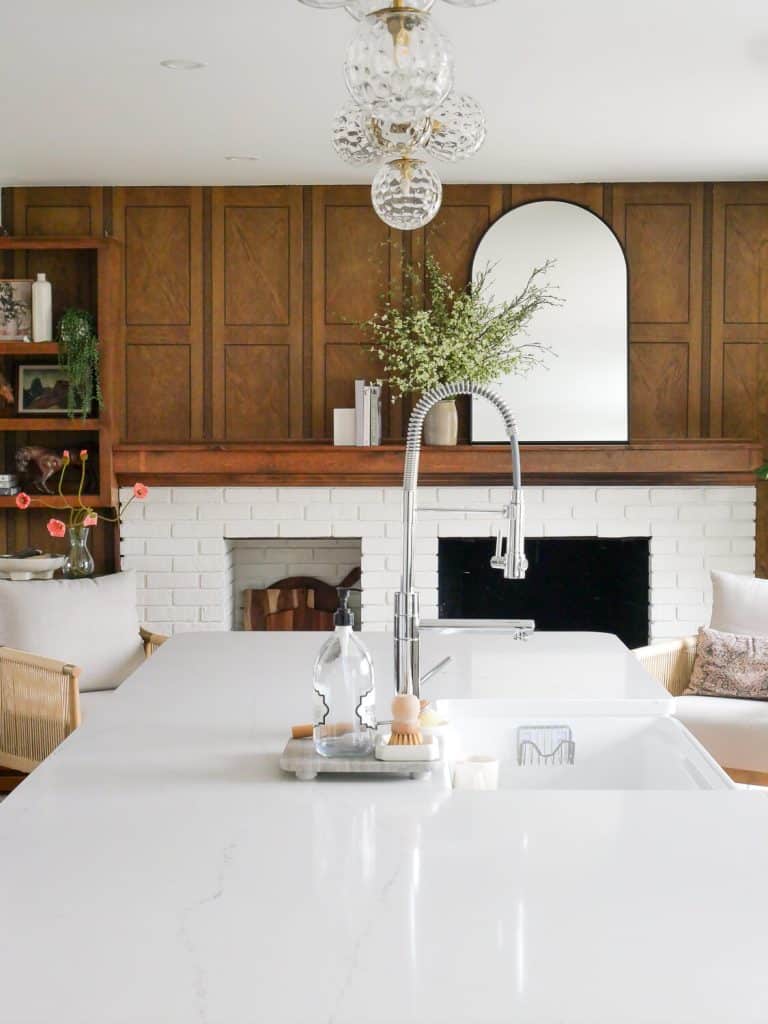
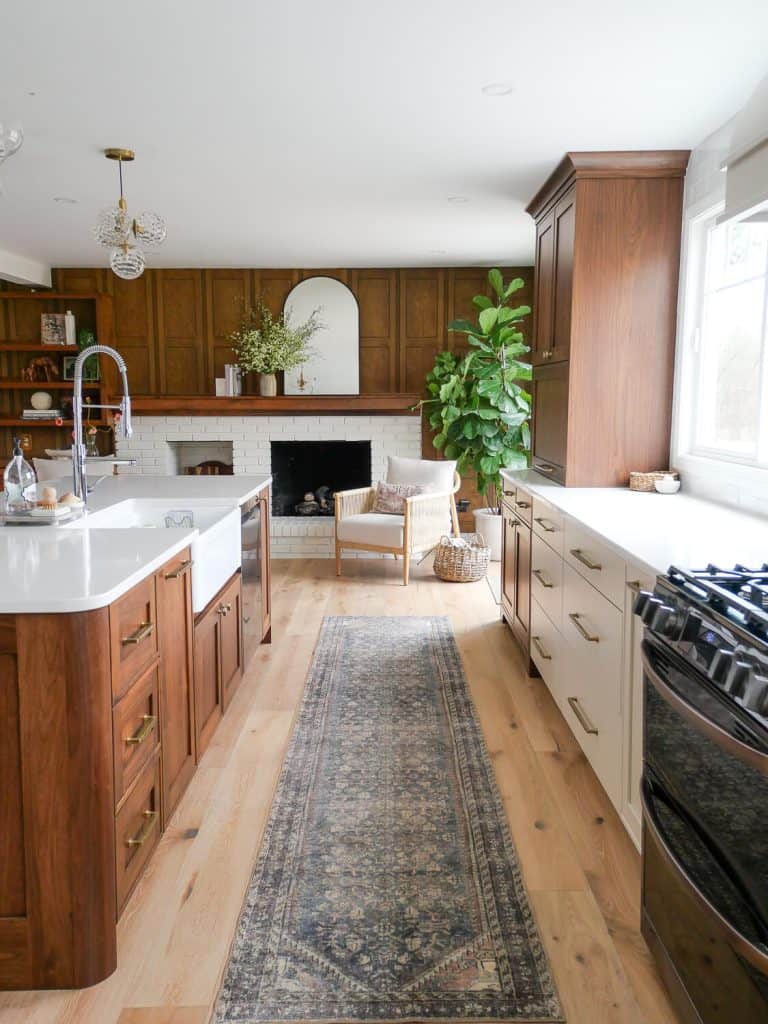
I love how rich the walnut cabinets are. They also match the pre-existing 1970s paneling that surrounds the brick fireplace I recently made over. This was a blessing and helped me decide to keep the paneling as a unique statement and nod to the original home.
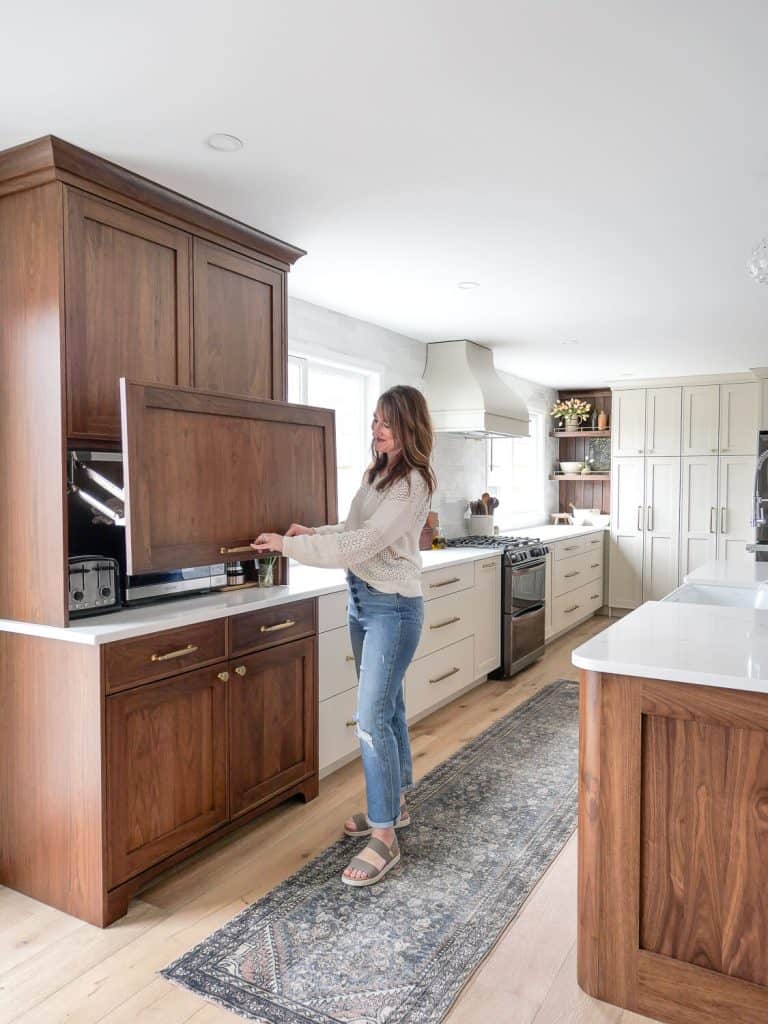
Appliance Hutch
One element I will always design into a kitchen is a space to hide appliances.
Some people call them appliance garages, but for this kitchen I wanted to elevate that concept.
I designed the appliance hutch to look more like a stand alone piece of furniture than a kitchen cabinet.
I only have three appliances I care about having easily accessible daily, but out of sight at the same time. The toaster, microwave, and coffee maker. So I designed this extra wide appliance garage in walnut to make it appear more like a hutch.
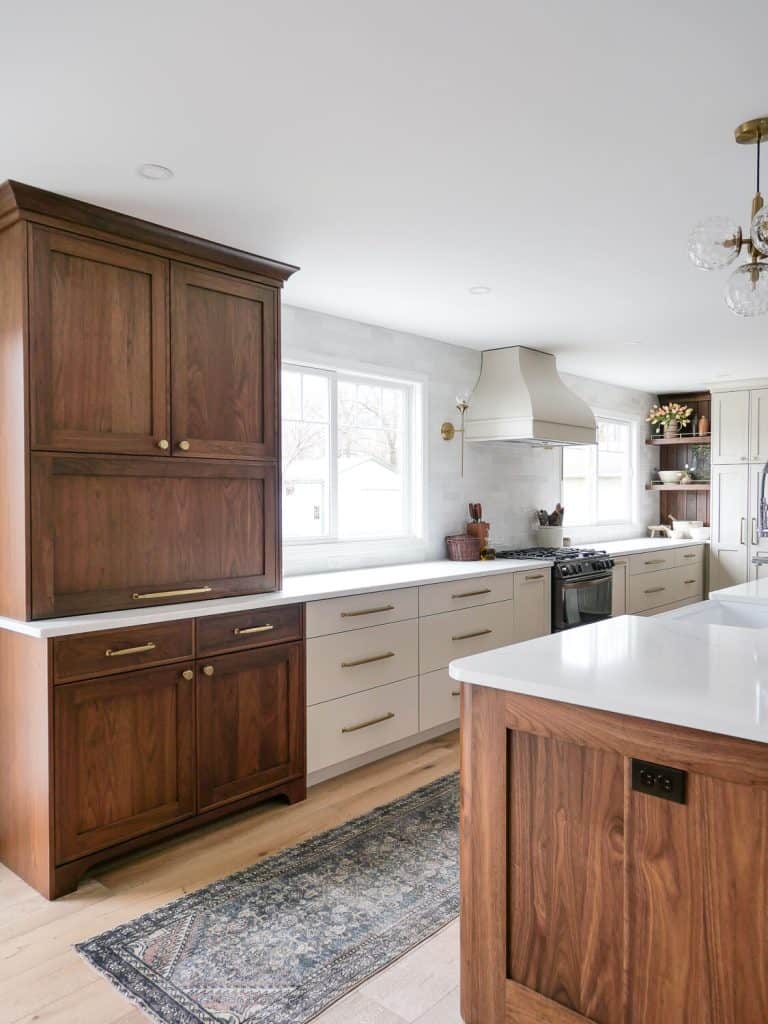
I added base trim to mimic feet, crown moulding to make it look built in, and stacked the top on the counter, all in walnut so it would look separate from the other painted base cabinets. But in reality, the bottom of the “hutch” is just a standard base cabinet.
Appliance Hutch Dimensions
The appliance garage portion of the hutch is 45” wide x 19” deep and fits a 4 slice toaster, small countertop microwave and standard coffee maker. I also have room for our personal blender but I keep it in the lower cabinet.
Also stored down there: crockpot, instant pot, ninja indoor grill, large pitchers and picnic ware and our fire extinguisher. It holds a ton!
The upper cabinet is for mugs, glasses and recipe books and it isn’t even half full. I’m sure I’ll continue to do some tweaking as we continue to move in fully.
The cabinet maker and I went rounds on the lift up door design. I originally wanted a flip top that slid into the cabinet. The cabinet maker swore it would be something I hated and would malfunction a lot.
We used Blum hardware for the door lift. So far, it is working well and I am training myself to get the mugs out of the top cabinet before making the coffee.
If you’d like to see this portion of the kitchen in more detail, make sure to watch my design loves and regrets video from this kitchen remodel.
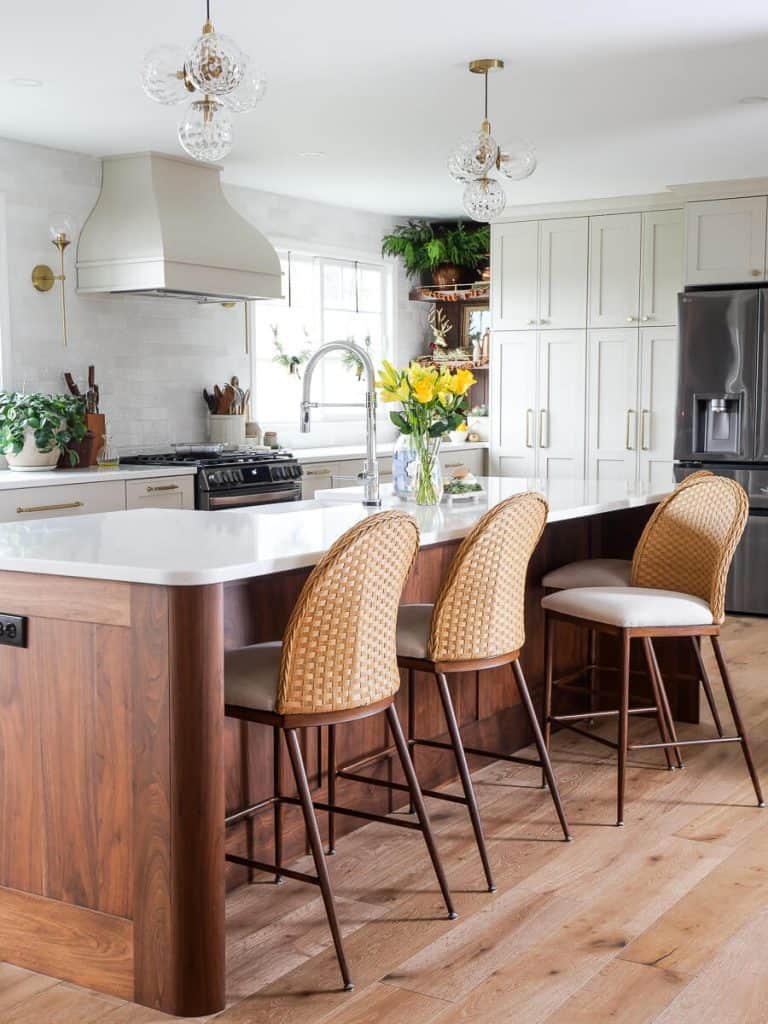
White Quartz Countertops
For our countertops, I chose ENVI Quartz in the color Sillaro from Lakeside Surfaces.
I’ve worked with Lakeside Surfaces on my last four stone installs. Three quartz and one granite. I keep coming back because of their amazing customer service and beautiful selection.
For this kitchen, I wanted the countertops to be more subtle, but not boring.
I quickly fell in love with the thin veining and soft white to contrast my more bold walnut accents and taupe cabinets. I love how it came together!
More Countertop Resources
Design the countertops of your dreams with these resources.

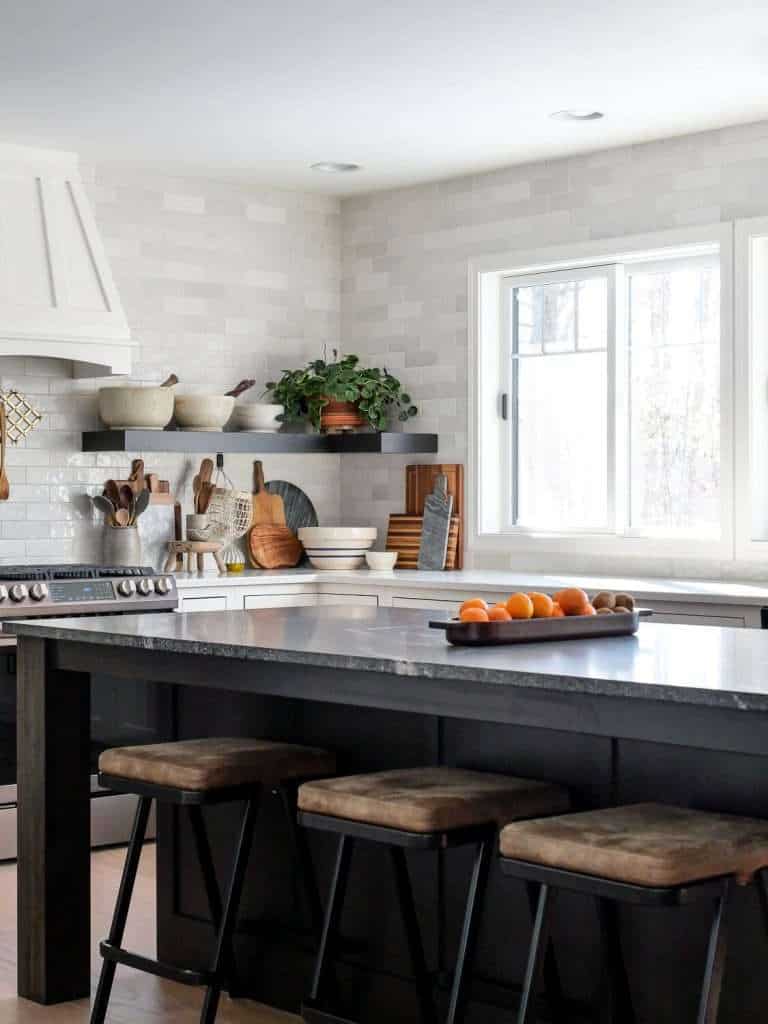
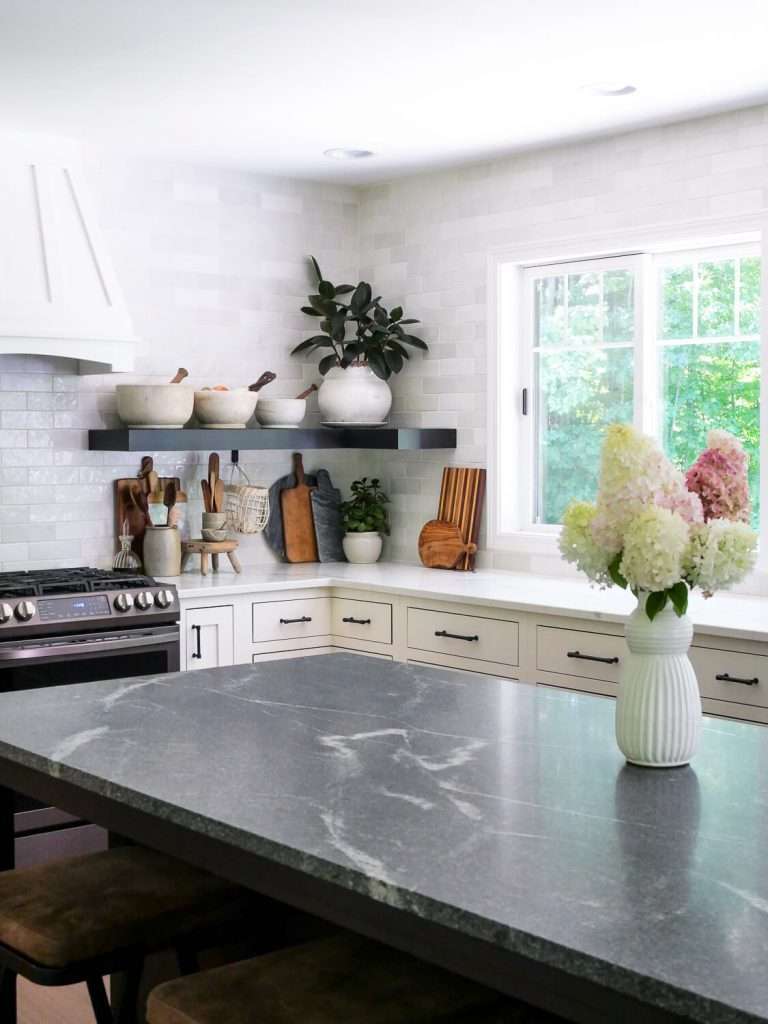
After having quartz, granite, butcher block and laminate countertops, I still love how durable and easy to care for quartz is. I did a 1/4” round over edge profile and had them match the radius of my rounded island.
Make sure to check out all the selection Lakeside Surfaces has to offer! You can get a free quote for your project here.
Cabinet Hardware
It’s time to show off what I like to call, the “jewelry” of the cabinetry.
This stunning cabinet hardware from Amerock Hardware brings so much richness and style to the kitchen. I chose the golden champagne finish for a fresh and modern take on gold hardware.
I went with a combination of knobs and pulls to break up our long bank of cabinets. And with a variety of drawer sizes, I used a variety of lengths for the pulls to keep a relational width.
- Stature Drawer Pulls: 6″, 8″ and 12″ widths
- Oberon Knobs
Personally, I prefer knobs on cabinet doors and pulls on drawers. The combination breaks up the space and feels more high end.
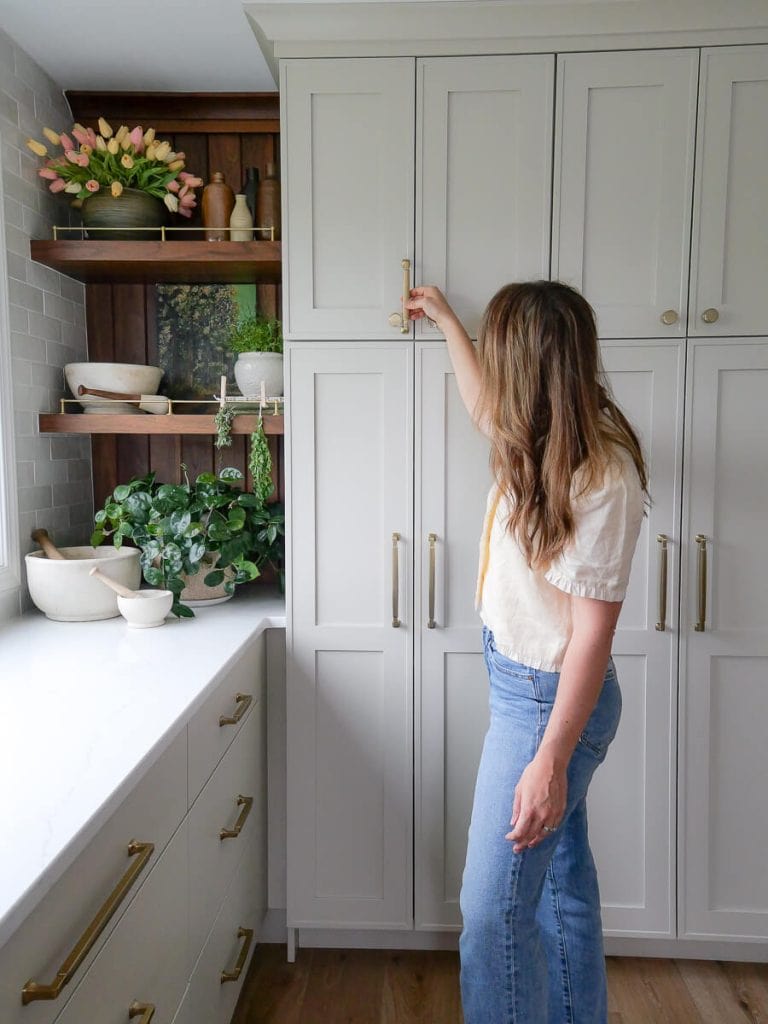
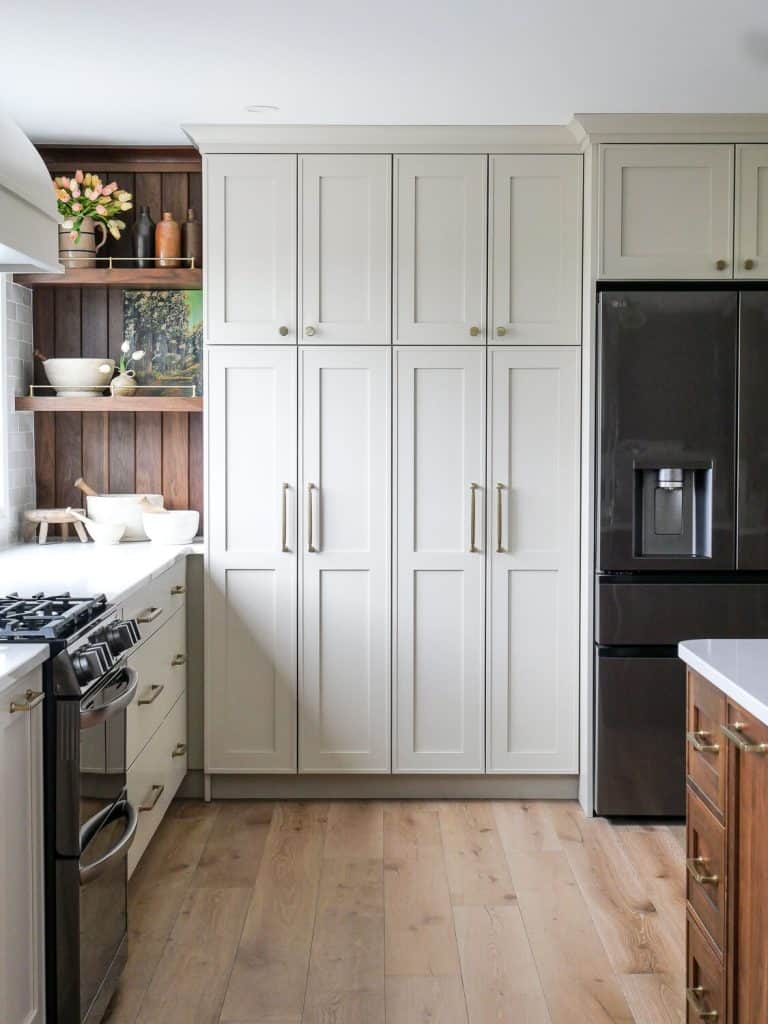
Kitchen Pantry Design
For the pantry area, I chose 20″ deep cabinets along the back wall.

These work great with plastic organization bins or pull out shelves on lower cabinets.
I love how they work seamlessly with the fridge surround and open shelving.
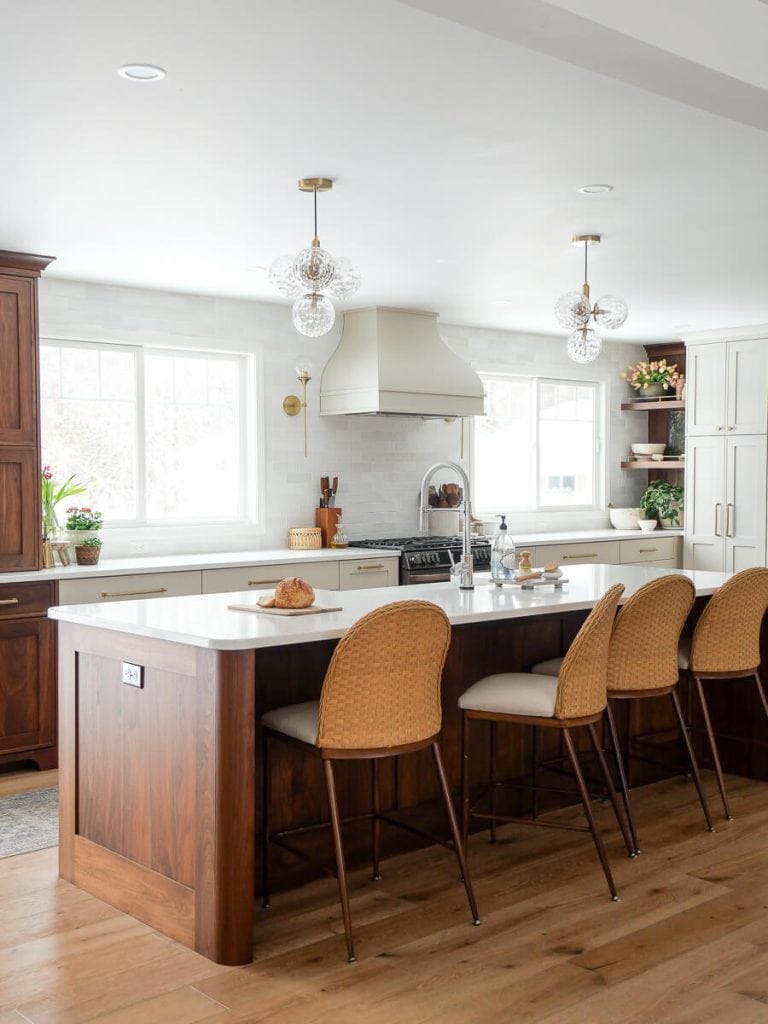
Walnut Kitchen Island Design
I have to say, my favorite element of the island is the natural walnut wood tone.
It’s the perfect medium brown with warm undertones. I brought the same wood element into the hutch and open shelving.
The next favorite design element is the rounded end panels. I love how it softens the space and brings in more traditional curves so everything isn’t harsh edges.
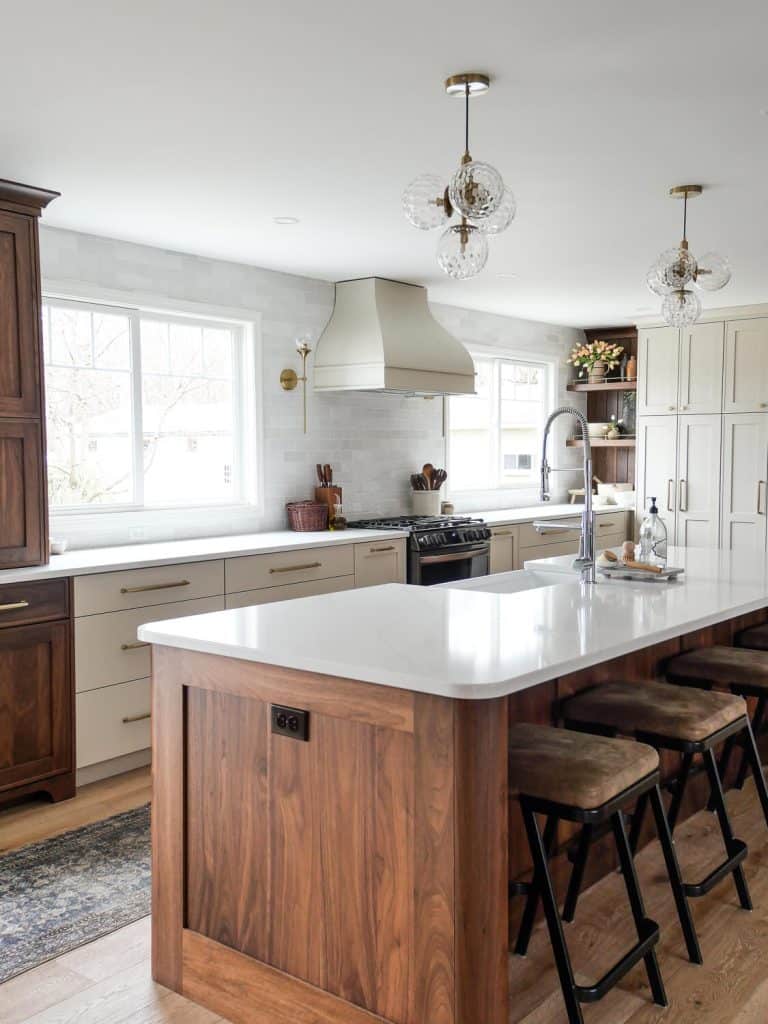
We brought the idea of a rounded island panel to my cabinet maker and they came up with the structure to make it happen!
I originally wanted the sink to be under a perimeter window instead of in the island, but a drain pipe in the exterior wall limited my window placement.
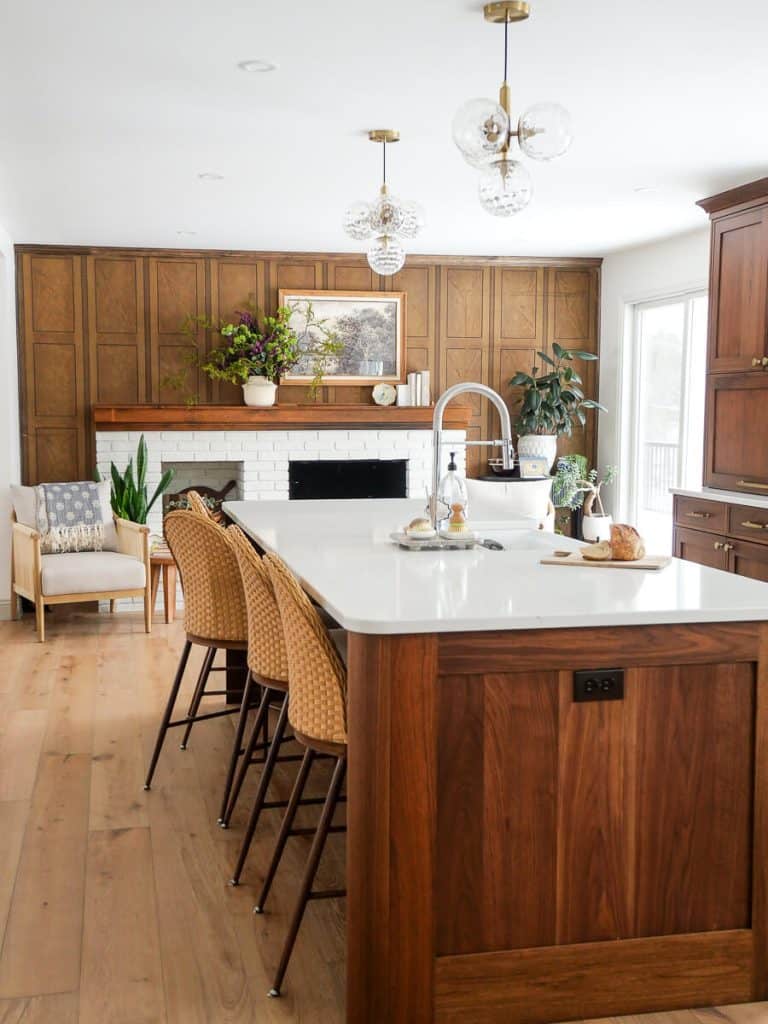
Rather than have the sink be directly next to the stove, I placed it in the island to create a good working triangle. It’s worked great and I actually love that when I’m doing dishes I can still have conversation with whoever is in the room.
Walnut Open Shelving
The corner next to the pantry would have been wasted space, or very difficult to use with cabinetry.
Instead, I opted for these beautiful walnut shelves with tongue and groove backsplash.
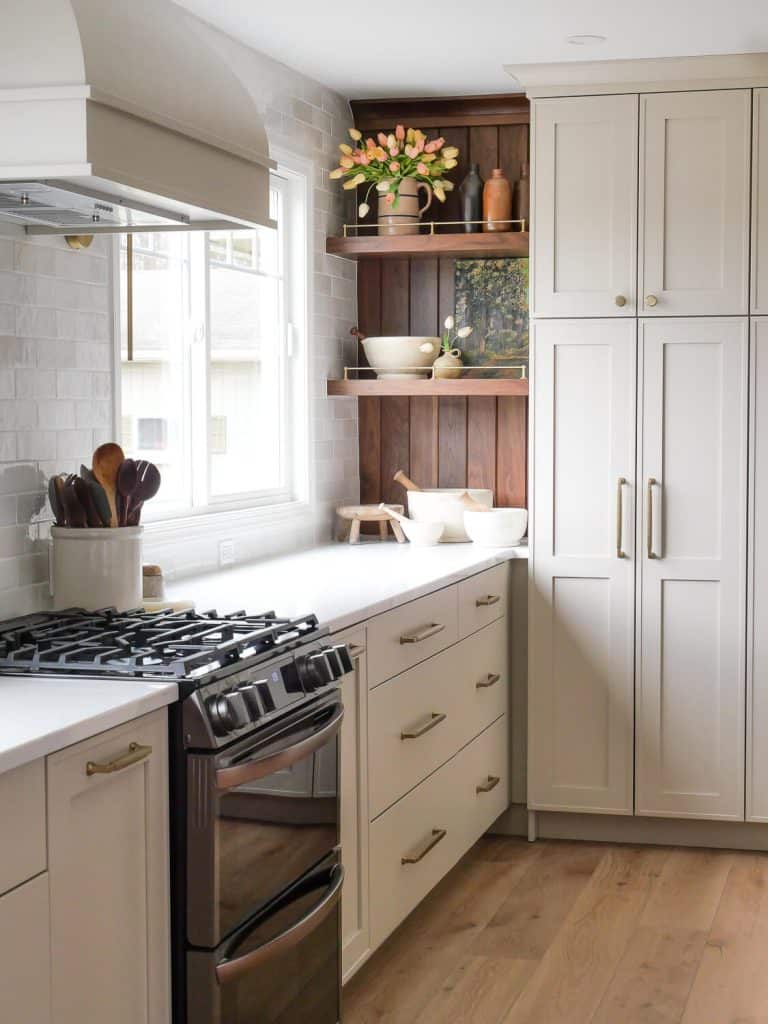
We installed a gallery rail for some added interest and charm.
If you’re trying to decide between open shelving or upper cabinets, these articles will be helpful to you!
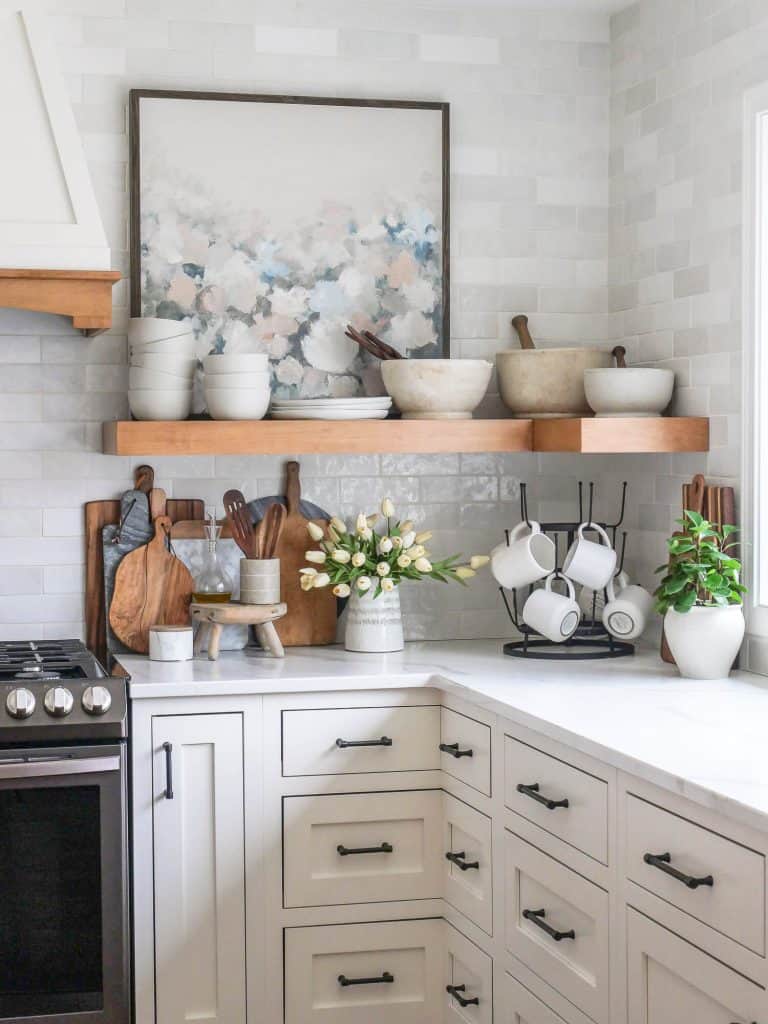

Kitchen Backsplash
Our kitchen backsplash is a classic.
It’s actually the same backsplash I used in my previous home.
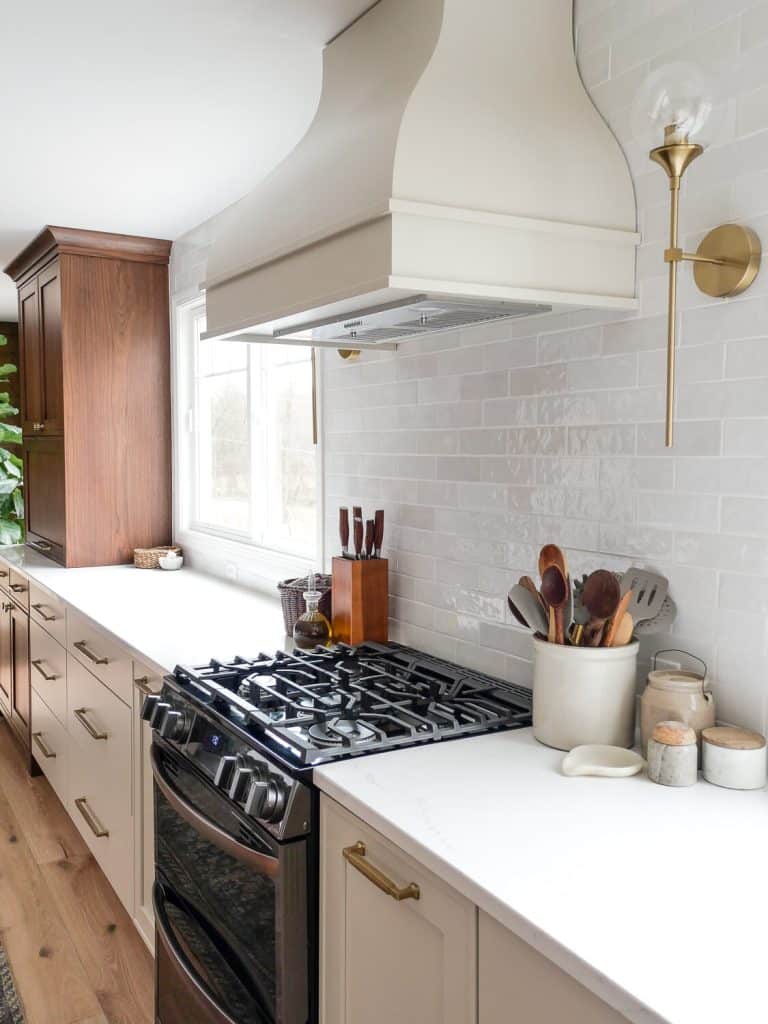
I love the subtle movement of the imperfectly shaped tiles. Plus, there is a color variation so it doesn’t look bland.
These are the Cloe tiles in White from Bedrosians Tile. I used Arctic White grout to minimize the busyness of the lines.
I love the handmade appearance. When the light catches it, the glimmer is incredible!
Kitchen Fireplace
One of my favorite things about the kitchen is the fireplace. This was a beautiful blessing from the Lord that MY original design plans fell through!
I was originally going to take out the brick fireplace to become an opening into our living room addition. The cost of this turned out to be prohibitive. So, instead I gave it a facelift!
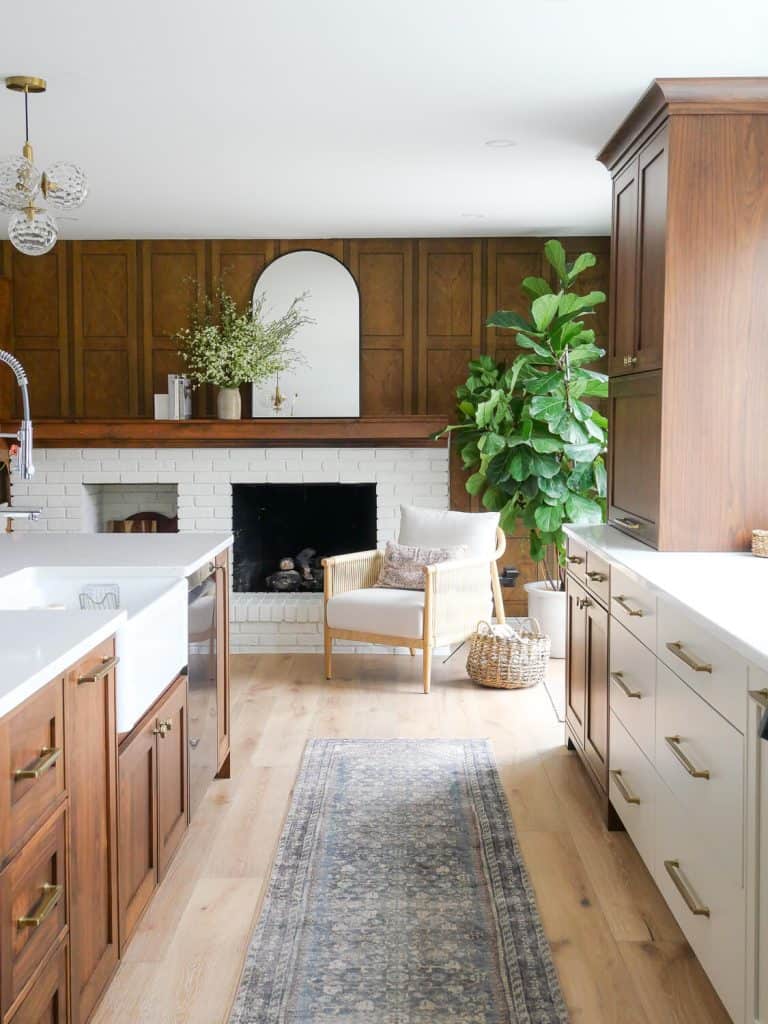
I removed the fireplace screen and painted the brick in Swiss Coffee. (Learn how to paint brick in this tutorial.)
Now, it is such a unique and charming element to the home. I was also originally going to remove the wood paneling. However, after painting the brick, I loved how it pulled the same walnut wood tone to the opposite side of the room.
It was meant to be!
70s Kitchen Remodel Journey
If you like watching a renovation, make sure to check out my 70s kitchen remodel YouTube video.
I documented the entire 8 month process in one video. Seeing the transformation in person is quite incredible.
More Kitchen Remodel Inspiration
I hope seeing this 1970s kitchen remodel before and after inspires you as you design your own kitchen renovation!
I’ve designed and remodeled four kitchens personally, and each one I learn a little bit more about good design and functionality.
If you need more resources, make sure to check out the articles below next.
Thanks so much for stopping by the blog today.
Make sure to subscribe to get my Grace Notes directly to your inbox and to access all my insider perks. You can also follow along daily on Instagram and weekly on YouTube!
~Sarah
Your kitchen is gorgeous and is the inspiration for my remodel. For your walnut cabinets and island, did you use a stain or just clear coating? Thank you so much!
what paint color did you use on your kitchen walls?
Absolutely stunning remodel, and such a wonderful incorporation of the existing fireplace and paneling! Did you use the same swiss coffee on the walls and trim, or something else? It can be hard envisioning what goes together and know if they will be too cold/warm/light/dark in a room. Thanks for sharing such a beautiful transformation!
Absolutely stunning remodel, and such a wonderful incorporation of the existing fireplace and paneling! Did you use the same swiss coffee on the walls and trim, or something else? It can be hard envisioning what goes together and know if they will be too cold/warm/light/dark in a room. Thanks for sharing such a beautiful transformation!
Sarah I LOVE your style and what you accomplished here! I also love your comments about making compromises to stay within budget. I have also used boxes and bins to achieve my own version of a pull out drawer etc. Thank you for putting so much practical info out there and taking the time to link so many of the products you use!
COULD YOU PLEASE PROVIDE SOME INFO ABOUT THE RANGE HOOD THAT YOU CHOSE? It is so beautiful, and set off by itself without cabinets right next to it — After seeing what you did I am wondering about giving up some upper cabinet space in order to achieve similar! Any info you can provide about where you bought it or how it was made if it was custom would really be useful. Thank you so much!! ( And I love that you honor the Lord by acknowledging his blessing in your decision making and design. I am also for His help to make wise and cost effective decisions while hoping to achieve beauty too!)
Thank you so much! I’m so glad you like it. The hood was made by our cabinet maker. It is simply framed out and then the placed notched plywood for the curves. 🙂
Your kitchen is beautiful – it a has warmth and timelessness, just what I’m hoping for in my kitchen. We are starting a remodel, and I’m curious about your sink. What do you think of it and would you recommend it?
I love it, but also have some things I wish were different. Pros: cleans up so well, perfect width, love that the divider is low to wash big pots and pans. Con: the divider is low which makes filling the sink to do a full sink of dishes hard if I’m not using the dishwasher, because it doesn’t have a lot of depth to the water. So that specific feature is a pro and a con for me!
I love this. I am in love with your floors. This has been proving difficult for me to decide on the floor. It’s such a big commitment. Are they just white oak?
Floors can be tough! These are white oak engineered hardwood from Brentwood Hills.
Could you share the color name of the floors?
They are engineered hardwood by Brentwood Hills in the color Oxnard.
Where did you get your mortar & pestle bowls? They are darling!
Thank you! They are one of my favorite collections, found at various antique stores over the years. Etsy and Ebay are both sources you could hunt for them online!